Have a Question?
How to Install OpenWrt On Protectli Vaults + Additional WiFi/Modem Driver Config
OpenWrt provides images on their website that inherently require you to manually install drivers and packages required for WiFi cards, certain NICs, modems, etc after the OS has been installed. This article will have instructions on how to install the default images on Protectli Vaults and how to install drivers for a variety of components offered by Protectli.
However, OpenWrt is a preinstall option on the VP2400 Vault Pro lineup. The image has packages and drivers included that allow support for all components and accessories that you can directly purchase from our website. You won't need to manually install drivers for WiFi cards or modems. The VP2410, VP2430, and VP2440 fully support a factory reset feature that allows you to revert the OS to the defaults that the unit arrived in. The reset can be performed by pressing the recessed reset button for 10 seconds that is signified by this icon:

This behavior works on some other Vaults, but hasn't been confirmed to work on everything at this point. We will slowly be updating and improving the image available overtime. Keep in mind that the image that can be preinstalled by us has been built by following the instructions found later on in this article, so you are welcome to do it yourself as well. If you purchased a unit with OpenWrt preinstalled, you can skip the Install and Installing Drivers section of this article.
**Note: The default LAN port for the preinstall option is Port 1, the default WAN port is port 2! On the VP2440, these will automatically be set as the 2.5GbE Ethernet ports and not the SFP+ ports! You can change this in the GUI later.
Alternatively, a custom image can be built by following the instructions further down in this article under the "Custom Build Instructions (3mdeb Protectli Image)" section.
In this scenario, you will need to have a monitor or TV to connect to the Vault, a wired USB keyboard and mouse, a single USB drive, and an Ethernet cable to connect from your modem or router to one of the Vault's Ethernet ports. You will also need another computer or laptop to initially create the bootable USB drive.
- On your computer or laptop, please download the latest LTS image of Ubuntu Desktop (https://ubuntu.com/download/desktop)
- Plug in your USB drive to your computer and acknowledge that anything on that USB drive will be overwritten/deleted in the next few steps
- If on Windows, download/install Rufus if you do not already have it. On MacOS, download/install Balena Etcher if you do not already have it
- Use one of those programs to burn the Ubuntu .iso directly to your USB drive (this will delete any preexisting data on the USB drive)
- Once completed, connect a monitor, keyboard, mouse, your USB drive, and an ethernet connection to your Protectil Vault
- Turn on the Protectli Vault
- Hold the F11 key right as the Vault powers on, and select the USB drive as your boot option
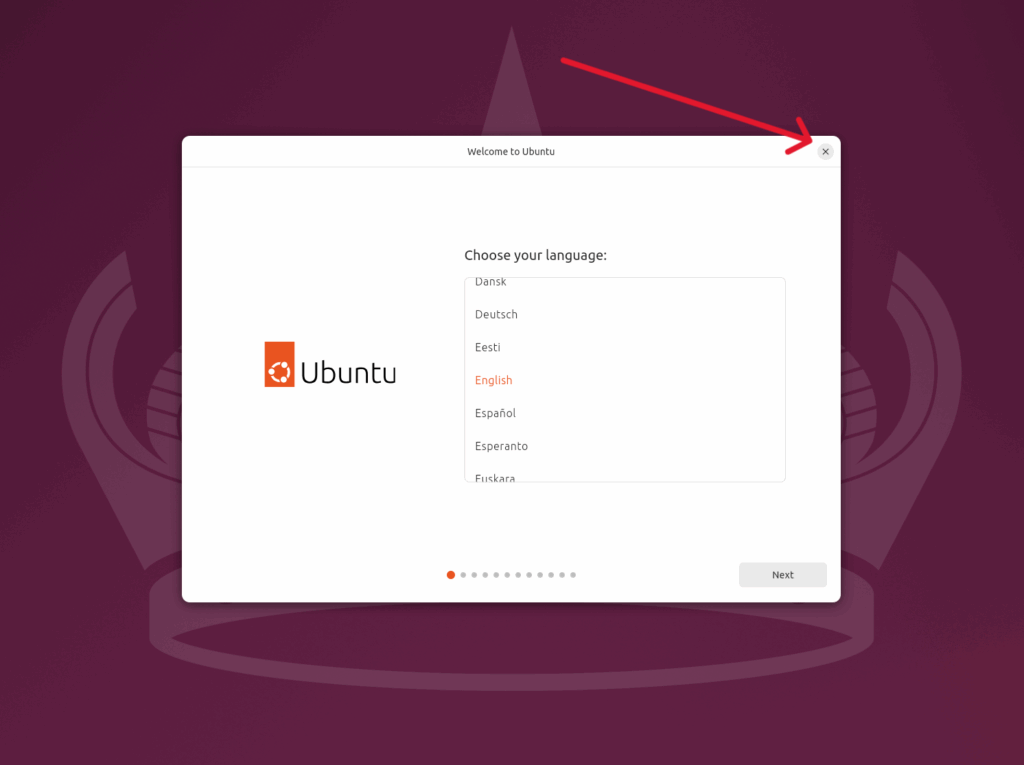
- The system will now boot into Ubuntu, make sure to select "Try or Install Ubuntu"
- It may take a minute or two before it loads
- Once you see the "Choose your language" screen, close it out
- Open up Firefox and go to downloads.openwrt.org/releases
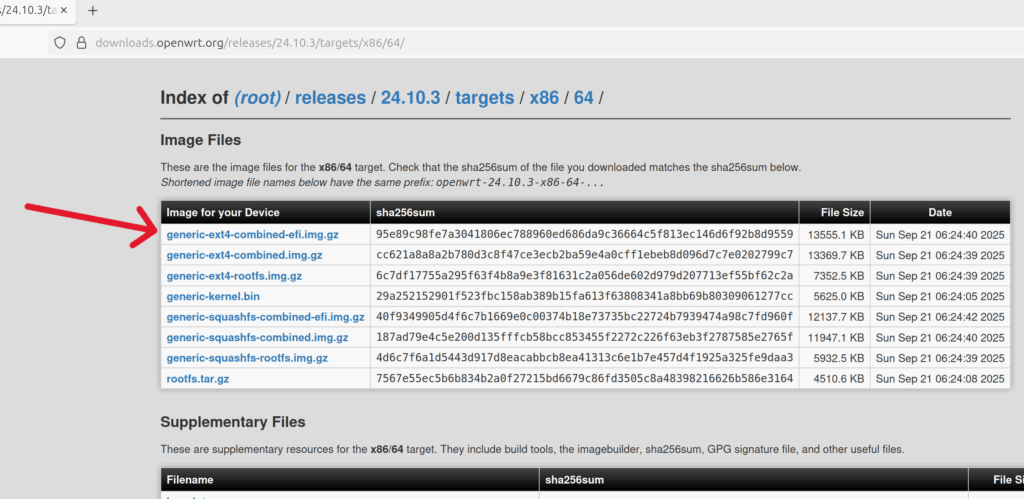
- Scroll down and click on the most recent version available. At the time of this article's creation, it was 24.10.3, but if a newer version has released you most likely will want to choose that
- You should then choose "targets", "x86", "64"
- Download the "generic-ext4-combined-efi.img.gz" (if you are on a FW series Vault with coreboot, you should instead download the "generic-ext4-combined.img.gz")
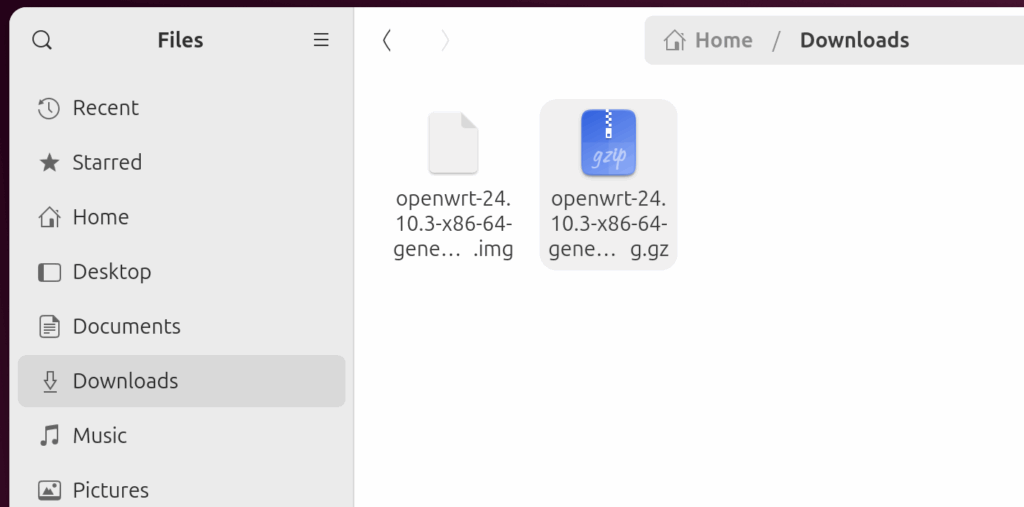
- The file should automatically save in your "Downloads" folder, so navigate there from the file browser

- Right click on the .gz file and extract it
- Right click on any of the empty white space in that directory and "open in terminal". This will open a new terminal window with you already in the directory.
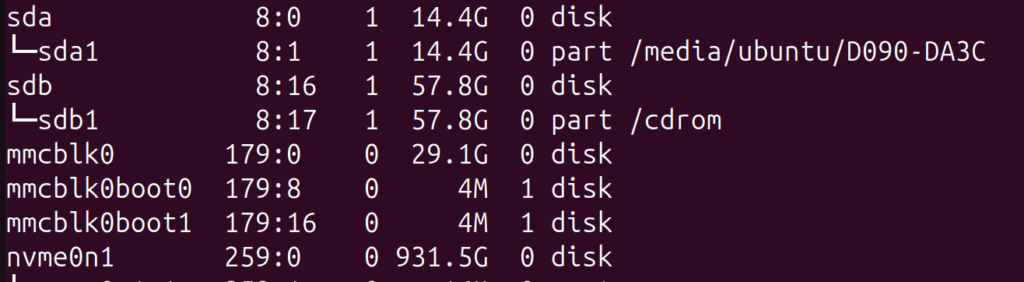
- In most cases you will want to install OpenWrt to an SSD installed in your Vault. Type and enter lsblk to view all installed drives
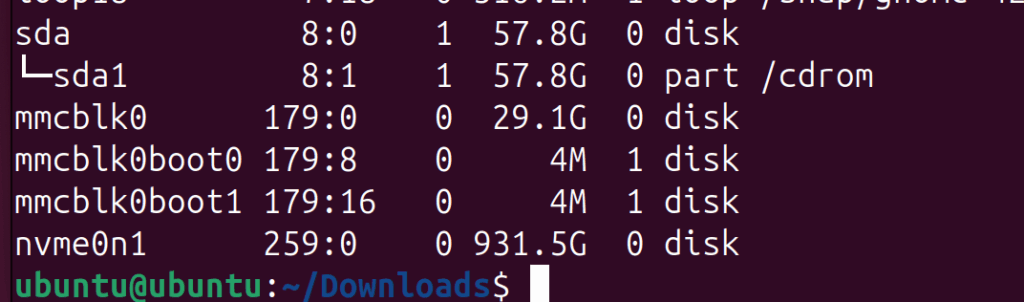
- In the image above, sda is the USB drive, mmcblk0 is the on-board eMMC, and nvme0n1 is the NVMe. For the purpose of this article, we will install it to the NVMe, but you can choose a different storage medium
- Type and enter: sudo dd if=openwrt-xxx.img of=/dev/nvme0n1 bs=4M status=progress conv=fsync
- Please note the OpenWrt image is not actually named openwrt-xxx.img, it will typically be something like openwrt-24.10.3-x86….img If you start typing openwrt and hit your tab key, it will automatically fill out
the name
- Please note the OpenWrt image is not actually named openwrt-xxx.img, it will typically be something like openwrt-24.10.3-x86….img If you start typing openwrt and hit your tab key, it will automatically fill out
- Once completed, you will get a completion message

- We will now want to extend the partition so you have more space to install packages and other things on OpenWrt
- You can view the current partition table by typing and entering: lsblk /dev/nvme0n1
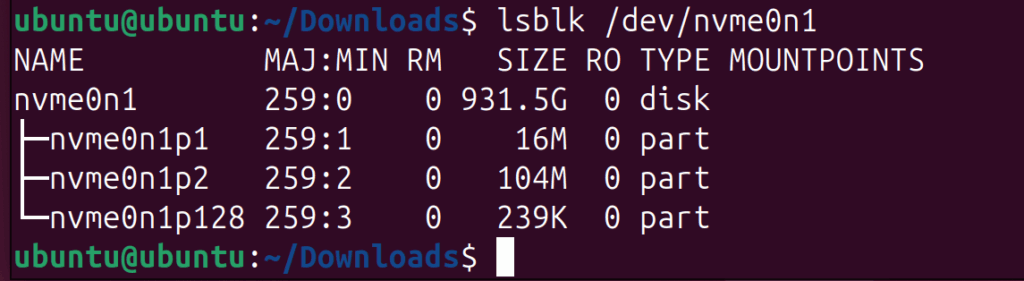
- Partition 2 (nvme0n1p2) is typically the root directory that we will want to increase
- Type and enter: sudo growpart /dev/nvme0n1 2
- Afterwards, type and enter: sudo resize2fs /dev/nvme0n1p2

- The partition has now been extended
- Power off the Vault
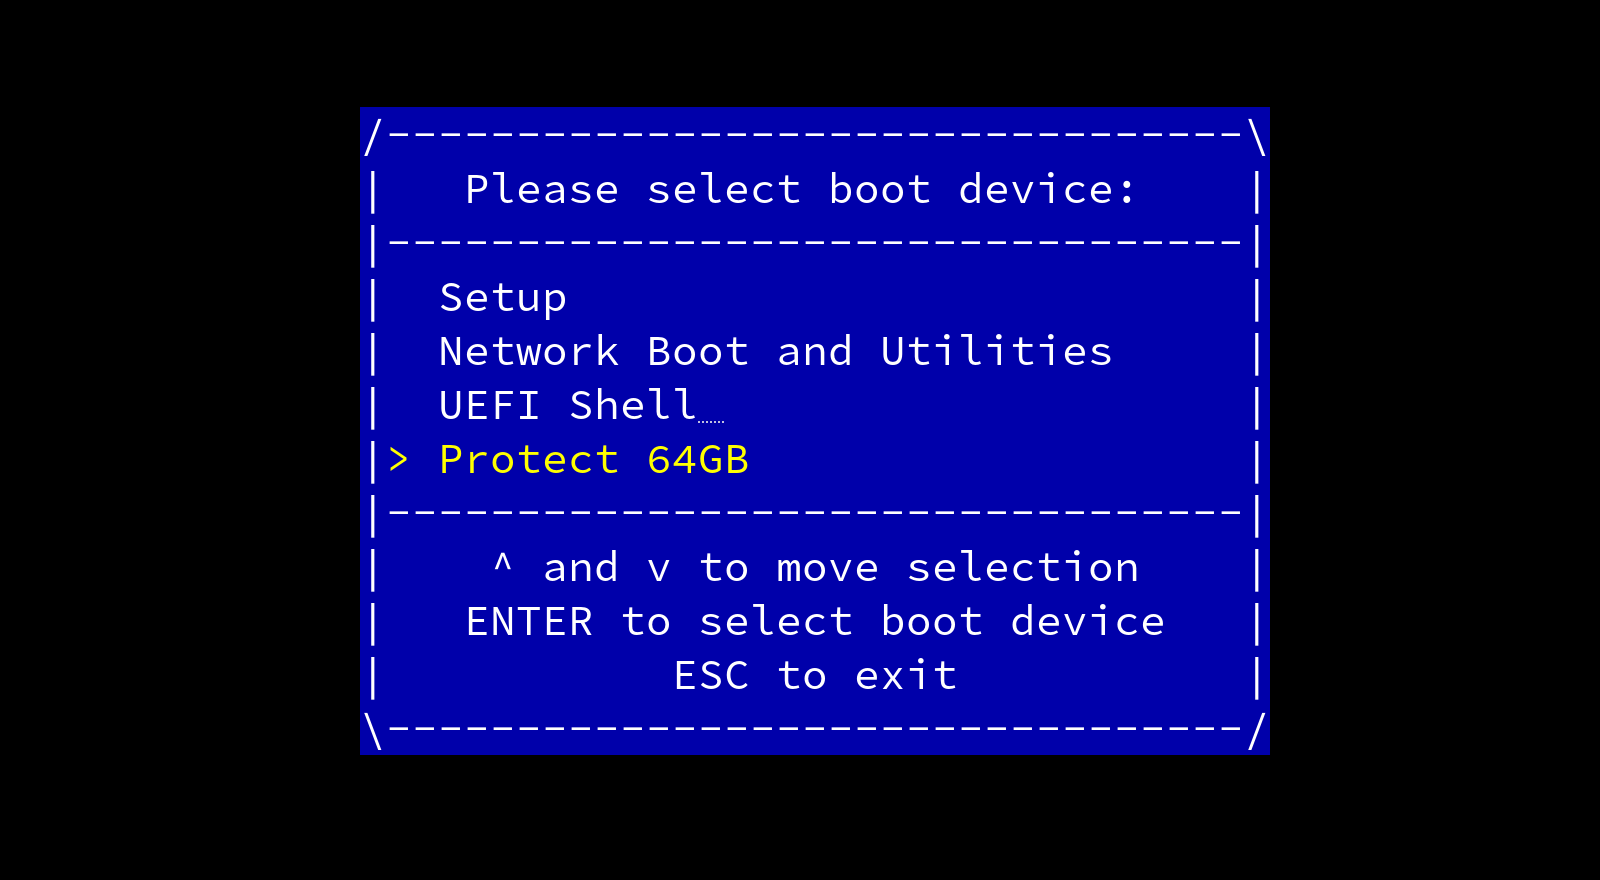
- Power it back on and hold F11 to choose the NVMe to boot to
- If you are on coreboot, you can instead change the boot order so it always automatically boots to OpenWrt from here on forward
- To do that, hold "delete" key at boot instead, go to Boot Maintenance Manager>Boot Options>Change Boot order
- Hit Enter to select the boot options
- Use the arrow keys to highlight over the NVMe
- Press Shift and + a few times to move it to the top
- Hit Enter again to accept
- Hit F10 to save
- Proceed
- Once OpenWrt boots fully, you can connect a computer to Port 1 on the Vault.
- On a computer connected to Port 1, navigate to 192.168.1.1 in your browser to access the OpenWrt GUI
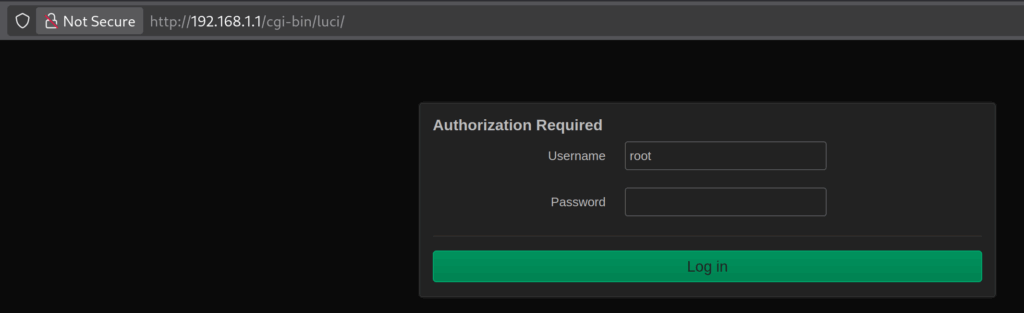
- "root" is the default username, and "openwrt" is the default password
- After logging in, it is highly recommended to change the default password

- After changing password, you can connect your modem to Port 2 on the Vault to give internet access to the Vault/OpenWrt
- OpenWrt is officially installed and is working as expected. Instructions on installing drivers can be found in the section titled "Installing Drivers" found lower down in this article
In this scenario, you will need to have a monitor or TV to connect to the Vault, a wired USB keyboard and mouse, and two individual USB drives (one USB drive will be used as storage, and the other will have Ubuntu installed to it). You will also need a computer or laptop (with internet access) to initially create the bootable USB drive and to download the OpenWrt image.
- On your computer or laptop, please download the latest LTS image of Ubuntu Desktop (https://ubuntu.com/download/desktop)
- You should also go to downloads.openwrt.org/releases
- Scroll down and click on the most recent version available. At the time of this article's creation it was 24.10.3, but if a newer version has released you most likely will want to choose that
- You should then choose "targets", "x86", "64"
- Download the "generic-ext4-combined-efi.img.gz" (if you are on a FW series Vault with coreboot, you should instead download the "generic-ext4-combined.img.gz")
- Plug in the USB drive that will be used as storage to your computer, and move the openwrt.img you downloaded to it. You are not burning this image to the USB, you are simply placing the file on the USB. If it is a brand new USB drive, you may need to format it beforehand so it can be used as storage (typically formatted as FAT32 or similar)
- Plug in your other USB drive (that you did not save OpenWrt to) to your computer and acknowledge that anything on that USB drive will be overwritten/deleted in the next few steps
- If on Windows, download/install Rufus if you do not already have it. On MacOS, download/install Balena Etcher if you do not already have it
- Use one of those programs to burn the Ubuntu .iso directly to your USB drive (this will delete any preexisting data on the USB drive)
- Once completed, connect a monitor, keyboard, mouse, both of your USB drives to your Protectil Vault
- Turn on the Protectli Vault
- Hold the F11 key right as the Vault powers on, and select the USB drive that has Ubuntu on it as your boot option
- The system will now boot into Ubuntu, make sure to select "Try or Install Ubuntu"
- It may take a minute or two before it loads
- Once you see the "Choose your language" screen, close it out
- Access the file browser found on the left side of the screen
- Navigate to your USB drive that has the OpenWrt image on it, and right click on the .gz file and extract it
- It is recommended to now copy the .img file from your USB to your downloads (or another) folder on Ubuntu
- Navigate to the folder you just copied the image to
- Right click on any of the empty white space in that directory and "open in terminal". This will open a new terminal window with you already in the directory.
- In most cases you will want to install OpenWrt to an SSD installed in your Vault. Type and enter lsblk to view all installed drives
- In the image above, sda is the USB drive with Ubuntu, sdb is the USB storage device, mmcblk0 is the on-board eMMC, and nvme0n1 is the NVMe. For the purpose of this article, we will install it to the NVMe, but you can choose a different storage medium if you wish
- Type and enter: sudo dd if=OPENWRT-IMAGE.img of=/dev/nvme0n1 bs=4M status=progress conv=fsync
- Please note the openwrt image is not actually named OPENWRT-IMAGE.img, it will typically be something like openwrt-24.10.3-x86….img If you start typing openwrt and hit your tab key, it will automatically fill out
the name
- Please note the openwrt image is not actually named OPENWRT-IMAGE.img, it will typically be something like openwrt-24.10.3-x86….img If you start typing openwrt and hit your tab key, it will automatically fill out
- Once completed, you will get a completion message
- We will now want to extend the partition so you have more space to install packages and other things on OpenWrt
- You can view the current partition table by typing and entering: lsblk /dev/nvme0n1
- Partition 2 (nvme0n1p2) is typically the root directory that we will want to increase
- Type and enter: sudo growpart /dev/nvme0n1 2
- Afterwards, type and enter: sudo resize2fs /dev/nvme0n1p2
- The partition has now been extended
- Power off the Vault
- Power it back on and hold F11 to choose the NVMe to boot to
- If you are on coreboot, you can instead change the boot order so it always automatically boots to OpenWrt from here on forward
- To do that, hold "delete" key at boot instead, go to Boot Maintenance Manager>Boot Options>Change Boot order
- Hit Enter to select the boot options
- Use the arrow keys to highlight over the NVMe
- Press Shift and + a few times to move it to the top
- Hit Enter again to accept
- Hit F10 to save
- Proceed
- Once OpenWrt boots fully, you can connect a computer to Port 1 on the Vault.
- On a computer connected to Port 1, navigate to 192.168.1.1 in your browser to access the OpenWrt GUI
- "root" is the default username, and "openwrt" is the default password
- After logging in, it is highly recommended to change the default password
- After changing password, you can connect your modem to Port 2 on the Vault to give internet access to the Vault/OpenWrt
- OpenWrt is officially installed and is working as expected. Instructions on installing drivers can be found in the section titled "Installing Drivers" found lower down in this article
There are various driver packages you can install to enable the functionality of your installed WiFi card, modem, or other peripherals. If you are using a WiFi card or modem in your Vault that wasn't directly purchased from us, you will need to find out what drivers are required by reading the documentation for the modules you purchased.
- To install drivers (or packages), you must access the web GUI at 192.168.1.1
- There must be a valid WAN connection established as well
- Navigate to System > Software
- Click on the "Update Lists" button
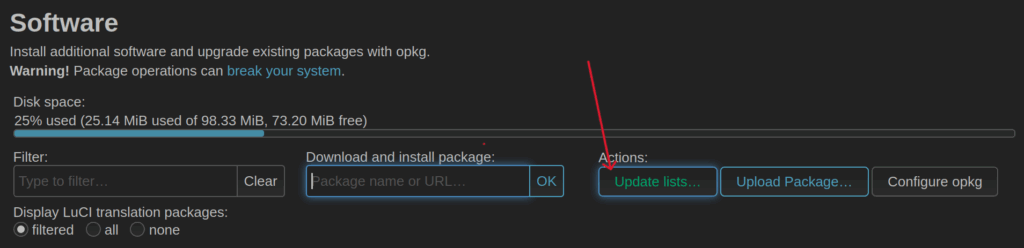
- From here, you can search for specific drivers and packages in the Filter box
The specific drivers for your components can be found in the drop downs below:
Once the drivers required have been installed as well as hostapd, you should see a "Wireless" section under Network. If you do not see it, then make sure you have rebooted your Vault after initially installing the required drivers.
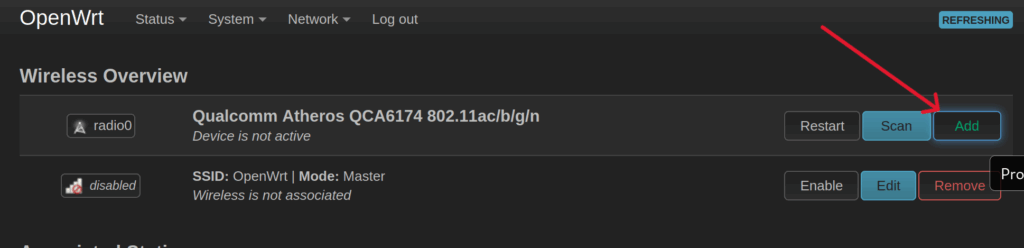
- Navigate to Network > Wireless

- Click on "Add" next to your WiFi card's name
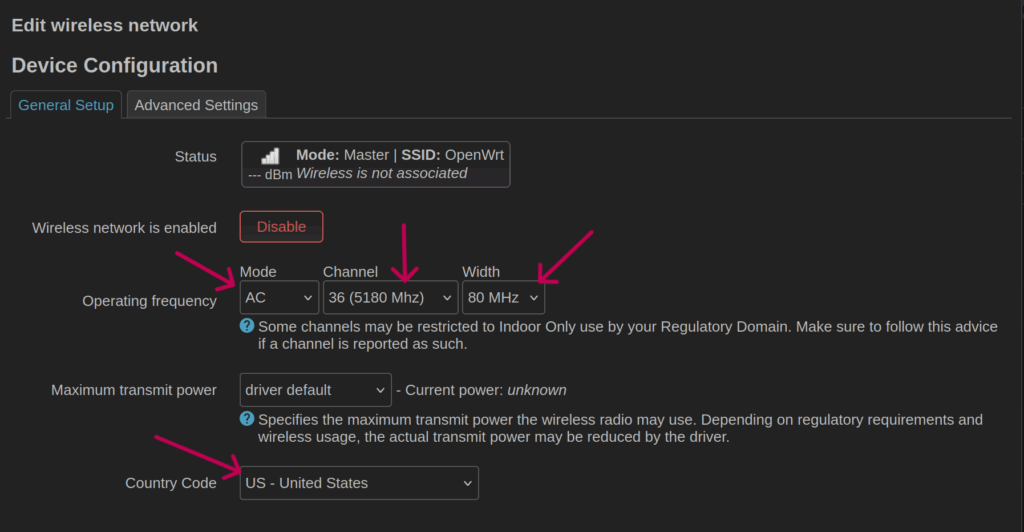
- Choose a Mode, Channel, and Width
- For our example we used AC, 36, 80Mhz
- You can play around with the channel and width to figure out what combination works best in your environment
- Set the Country Code to correlate with the country you are physically located in
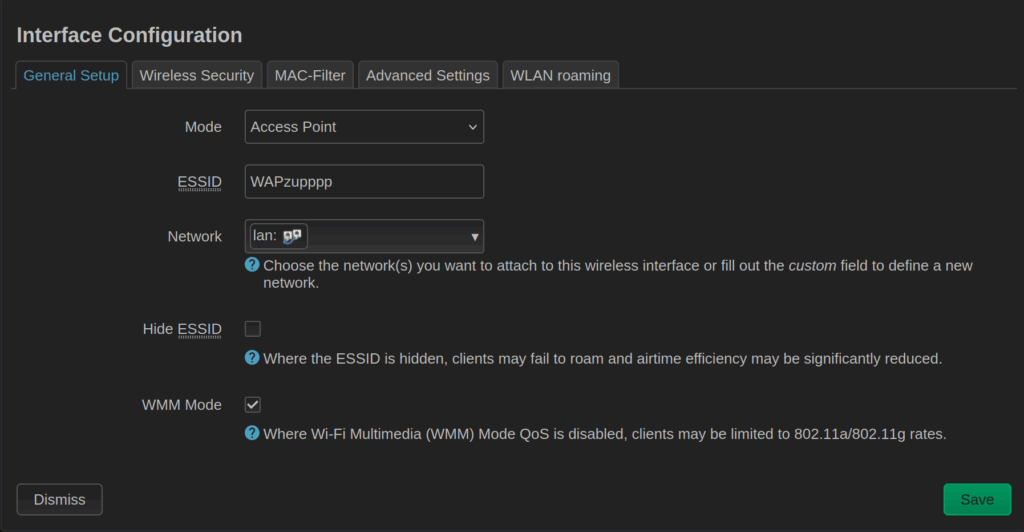
- Scroll down a bit to the "Interface Configuration" section
- Set Mode to Access Point
- Give your network a name (ESSID)
- Select lan as the Network
- This will bridge the connection with the preexisting lan network, so no additional firewall rules will need to be set
- You can turn on Hide ESSID if you wish (you won't see the SSID publicly visible on your devices, you will have to create a manual entry to connect)
- You can leave WMM Mode enabled
- Navigate to the "Wireless Security" tab
- The following steps are up to you to determine what encryption method works in your use case, but we used the following settings:
- Encryption set to WPA2-PSK (Strong Security)
- Cipher set to auto
- Key will be the password that allows you to connect to the network
- Everything else left default

- Click the green "Save" button
- Then, click the blue "Save & Apply" button
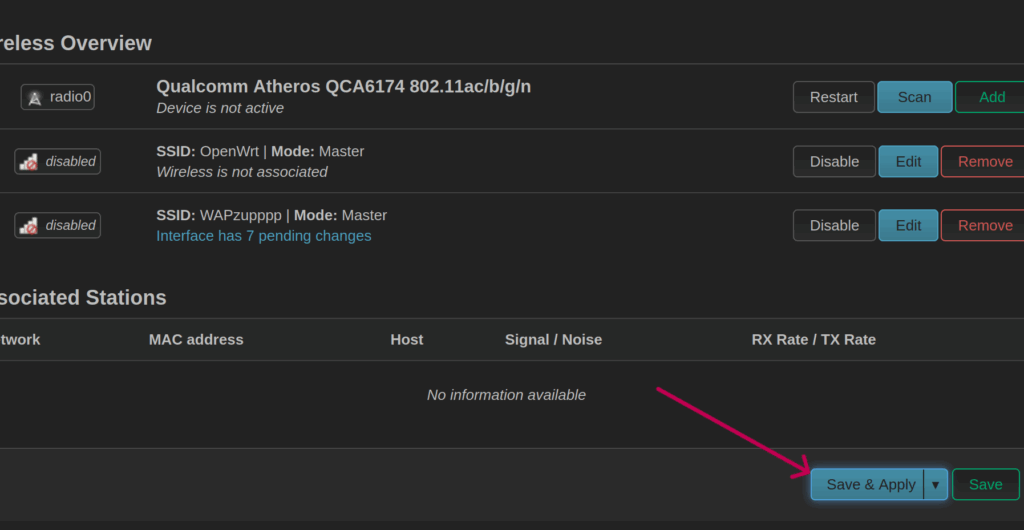
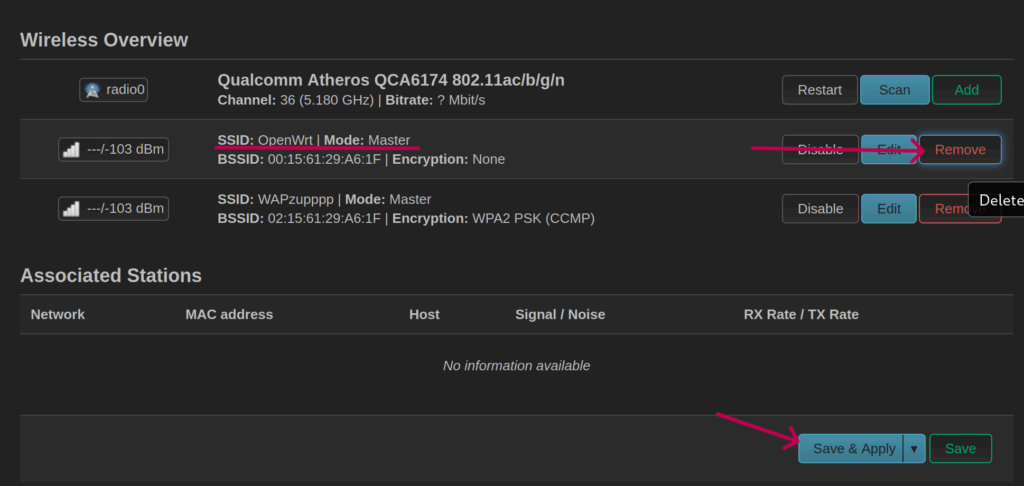
- You can also delete the preexisting "OpenWrt" SSID if you wish
- Save & Apply after
At this point the Access Point will begin configuring and will enable. It can take a few minutes for it to initially show up, but subsequent reboots should only take a matter of seconds to a minute to load the AP.
This is the WiFi card that is only available for the FW2B, FW4B, FW4C, and FW6 Series. This is a USB-based WiFi card that connects via mPCIe form factor.
Once the drivers required have been installed as well as hostapd, you should see a "Wireless" section under Network. If you do not see it, then make sure you have rebooted your Vault after initially installing the required drivers.
- Navigate to Network > Wireless
- Click on "Add" next to your WiFi card's name
- Choose a Mode, Channel, and Width
- For our example we used N, 6, 20Mhz
- You can play around with the channel and width to figure out what combination works best in your environment
- Scroll down a bit to the "Interface Configuration" section
- Set Mode to Access Point
- Give your network a name (ESSID)
- Select lan as the Network
- This will bridge the connection with the preexisting lan network, so no additional firewall rules will need to be set
- You can turn on Hide ESSID if you wish (you won't see the SSID publicly visible on your devices, you will have to create a manual entry to connect)
- You can leave WMM Mode enabled
- Navigate to the "Wireless Security" tab
- The following steps are up to you to determine what encryption method works in your use case, but we used the following settings:
- Encryption set to WPA2-PSK (Strong Security)
- Cipher set to auto
- Key will be the password that allows you to connect to the network
- Everything else left default
- Click the green "Save" button
- Then, click the blue "Save & Apply" button
- You can also delete the preexisting "OpenWrt" SSID if you wish
- Save & Apply after
At this point the Access Point will begin configuring and will enable. It can take a few minutes for it to initially show up, but subsequent reboots should only take a matter of seconds to a minute to load the AP.
Verify you have the required drivers/firmware/packages mentioned previously in this article. Note that you will need a SIM card to be installed in the modem in order to actually establish a connection. In the example below, we utilized a Google Fi SIM card.
- You can determine what your modem is labeled as at Network > Interfaces > Devices
- In our example, our modem was eth4, because eth0-3 are the ethernet ports on the Vault
- Go back to Network > Interfaces

- Click on "Add new interface" towards the bottom left
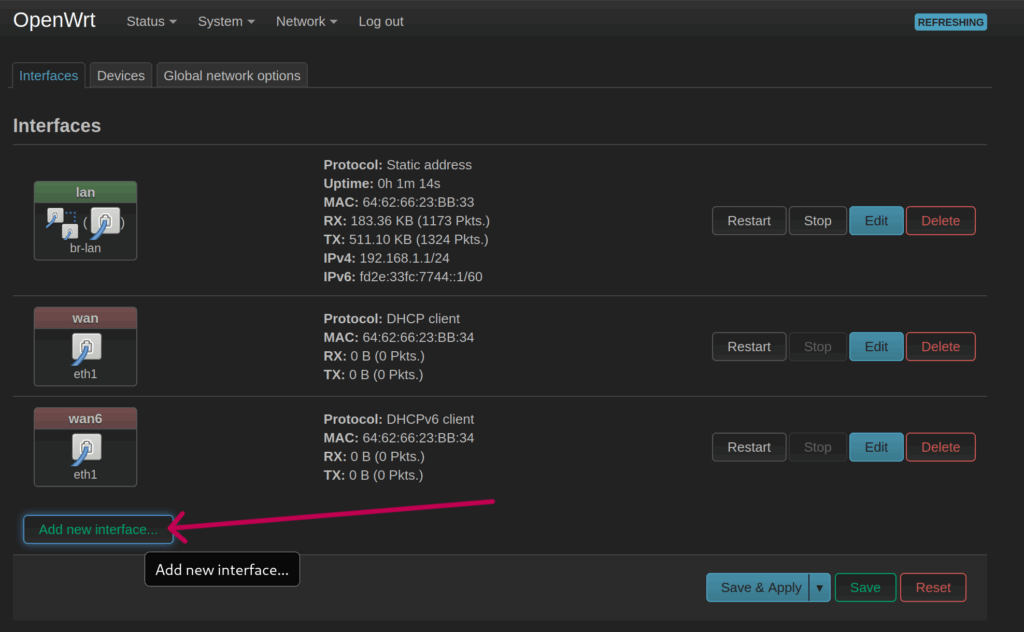
- Give the interface a name
- Set Protocol to DHCP client
- Choose the device that correlates with the modem that you determined earlier
- For example, ours is eth4
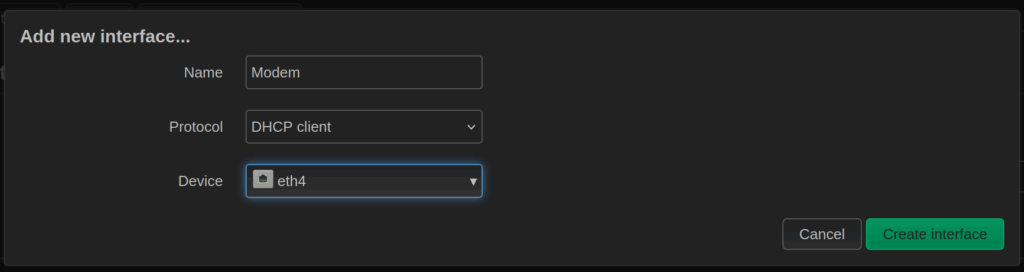
- Click "Create interface" button
- All the default options in the "General Settings" and "Advanced Settings" tab can be left alone
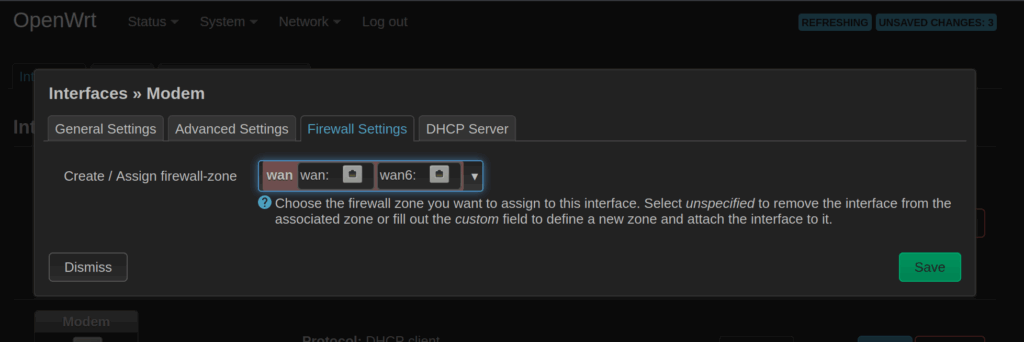
- In the "Firewall Settings", choose the preexisting WAN zone as the firewall-zone
- This will allow LAN connected devices to gain internet access through the modem
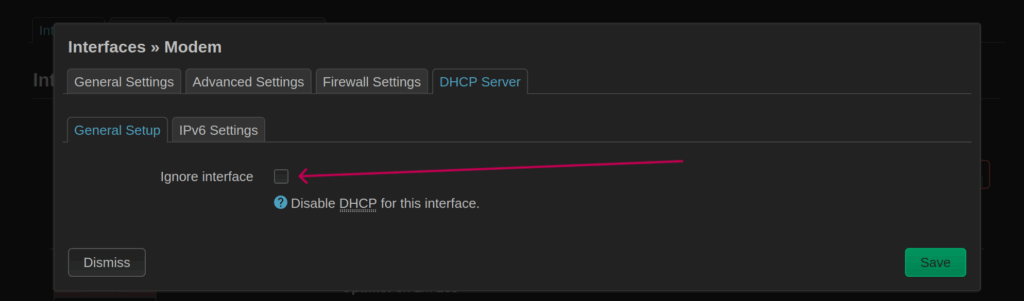
- In the "DHCP Server" tab, click on "Set up DHCP Server"
- Then, uncheck the "Ignore Interface" box so it is NOT selected
- Click "Save", and then hit "Save & Apply"
- Please allow for upwards of a minute or two for everything to configure
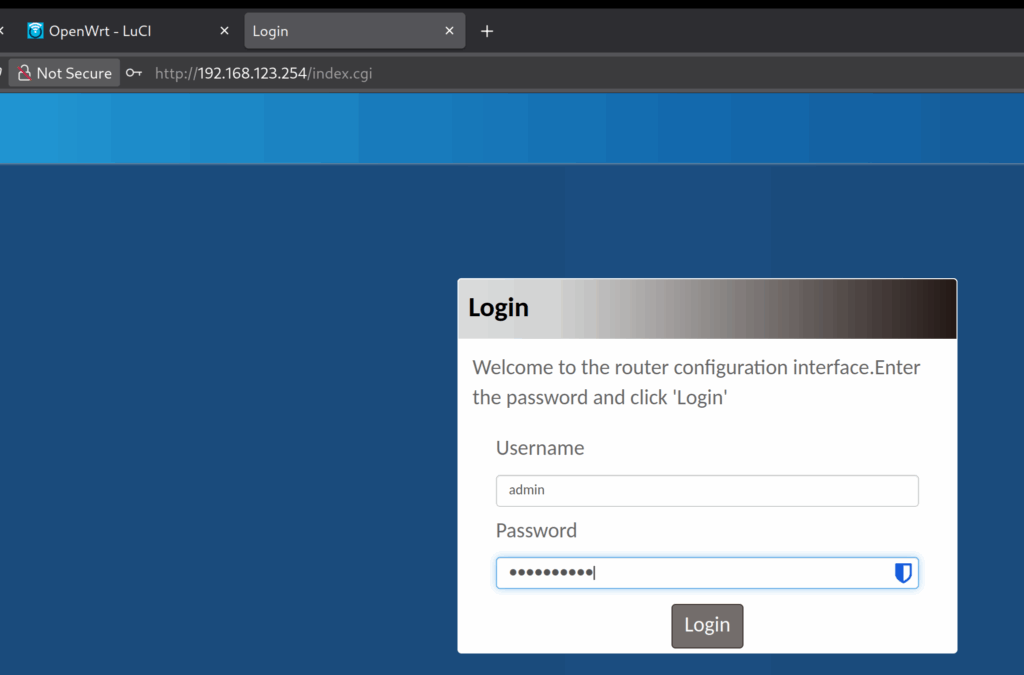
- In a web browser on a computer connected to the LAN port of OpenWrt, navigate to 192.168.123.254
- This is the modem's gateway, GUI location
- If you are unable to access this, wait another minute and try again
- If you still can't access it, try removing the Ethernet cable from your computer and plug it back in, and also you may need to reboot the Vault one time
- If you have not logged in before, the default username and password should be either:
- admin / admin
- admin / Admin12345
- The information should have been provided on a physical note with your order
- After logging in, use this GUI to navigate to Setup > Network > Cellular tab
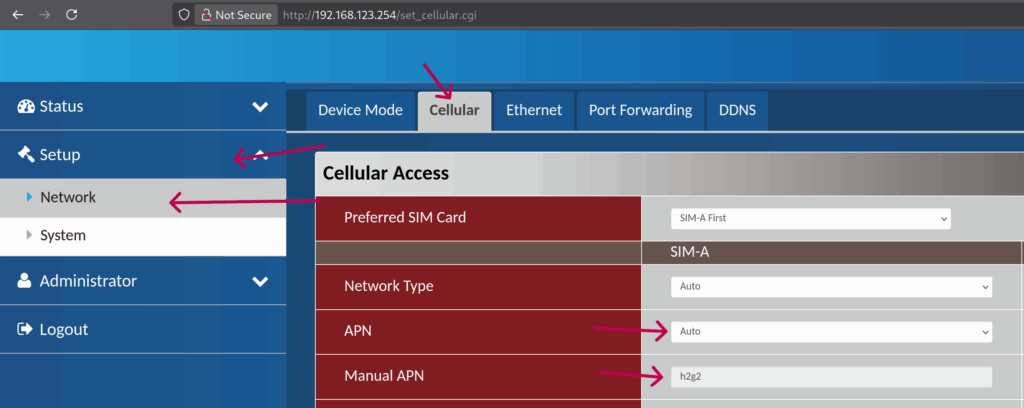
- Typically you will need to configure an APN correlating with your SIM card to establish a connection
- For our Google FI SIM, we set APN to Auto
- After setting the APN, make sure to save and apply settings!
- After a little bit of time, you should gain an IP address and establish a connection with your network provider
- You can go to Status section of GUI to confirm
- If you aren't establishing a connection, wait a bit, and then reboot the entire Vault one time
- On the subsequent reboot, wait another minute or so, and a connection should be established
- You should now be able to access the internet on a computer connected to the LAN port without a physical WAN connection to a modem
- Again, if you still aren't getting a connection on the computer, try resetting the ethernet connection to the computer