Have a Question?
How to use the Vault's COM Port/Serial Connection
Overview
This article should help with understanding what a COM port/serial output is, how to utilize it, and important information for each product.
A video explaining most content outlined in this article can be found here:
All Vault models include an external COM port that can be used to view the Vault's console output on a connected computer via a serial console cable. This COM port is simply a redirect from the Vault's display output (whether HDMI/Display Port/VGA). Importantly, this output is used before an Operating System (OS) boots, giving the user the ability to use the COM port instead of the HDMI or Display Ports for things like adjusting BIOS settings (if needed). The COM output will translate the display into a text and color based output. You will not see a fully detailed GUI with intricate images, and some OS may not support COM output.
Connecting to the COM port is relatively simple. All FW Vault models come with a DB9-to-RJ45 COM cable. Given that there aren't many computers with DB9 ports these days, you'll want to make sure you have a USB to Serial adapter (like this), as well as the serial cable that was supplied with your Vault. Plug your serial port adapter into your computer. For users who do not want to use an adapter; we offer our Protectli USB COM Port here. Necessary drivers should be automatically installed for Windows and Linux when connected, and are provided by FTDI.
The V Series (V1XXX) Vaults come with a USB-C COM cable. This cable will work with Windows, MacOS, Linux, etc.
The VP2410/VP2420 and VP4600 series Vaults come with a Micro USB-to-USB-A COM cable. For Windows, you will be required to download compatible drivers which can be found in the VP2400 and VP4600 Series section of this article. Does not work with MacOS.
The VP2430 comes with a USB-C COM cable, and no additional drivers are required. An internal COM header is also found on the motherboard, which is outlined in the official datasheet for the product.
The VP6600 Series and VP3200 Series can use either an RJ45 or USB-C COM cable. The VP6600 will prioritize the RJ45 port, so you will need to make some changes in the BIOS for USB-C COM output. Instructions can be found in the VP6600 series section of this article. The VP6660/VP3200 comes with a USB C COM cable, but you can purchase a compatible RJ45 to USB COM cable here.
By default, the Vault's serial port is enabled. Out of the box, you can connect the RJ45/MicroUSB/USB-C end of the COM cable to the port labeled "COM" on the Vault. If you are using the RJ45 COM cable, do not plug the COM port RJ45 into any of the Vault's network ports.
Other Tested COM Cable Brands
How to Determine what COM Port your Adapter Connects to
When you plug your COM cable into your computer, it will be given a specific COM port number, which will be needed when configuring your serial console.
Linux
You can find the COM cable's name by running the following command in the terminal:
sudo dmesg | grep tty
You can then use a program like minicom to view COM output. Follow this documentation for help.
MacOS
- This may vary between different MacOS versions, but for a general flow:
- Open the Terminal app
- Connect serial cable to Mac and Protectli Vault
- Find the serial port name by typing ls /dev/tty.*
- Type screen /dev/tty.[board_name] 115200 to connect to the serial console
- Replace [board_name] with the name of the board
- For example, it could be something like "usbserial-AV0L1TOE"
- For additional context, 115200 is the required Baud rate
- Press Enter to run the command
- Console should now display output
Windows 10/11
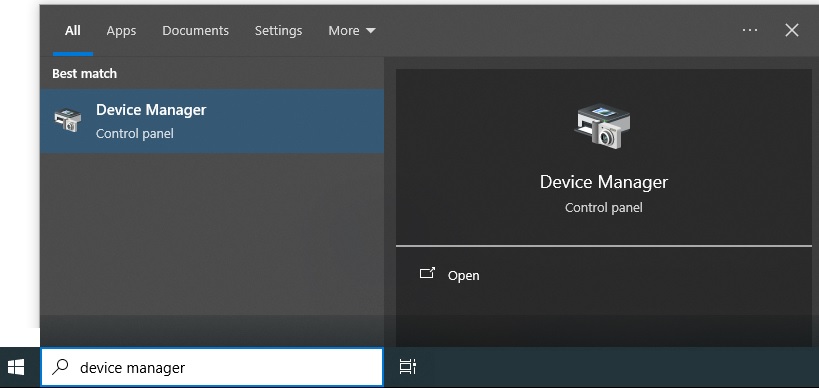
- On Windows 10/11, open up your Device Manager. (Search for "Device Manager" in your Windows Search bar.)
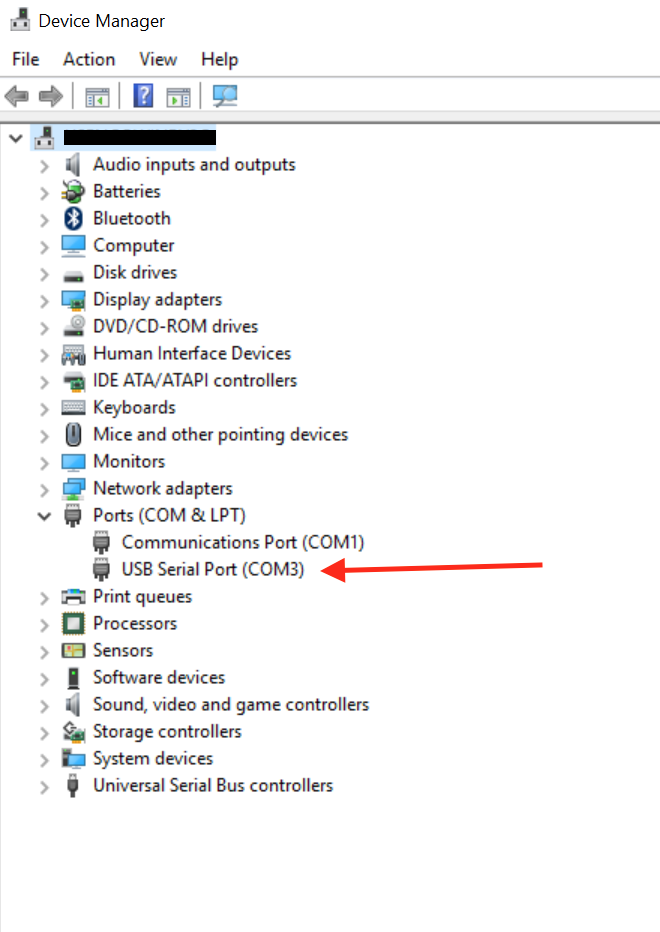
After opening the Device Manager, drop down the Ports (COM & LPT) section. See the example below, where our USB Serial Port was given the name COM3.
On your computer, you'll need to use extra software in order to access the COM port. In Windows, PuTTY (available here) is a popular choice. Download, install, and open PuTTY. You will find yourself at a screen that looks similar to the following:
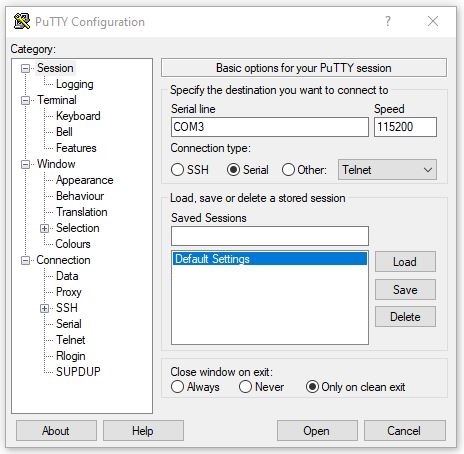
- First, click "Serial" under "Connection Type", then adjust your "Serial Line" to correlate with your previously determined COM number.
- Next, change the "Speed" to be "115200" [This is the Baud rate] (this is the default value the Vault is set to).
- Next, click "Open" and you will see a blank terminal window open. Power on your Vault and you should start to see the equivalent of the VGA or HDMI output appear in the console window.
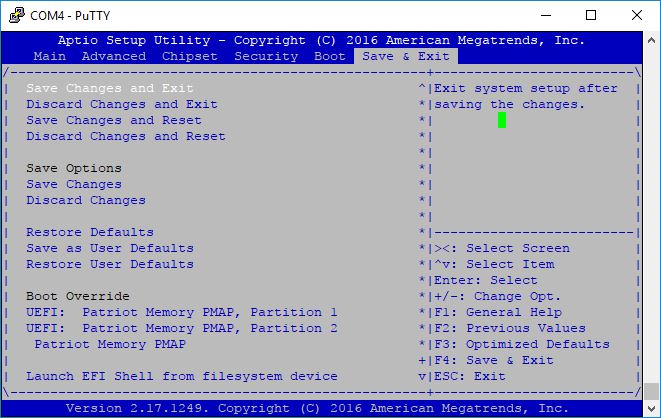
- If you wish to access the Vault's BIOS, you can do so by holding down the <DEL> key as the Vault boots. You should see a screen that looks like the following.
Why am I not seeing COM Output from a Linux/Debian OS?
It is important to note that if you have a Linux based OS like Ubuntu or Debian installed on your Vault, you may not get any COM output when you boot the OS. You will most likely need to do some additional configuration to allow the OS to display COM output.
To configure serial output on Ubuntu, follow their official documentation here.
Please refer to the documentation of whatever OS you are using on your Vault for configuring serial COM output.
Why am I not Seeing COM Output on OPNsense or pfSense®?
Both of these OS must have the default output set for serial/COM. The VGA image will not display COM output past a certain point. If you already have the VGA image installed, you can change the default output to serial via the OS's webGUI. Alternatively, you can download the serial image for OPNsense here (Select "serial" image type): https://opnsense.org/download/
For pfSense®, you can follow their official documentation for instructions on switching to serial/COM: here.
VP2410/VP2420 and VP4600 Series Guide
Both of these series of Vault Pro models come with a Micro USB Serial Console Cable. You cannot use COM output with these units if your connected computer is running MacOS.
It is required to download drivers from Fintek to utilize this cable. For Windows 10/11, linked below are the latest WHQL drivers supplied by Fintek. We have noticed system instability with the driver supplied by Windows update, the drivers below seemed to have resolve this issue.
Windows Driver Install Instructions
-
- Download driver above and unzip into desired location
-
- Attach COM cable to PC and Vault
-
- Open "Device Manager" and navigate to "Ports (COM & LPT)"
-
- Right Click on "Fintek USB-to-Serial" and select "Update Driver"
-
- Select "Browse my computer for drivers"
-
- Under "Search for drivers in this location:" Browse to the location of the unzipped driver
-
- Select the top level folder named "F81232_230522_whql_2" and click 'OK'
-
- Verify "Include Subfolders" is selected and then click "Next"
-
- The you should then see confirmation of successful driver install
-
- A restart may be required to complete the driver install
-
- Verify the latest driver is now installed by again right clicking on the "Fintek Usb-to-Serial" device and selecting "Properties", then the tab titled "Driver"
-
- Driver Provider: Fintek USB2COM
-
- Driver Date: 5/22/2023
-
- Driver Version: 23.5.22.0
- Verify the latest driver is now installed by again right clicking on the "Fintek Usb-to-Serial" device and selecting "Properties", then the tab titled "Driver"
Linux Driver Install Instructions
Ubuntu/Debian should have the drivers included, otherwise here is a (link) to the available driver (USB to Serial Port (F81532A/F81534A/F81535/F81536)) along with build instructions.
VP6600 Series Guide
The VP6600 Series has both a RJ45 and USB-C COM Port. With a default BIOS configuration, you can view the BIOS menu by holding <DEL> key at boot with either COM port connection. However, many OS will prioritize the RJ45 port, so you will need to make some changes to the BIOS settings if you wish to use the USB-C COM port for viewing an OS output.
How to Prioritize the USB-C COM Connection
You can modify these settings via COM connection or with a keyboard and monitor connected to the Vault. This will disable the RJ45 COM port. If you want to quickly revert these changes, you can reset BIOS to defaults or perform a CMOS reset.
- Boot the Vault and hold the <DEL> key to open BIOS menu
- Navigate to Advanced>IT8659 Super IO Configuration>Serial Port 1Configuration
- Set Serial Port to [Disabled]
- Navigate back a few menus until you are back on the Advanced menu main page
- Navigate to Advanced>Serial Port Console Redirection
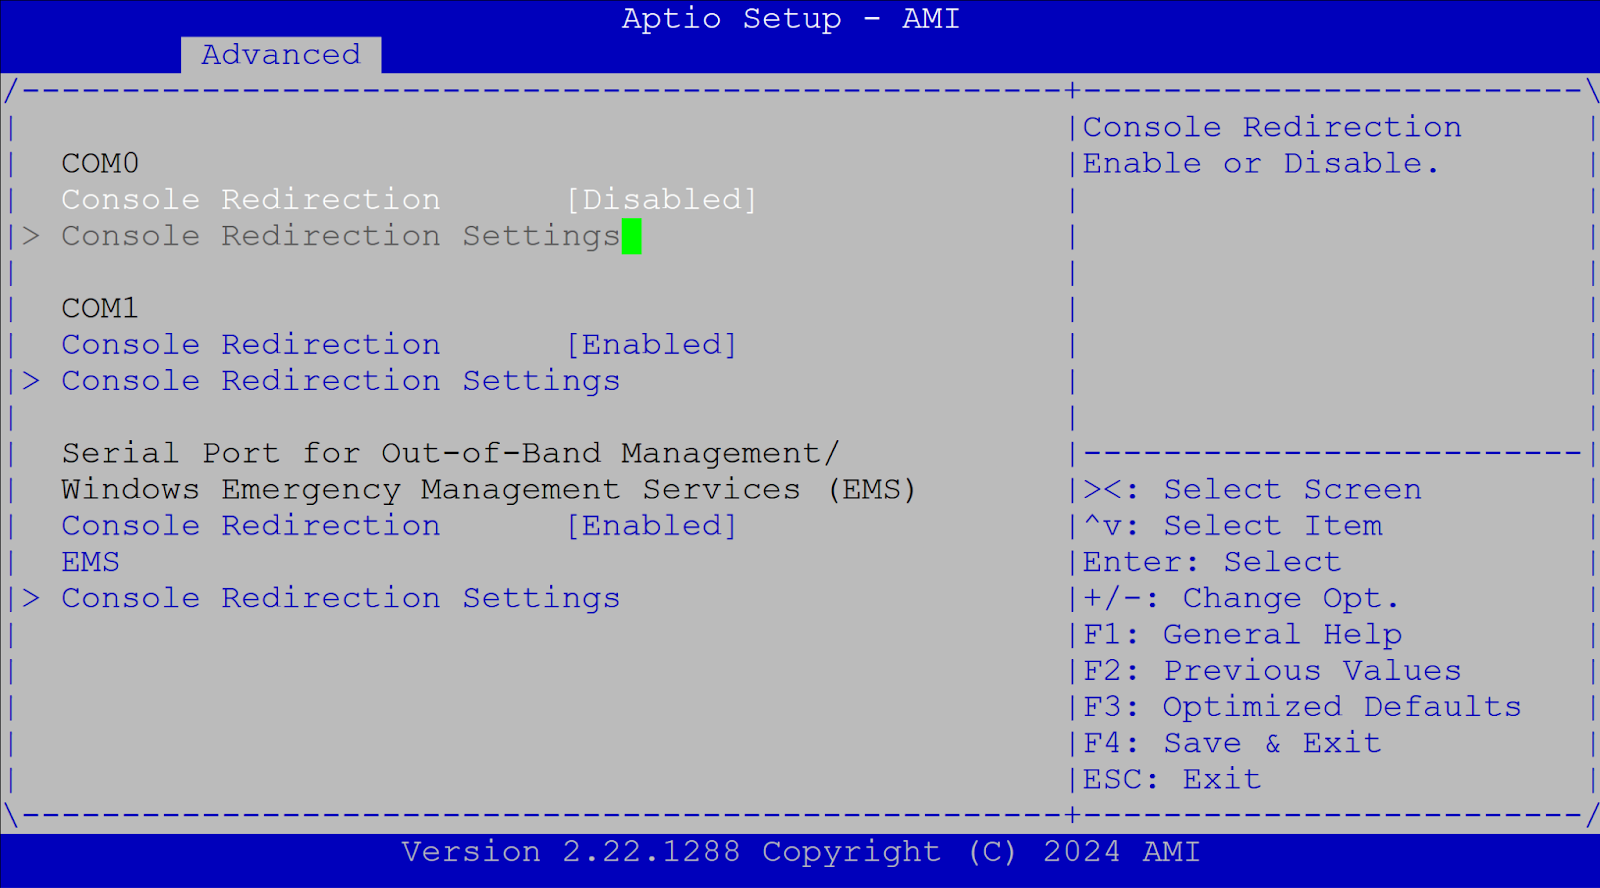
- Set COM0 Console Redirection to [Disabled]
- On the very bottom of the menu options, select the Console Redirection Settings found in the Serial Port for Out-of-Bound Management
- Change Out-of-Band Managment Port to [COM1]

- Save BIOS settings
- Reboot
COM Port Pinout (FW Series/DB9 Cable)
The pinout for the COM Port and RJ-45 to DB9 cable is shown in the table below. On the Vault, pin #1 of the COM port is the rightmost pin when looking at the port. On the DB9 side of the cable, pin #1 is the upper right pin of the 5 pins when looking into the connector end.
| Console Port (DTE) | RJ-45 Pin | DB9 Pin | Signal |
|---|---|---|---|
| TX | 3 | 2 | RX |
| GND | 4 | – | – |
| GND | 5 | 5 | GND |
| RX | 6 | 3 | TX |
If you have any further questions, please feel free to reach out by opening a support ticket: https://protectli.com/submit-ticket
