Have a Question?
How to Install pfSense® CE on the Vault
Overview
pfSense® CE is an open source routing and firewall software which is based on FreeBSD. It has a variety of packages easily downloaded and configurable within the GUI itself. https://www.pfsense.org/getting-started/
Note: pfSense® CE is open source software developed for the benefit of the community. If you are using pfSense® CE with the Vault, please consider supporting the pfSense project. https://www.pfsense.org/get-involved
Note: pfSense® CE version 2.7.0 is now available. Protectli recommends using the latest released version.
If you are here because you got a message saying "“Not Enough Disks Selected” / “Stripe: Not Enough Disks Selected” during the final section of the installer, please press the spacebar on your keyboard while highlighted over the drive you wish to install to, to properly install the OS. When you hit spacebar on the desired drive, you will see an asterisk [*] next to the drive name.
Verify Hardware Recommendations
pfSense® CE has good documentation regarding general hardware recommendations on their web site. See https://docs.netgate.com/pfsense/en/latest/book/hardware/minimum-hardware-requirements.html to verify that the proper memory and storage is available for the intended application.
Install pfSense® CE
Obtain the Installation Image and Uncompress It
There are two ways to install pfSense® CE on the Vault. Because the Vault has a COM (serial console) port, users can install pfSense® CE using only the COM port, OR, users can install pfSense® CE the more 'traditional' way by using a VGA or HDMI monitor, along with a USB keyboard.
- The easiest way to install pfSense® CE that is most likely to be error-free is with a HDMI or Display Port monitor and a USB keyboard, using the VGA version of the installer
- If the user chooses to install pfSense® CE with the serial console port on the Vault, the user MUST use the serial version of the installer
- If the user encounters an issue whereby the installation appears to stop and not proceed, please double check to ensure you're using the correct version of the pfSense® CE installer with your chosen installation method
The pfSense® CE installation image (IMG) can be downloaded from https://www.pfsense.org/download/. The same image can be used to install pfSense® CE on any of the Vault platforms. It is important to choose the correct options when downloading the image including "Version", "Architecture", "Installer", and "Console." The proper selections are as follows for installing the Vault using a VGA monitor and USB Keyboard:
**Note for balenaEtcher users: You may need to download the DVD Image (ISO) installer to properly burn the image to your USB.
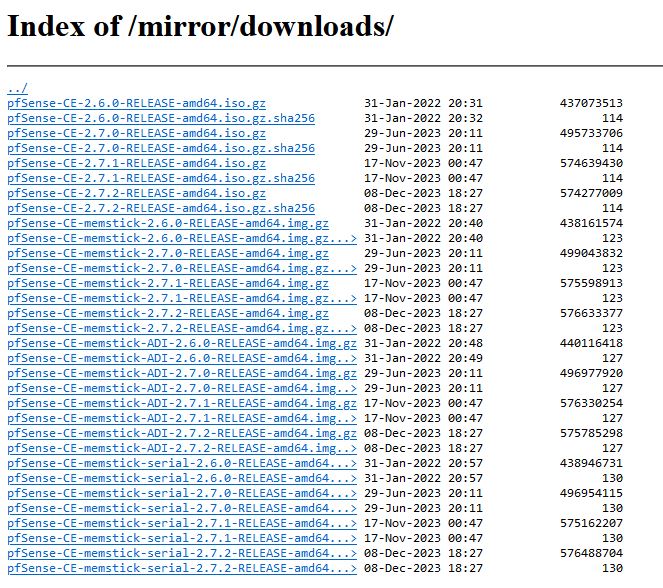
Version: The latest available (2.7.2 as of this edit)
Architecture: AMD64 (64 bit)
Console: VGA or Serial as needed (see note above; VGA or HDMI monitor = VGA installer; COM port = serial installer)
Installer: USB Memstick Installer
Your download should begin immediately and when it is completed you should have a compressed IMG file (an example file name is: pfSense-CE-memstick-2.7.2-RELEASE-amd64.img.gz) downloaded that is ~800MB in size.
Now that the compressed image file has been downloaded, you will need to use a program like "7zip" or "WinRAR" on Windows to decompress the file. The resulting file should look the same, except that the file name will now end in ".img" instead of ".img.gz".
Burn the installation image to a USB drive
The easiest way to transfer the installation image to a USB drive is by using software called "Rufus" on Windows or "balenaEtcher" on Mac OSX. See this link for detailed instructions on how to create a bootable USB drive using Rufus or balenaEtcher.
Install pfSense® CE Operating System on the Vault
- Verify the Vault is powered off
- Verify a monitor (or COM cable/serial console) is connected
- Verify the wired USB keyboard is plugged in (ignore if using serial connection)
- While powering up the Vault, hold the <F11> key to open boot options
- Select your USB drive
- If you see a partition that mentions UEFI, select this one
- pfSense® CE should now start booting, lots of text will start flying across the screen (don't be scared!)
- You will eventually be greeted with a Copyright and distribution notice
- Review and [Accept]
- Select the Install option
- Select Auto (ZFS)
- Select Proceed with Installation
- Select Stripe
- Highlight over the SSD and HIT SPACEBAR KEY. You MUST select the SSD, an [*] will show up next to the drive name
- Hit <Enter> key
- Confirm you wish to overwrite the contents of the SSD
- The OS will quickly install
- Reboot and remove the USB drive
Change Boot Order (UEFI coreboot only)
If you are on a unit with UEFI coreboot (VP Series or FW4C), you may need to change the boot order in the coreboot menu to make sure the SSD with pfSense® CE is at the top of the boot order.
-
- Hold <DEL> at the time of boot to access the coreboot menu
- Navigate to Boot Maintenance Manager > Boot Options > Change Boot Order
- Hit <Enter> to select the first option
- Use arrow keys to highlight the SSD
- Press <Shift> and <+> to move it up to the top selection
- Hit <Enter>
- Hit <F10> to save
- Reboot
First Time Boot Instructions
After you have installed pfSense® CE, allow the Vault to boot back up and load the OS.
On units with i225-V or i226-V NICs, you will most likely be prompted to configure the interface assignments so you actually have a WAN and LAN port to utilize. We will be setting port 1 as WAN (which connects to your modem) and port 2 as LAN (which connects to your computer or switch).
You will eventually get to a point in the booting process that asks "Should VLANs be set up now [y | n]?"
- Type the letter "n" and hit <Enter> key
- For "Enter the WAN interface name" type igc0 (potentially igb or ixl depending on NIC) and hit <Enter> key
- For "Enter the LAN interface name" type igc1 (or whatever the NIC is labeled as) and hit <Enter> key
- When asked to Enter the Optional 1 interface name, just hit the <Enter> key without typing anything
- You can setup the OPT ports at a later time after the initial setup, follow this guide
- When asked to proceed, type "y" and hit <Enter> key
- The OS will now configure everything, this may potentially take a minute or so
- Once you see a menu with 16 options, you are good to go
- Feel free to unplug your monitor from the Vault, you can now connect to the WebGUI on a computer connected to the LAN port
Accessing WebGUI
- Connect a computer to the Vault's LAN port
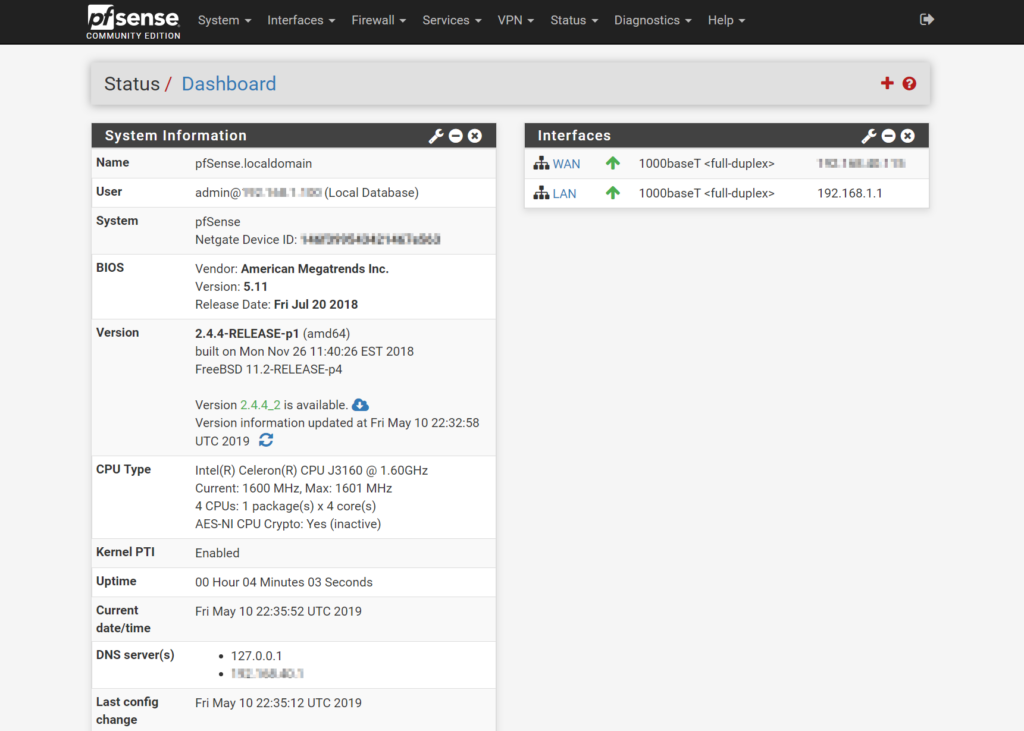
- Browse to the pfSense® CE dashboard at 192.168.1.1 login with the default credentials.
- Username: admin
- Password: pfsense
- If a warning regarding an insecure connection shows, simply ignore and continue (this is normal)
- Verify the dashboard is displayed
For more detailed configuration instructions, the documentation page at: https://docs.netgate.com/pfsense/en/latest/index.html
Please refer to their official documentation for configuration assistance.
BIOS Compatibility
Vault | pfSense® CE Version | AMI BIOS – Legacy | AMI BIOS – UEFI | BIOS – coreboot |
---|---|---|---|---|
FW2B | 2.7 | Tested | Tested | Tested |
FW4B | 2.7 | Tested | Tested | Tested |
FW4C | 2.7 | Tested | Tested | Tested |
FW6A | 2.7 | Tested | Tested | Tested |
FW6Br2 | 2.7 | Tested | Tested | Tested |
FW6C | 2.7 | Tested | Tested | Tested |
FW6D | 2.7 | Tested | Tested | Tested |
FW6E | 2.7 | Tested | Tested | Tested |
VP2410 | 2.7 | Tested | Tested | Tested |
VP2420 | 2.7 | N/A | Tested | Tested |
VP4630 | 2.7 | N/A | Tested | Tested |
VP4650 | 2.7 | N/A | Tested | Tested |
VP4670 | 2.7 | N/A | Tested | Tested |
VP66XX | 2.7 | N/A | Tested | TBD |
Suggested Port Assignments
Model | WAN | LAN | OPT1 | OPT2 | OPT3 | OPT4 |
---|---|---|---|---|---|---|
FW2B | igb0 | igb1 | N/A | N/A | N/A | N/A |
FW4B | igb0 | igb1 | igb2 | igb3 | N/A | N/A |
FW4C | igc0 | igc1 | igc2 | igc3 | N/A | N/A |
FW6 Series | igb0 | igb1 | igb2 | igb3 | igb4 | igb5 |
VP2410 | igb0 | igb1 | igb2 | igb3 | N/A | N/A |
VP2420 | igc0 | igc1 | igc2 | igc3 | N/A | N/A |
VP4600 Series | igc0 | igc1 | igc2 | igc3 | igc4 | igc5 |
VP6600 Series | ixl0 | ixl1 | igc0 | igc1 | igc2 | igc3 |