Have a Question?
How to Install Windows 11 on the Vault
Overview
The Vault is a network appliance and the most popular applications have been network-oriented, such as firewalls, routers, and hypervisors. However, the Vault can serve as a general-purpose PC as well.
One of the security features of Windows 11 is that a Trusted Platform Module (TPM) must be present in order to install the Operating System (OS). On a V Series (V12XX, V14XX), VP2420, VP4600, or VP6600 with AMI BIOS, you can utilize the on-board firmware TPM (PTT) if you do not have a hardware TPM (dTPM) installed. Instructions to utilize PTT can be found in this article. This article will also show how to install Windows 11 on the Vault including a method to bypass the TPM requirement.
Please refer to the Windows 11 System Requirements for more details. https://www.microsoft.com/en-us/windows/windows-11-specifications
Windows 11 ISO
**Important Note for Linux users: If you wish to burn a bootable Windows USB on your Linux machine, you will not be able to follow the instructions for burning an image on this article, and the dd command will not work. Please use this article to successfully burn a Windows ISO to your USB using Linux: https://kb.protectli.com/kb/how-to-create-bootable-windows-10-11-usbs-on-linux-using-woeusb-for-protectli-vaults/
The first step will be to create a Windows 11 Bootable Disk Image.
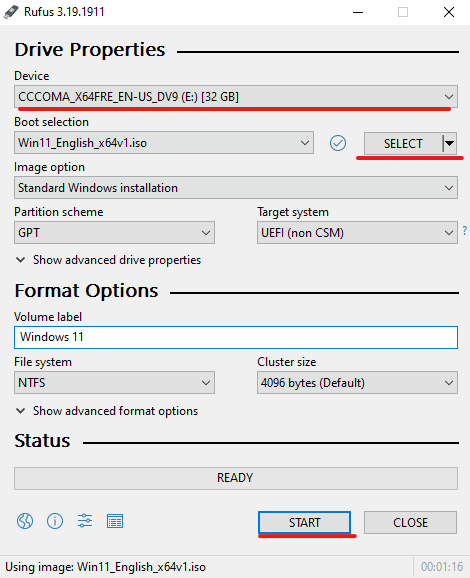
In this example, we create a bootable image on Windows using Rufus 3.19.
Creating Bootable USB with Rufus
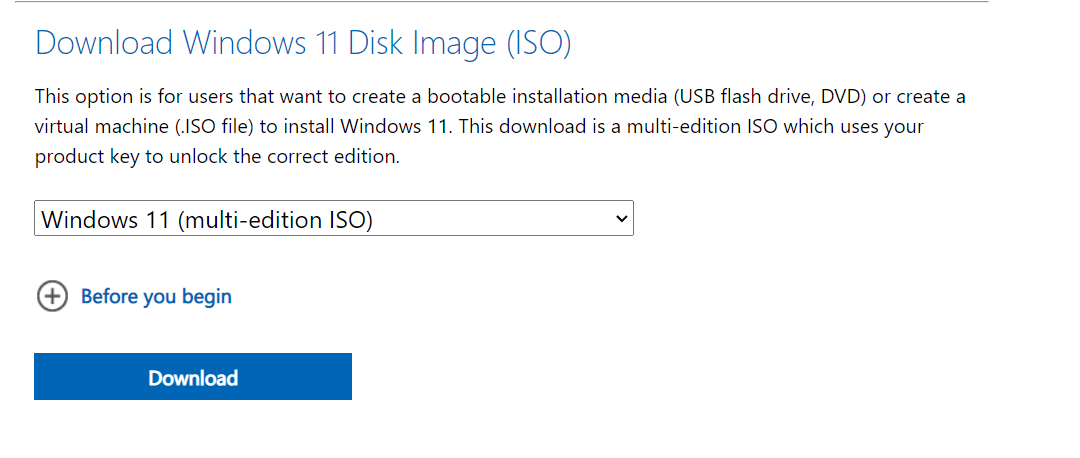
Navigate to https://www.microsoft.com/software-download/windows11 and scroll down until you see Download Windows 11 Disk Image (ISO)
- Use the dropdown to select Windows 11 (multi-edition ISO)
After Downloading the ISO use Rufus 3.19 to create the bootable USB.
- Select the desired USB device
- Select the Windows 11 ISO from your files
- Leave other settings default to match the screenshot below
- Click start to create a bootable USB
Rufus will prompt you to customize the Windows installation by providing access to additional installation options, one allowing you to bypass the TPM requirement. This bypass is possible by editing the system setup registry, the registry can be edited manually, but Rufus 3.19 simplifies and streamlines the process.
*Note: If your Vault is not equipped with a dTPM or PTT, or if you are using coreboot without a dTPM, you must select Remove requirement for Secure Boot and TPM2.0 for a successful installation.
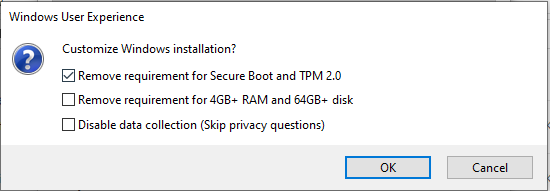
For additional security, TPM can be added after installation.
Prerequisites for VP2420, VP4600, VP6600 Series If Using Firmware TPM [PTT] on AMI BIOS:
If you have a V Series (V12XX, V14XX), VP2420, VP4600, VP6600 series Vault with AMI BIOS, and you do not have our dedicated hardware TPM, you can use the firmware TPM (PTT) on the board to successful install Windows 11.
On the V Series (V12XX, V14XX):
- No changes need to be made to BIOS
On the VP2420 (AMI BIOS):
- Power on the Vault and hold the "Delete" key to load into BIOS options
- Navigate to Advanced>CPU Configuration and change TPM Device Selection to "PTT"
- Save settings and reboot
- Hold the "Delete" key again to load back into BIOS options
- Navigate to Advanced>Trusted Computing and verify that "Security Device Support" is set to "Enable"
- Save settings and continue to next section of this article
On the VP4600 Series (AMI BIOS):
- Power on the Vault and hold the "Delete" key to load into BIOS options
- Navigate to Advanced>Trusted Computing and verify that TPM Device Selection is "PTT" and Security Device Support is set to "Enable"
- Save settings and reboot
- Continue to next section of this article
On the VP6600 Series (AMI BIOS)
- Power on the Vault and hold the "Delete" key to load into BIOS options
- Navigate to Advanced->PTT Configuration-> TPM Device Selection-> make sure it is set to "PTT"
- Save settings and reboot
- Continue to next section of this article
Installation Process
- Verify the Vault is powered down
- Verify the monitor is connected
- Verify the USB keyboard is plugged in
- Verify connection to WAN
- Insert the USB install drive into a Vault USB port.
- Power on the Vault
- This may take a few minutes, A post-boot terminal status screen may appear, this is normal.
- Press "F11" key during boot to enter the boot menu
- Select the Windows 11 bootable USB drive
- Select the Language, Time, and Keyboard preferences
- Begin Installation
- Enter a Product Key or select I don’t have a product key

- Select the Windows 11 version, in this example, we will install Windows 11 Pro
- Accept the Software License Terms
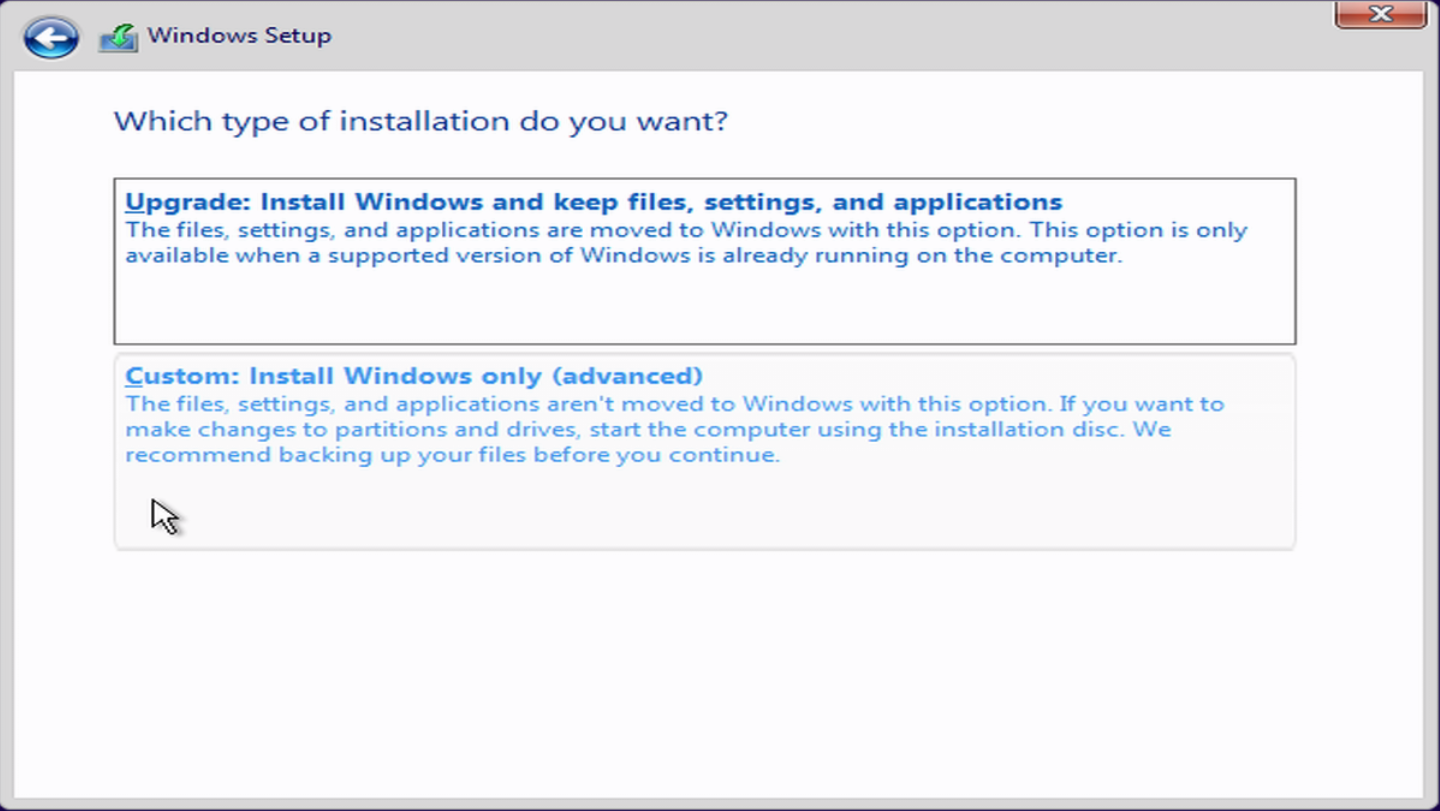
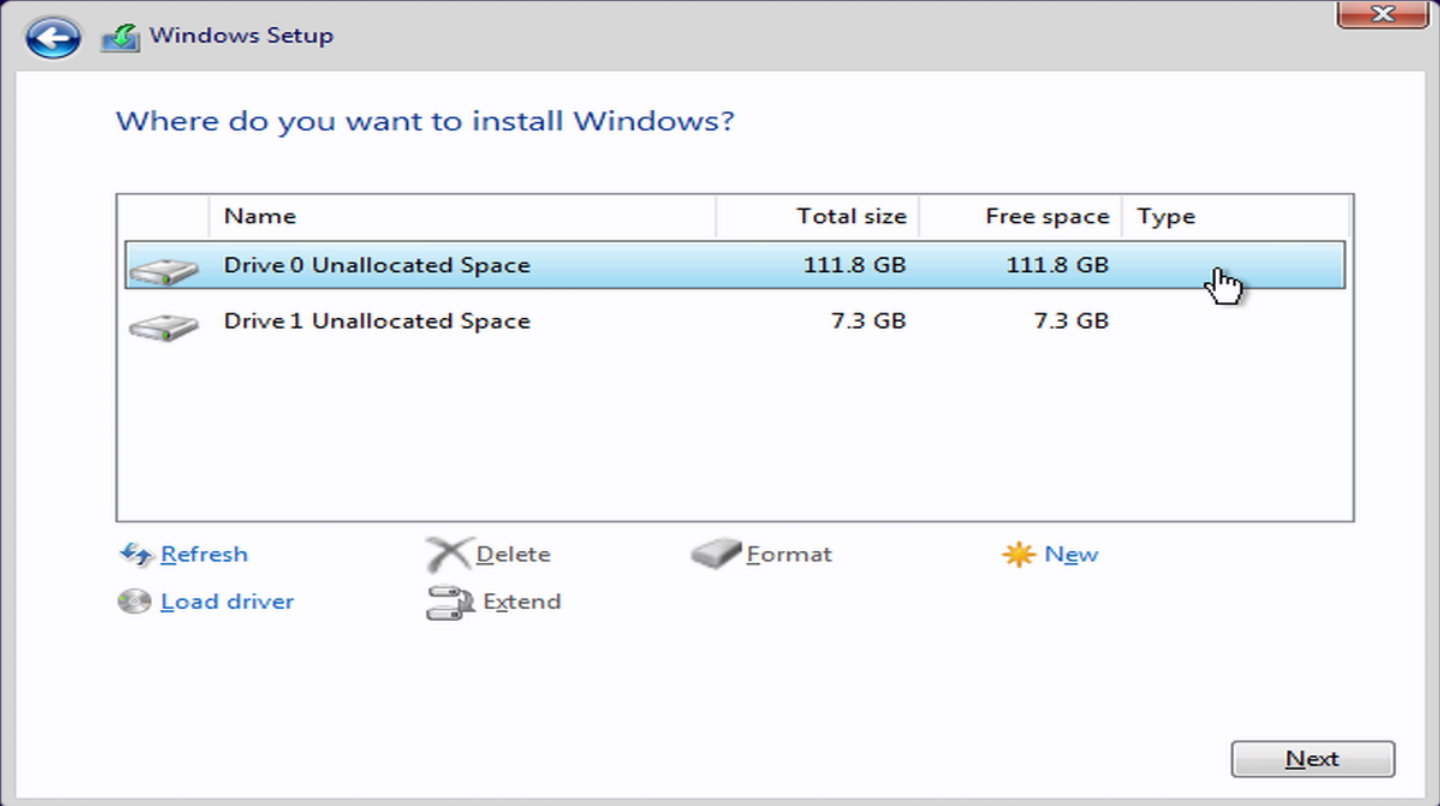
- Select Custom: Install Windows only
- Select a drive
- Verify the destination drive is empty
- Select the drive, then select the delete option to clear the drive.
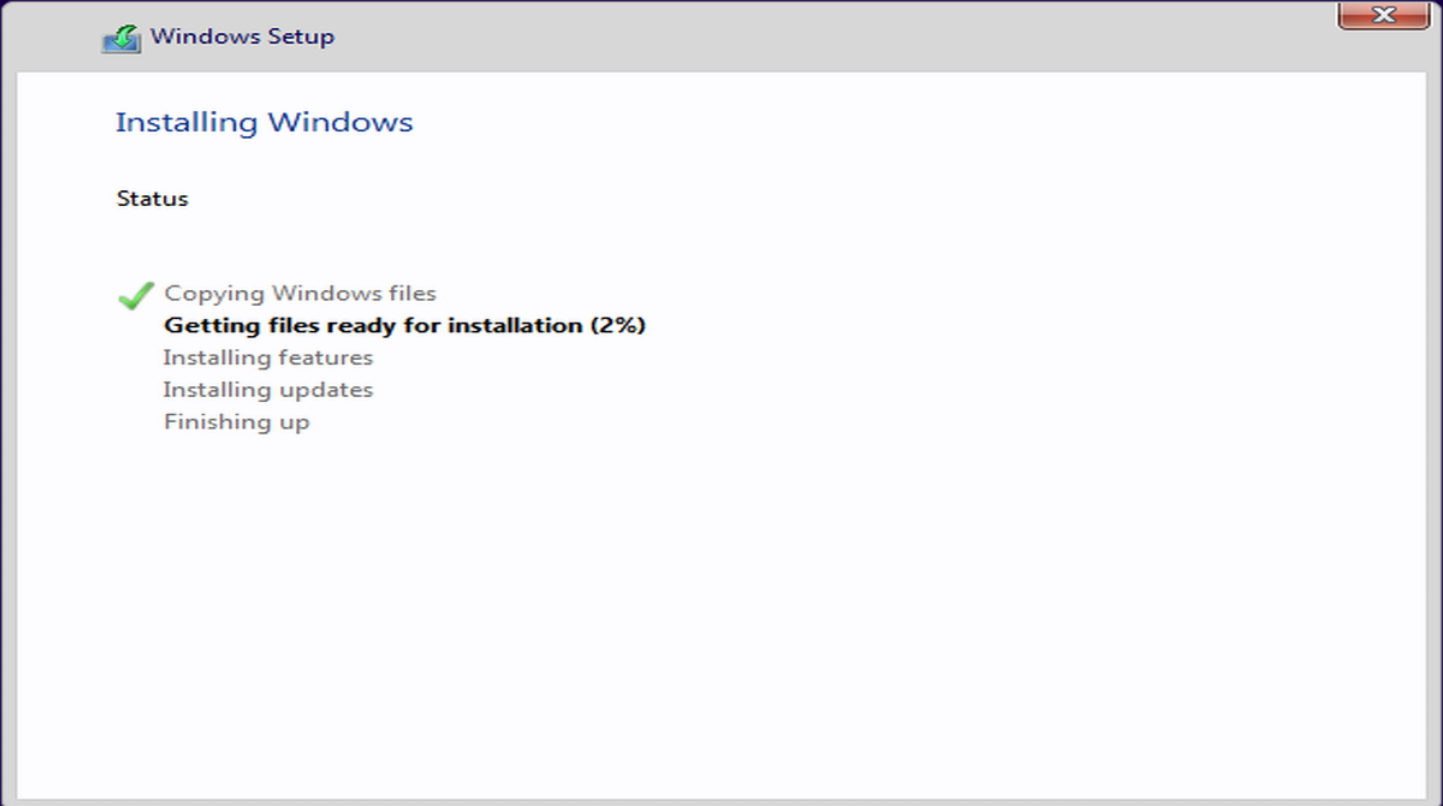
- Wait while Windows 11 installs
- Reboot Vault (will reboot automatically after 10 seconds)
- Select your Country
- Select Keyboard layout
- Connect to network
- Check for updates
- Automatic Reboot again
- Name your Device
- Automatic Reboot
- Set up for Personal, Work, or School use; In this example, we set up for personal use.
- Sign in with your Microsoft account.
It will take a few minutes for Windows 11 to complete the installation, Don’t turn off your PC
Verify that the unit reboots and Windows 11 is displayed
At this point, Windows 11 has been successfully installed, but some units may be missing drivers. You can determine this by opening the Windows Device Manager.
If you are missing some drivers:
Fixing Missing Drivers
Some units might be missing some Intel driver packages that may not be automatically installed by the Windows Installer or via Windows Updates. It is recommended to:
- Download and install all Windows updates, including optional updates
- If you do not have a network connection, you may need to manually install the Intel NIC drivers from this link, and put them on a USB drive to transfer to the Vault.
- The V Series (V12XX, V14XX), VP2430, VP6600 i226V Drivers can be found in the PRO2500>W11 folder in the Intel driver pack
- You can run all Windows Updates to automatically install the 10GbE NIC drivers
- Allow Windows to finalize updates, it may reboot a few times
- Download and utilize Intel's Chipset INF Utility to automatically install all necessary chipset drivers (Link Available Here)
- Download and utilize Intel's Driver & Support Assistant to verify the Vault has all Intel drivers up-to-date (Link Available Here)
If you notice any other missing drivers, they may be linked to Intel ME, which can be downloaded here
Windows 11 Compatibility
| Vault | AMI | coreboot |
|---|---|---|
| FW2B | Tested | Fail (UEFI only) |
| FW4B | Tested | Fail (UEFI only) |
| FW4C | Tested | Tested |
| FW6A | Tested | Fail (UEFI only) |
| FW6Br2 | Tested | Fail (UEFI only) |
| FW6D | Tested | Fail (UEFI only) |
| FW6E | Tested | Fail (UEFI only) |
| VP2410 | Tested | Tested |
| VP2420 | Tested | Tested |
| VP4630 | Tested | Tested |
| VP4650 | Tested | Tested |
| VP4670 | Tested | Tested (requires newest coreboot version) |
| VP66XX | Tested | TBD |
| V Series | Tested | TBD |
Network Settings
You will see all network adapters in Network & internet advanced settings or Control Panel > Network and Internet > Network Connections
There is a minor discrepancy with the interface names, Windows arbitrarily names the network ports. Be vigilant while connecting the Ethernet cables.
If you experience any issues, please feel free to reach out to: support@protectli.com.