Looking for a Specific Topic?

How to Configure a Proton VPN Connection on OPNsense 25.1 with a Protectli Vault

Print

Introduction

Proton VPN is a subscription based, privacy-focused Virtual Private Network (VPN) service developed by the team behind ProtonMail, known for their emphasis on security and data protection. It allows users to encrypt their internet traffic and route it through secure servers in various countries, helping to safeguard online activity from surveillance, tracking, or region-based restrictions. 

While Proton VPN offers user-friendly apps for Windows, macOS, Linux, and mobile platforms, it also supports manual configurations on operating systems like OPNsense. By setting up a VPN tunnel within OPNsense, you can secure the internet connection of your entire network, or specific interfaces, without needing to install software on each device individually. This provides a lot more customizability and it's way more fun to do it yourself then just relying on a downloadable client!

This article will go over the steps required to use a Proton VPN connection on OPNsense 25.1 with a Protectli Vault Pro VP2430, but if you're reading this after a newer version of OPNsense has released, or using different hardware, the same process should effectively be the same.

Step 1. Create a Proton VPN Account!

This is the easiest part… go to https://protonvpn.com/ and either create an account, or click on the "Get Proton VPN" button to view subscription plans. If you immediately go to purchase a subscription plan, an account will be created during the checkout process. Make sure to use a secure password and never share this info with anyone.

These are the prices and plans available as of May 2025. If the current prices are higher when you're reading this, don't get mad at us! We have nothing to do with it, man.

Step 2. Make Sure You Have OPNsense Installed and Ready

To reiterate, this article is on how to configure a Proton VPN connection on OPNsense, so we are assuming you have OPNsense installed on a Protectli Vault product or some other device. If you do not, you can follow our guide on how to install OPNsense on a Protectli Vault. If you have no idea what OPNsense is, it is an open-source, highly customizable firewall and routing platform based on FreeBSD. 

Once you have OPNsense installed, or if you already have it running on your network, you can access the web GUI in a browser on a computer connected to your OPNsense machine's LAN port. By default this is 192.168.1.1, but if you already had OPNsense installed you may have already changed this default LAN port IP address.

When accessing the Web GUI, you may get a warning about a potential security risk, but this is expected. On most browsers there will be an option to continue regardless. You should then see the OPNsense login screen.

Step 3. Confirm that the Wireguard Plugin is Installed on OPNsense

With a default install of OPNsense 25.1, Wireguard should already be available and installed by default. Let's just double check that you can see the following option on the WebGUI:

Go to the VPN tab on the left side of the screen and verify you see "Wireguard" as an option when you click on it. If you do not see it, you must go to System > Firmware > Plugins and download it from there. You may also want to update OPNsense completely.

Step 4. Return to the Proton VPN Website

We will now be setting up the Wireguard configuration on Proton VPN's website.

  • Head to https://account.protonvpn.com/downloads
  • Scroll down to the "Wireguard configuration" section
  •  Give a name to the config, this can be whatever you want
  • Choose "Router" for the "Select platform" section

The third option for "Select VPN options" will vary depending on what you want to accomplish.

For the sake of this tutorial, we are going to choose "Block malware, ads and trackers" and will choose the "VPN Accelerator" option. Information on the Moderate NAT and NAT-PMP options can be found on Proton's documentation, you can choose these if they seem important to you.

(The moderate NAT option might trigger some flashbacks for those of you who were gaming on a console in the Xbox 360 and PS3 days)

The fourth option allows you to either manually select a server location, or you can have Proton use the "best server according to current load and position" – which may offer more optimal performance. You can also either select a Standard server config or Secure Core config. 

For the sake of this tutorial, we will use a standard server in Japan, but you should actually pick what you want! The overall setup instructions won't really change based on the server you select.

Standard Server Configuration:

  • Your traffic is routed directly to a Proton VPN server in the country you choose.
  • It’s fast and efficient
  • Example: You connect directly to a server in the U.S., and your IP address reflects that.

Secure Core Configuration:

  • Your traffic is first routed through a Secure Core server in a privacy-respecting country (like Switzerland, Iceland, or Sweden), then exits through a second VPN server in your chosen location.
  • This adds an extra layer of protection in case the exit server is compromised, particularly in high-risk countries.
  • More secure, but usually slower than standard connections due to the extra hop.

Use Standard for speed and general use.

Use Secure Core if you're worried about surveillance or attacks on VPN endpoints, especially in hostile environments.

  • Choose either "Standard server configs" or "Secure Core configs"
  • Either hit the purple colored "Create" button for Proton to automatically pick a server, OR scroll down to a specific country, click on it, and choose the "Create" button next to the server you want to connect to

Once you click the create button, a small pop-up screen will show with the full configuration alongside a generated private key. Make sure to download this and store it somewhere secure, you'll need it later.

Step 5. Configuring on OPNsense Web GUI

Alright, great! We have the configuration ready to go, now we just need to set it up on OPNsense.

  • Go back to your OPNsense Web GUI in your browser, login if you have not already
  • Go to VPN > Wireguard > Instances
  • Click on the (+) sign to add a new instance
  • Toggle the "advanced mode" on
  • Make sure the first option, "Enabled" is indeed enabled
  • Name this whatever you want
    • We named it Protectli_Proton_VPN
      • You cannot use spaces
  • Leave the Public key blank
  • Copy the Private Key from the Proton Wireguard Config file we downloaded in Step 4 
  • You can set the "Listen port" to 51820
  • You can set the MTU to 1420 (80 bytes shorter than the normal MTU), but you may have to make this something else if you have manually changed the MTUs previously (if you don't know what this means, just put 1420)
  • Set the "DNS Server" to the DNS provided in the Proton Wireguard Config file we downloaded in Step 4 (In the config file, it is the one that says "DNS =" found underneath the PrivateKey)
    • For example, ours was 10.2.0.1
  • Set the "Tunnel Address" to the Address provided in the Proton Wireguard Config file we downloaded in Step 4 (In the config file, it is the one that says "Address = " found right under the PrivateKey.
    • For example, ours was 10.2.0.2/32
  • Ignore the "Depend on (CARP)" options leave it as "None"
  • Ignore the "Peers" for now, we will come back to that later
  • Check the option for "Disable routes"
  • Set the "Gateway" as the one address above the Tunnel Address
    • In our example, it would be 10.2.0.3
  • Click the "Save" button then click the "Apply" button afterwards.

We're almost there. Now you will want to navigate to VPN > WireGuard > Settings > Peers.

  • Make sure you are on the "Peers" tab, then click the (+) sign to edit the peer
  • In the new window that pops up:
  • Make sure the "Enabled" option is enabled
  • Name this whatever you want
    • Example: we did Proton_Protectli_VPN_Peer
  • For Public Key, enter the "PublicKey" value found in the Wireguard Proton VPN config file we downloaded in Step 4.
  •  For the "Pre-shared key", leave it blank
  • For "Allowed IPs", use 0.0.0.0/0
  • For "Endpoint Address", use the "Endpoint" IP found in the Wireguard Config File. It is found right below the PublicKey.
    • Just use the IP, not the port
      • For example, if your Endpoint was 102.120.200.15:51820, just use the IP (102.120.200.15) and don't include the :51820
  • For "Endpoint Port", use the port that is at the end of that Endpoint IP
    • In most cases it is probably 51820
  • For "Instances", use the Instance we created just a bit ago
    • In our example, it was Protectli_Proton_VPN
  • For "Keepalive interval", we can just use 25.
  • Save and then Apply the settings
  • Right above the "Apply" button, make sure to check the box for "Enable Wireguard"
  • Hit the "Apply"  button again for good measure

Step 6. Enabling Interface and Setting up Rules

We're getting there. We now have to enable the Wireguard interface, setup some rules to allow traffic to pass, and then we should be golden. The following steps will assume you are setting up the VPN connection on your LAN interface. If you want to set it up on a different interface, just change anything that directly mentions LAN or the LAN's subnet to whatever other OPT interface and OPT interface subnet you plan on using. Please make sure that the interface you want to set the VPN up on has already been setup ahead of time and works as expected in regards to passing traffic and whatnot.

  • On the OPNsense Web GUI, navigate to Interfaces > Assignments
  • Under the "+ Assign a new interface" section, click the dropdown to select the WireGuard interface, click on "Add"
  • Click on "Save"


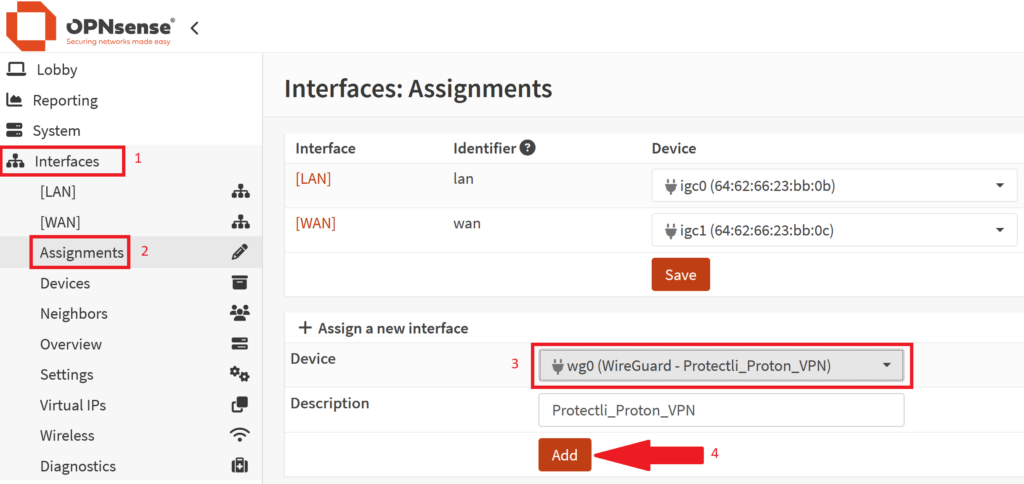
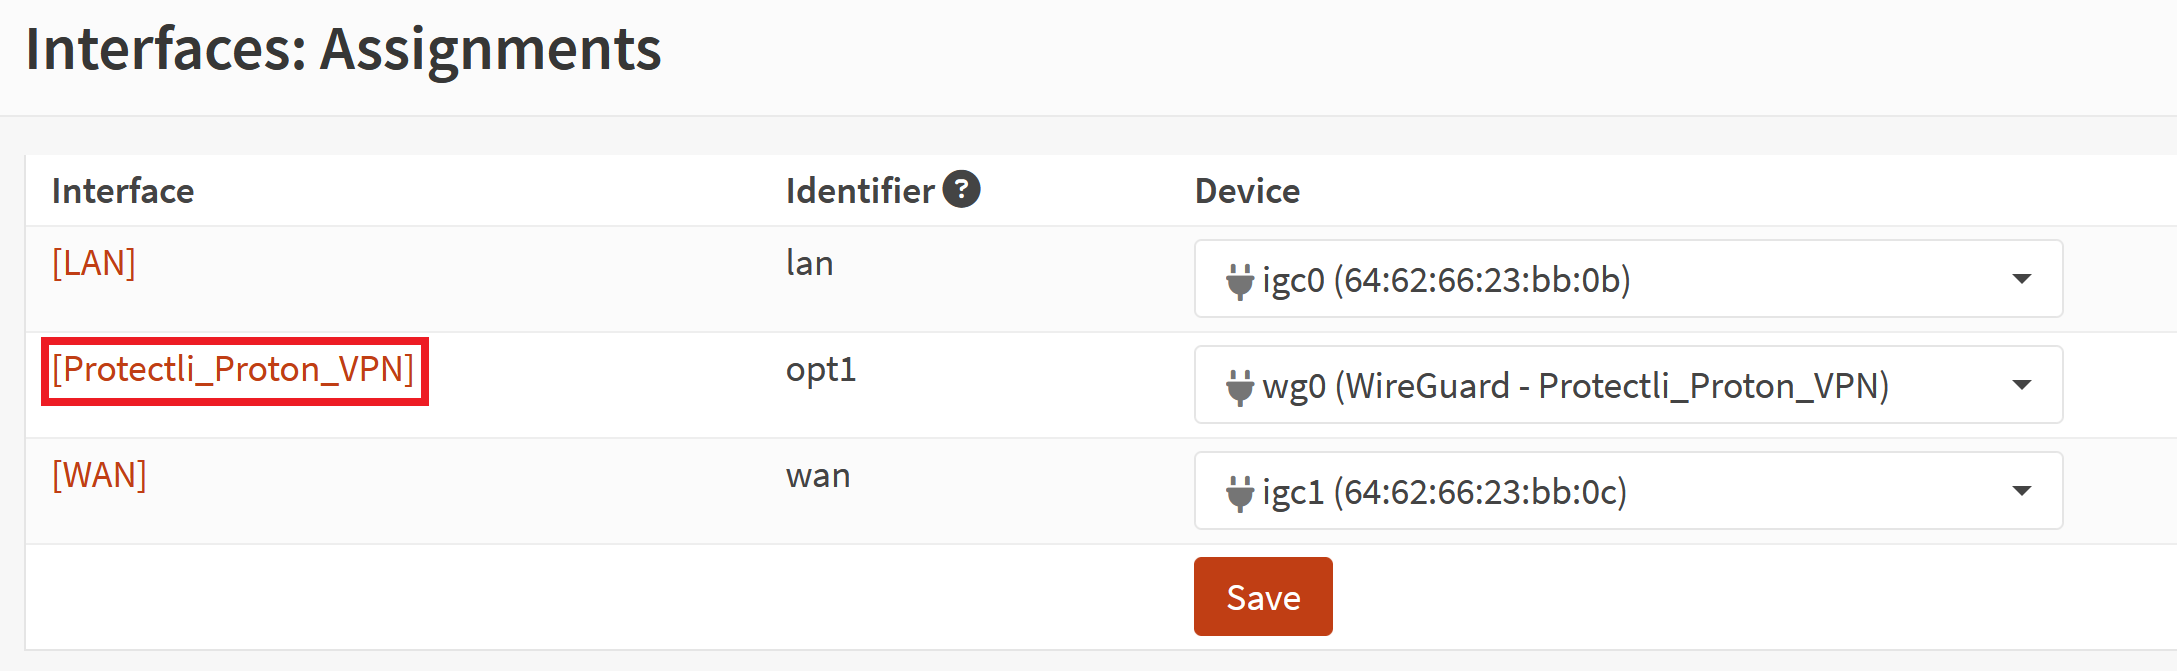
  • You should now see a Interface that is designated as "wg0 (WireGuard – "Whatever Name You Set")
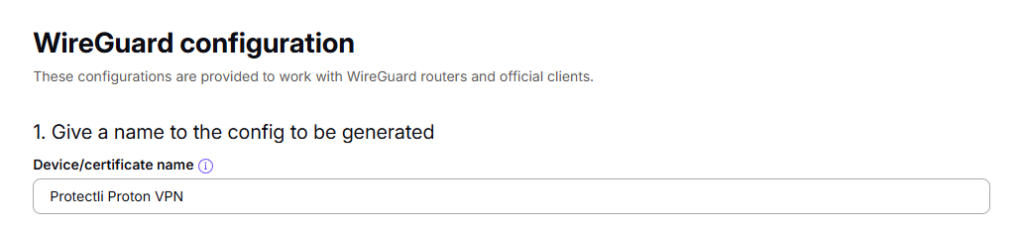
  • Click on the name of the interface, in our example it is [Protectli_Proton_VPN]
  • You will be taken to another menu
  • Click the check box for "Enable Interface"
  • Scroll down and hit the "Save" button
  • Press the "Apply changes" button
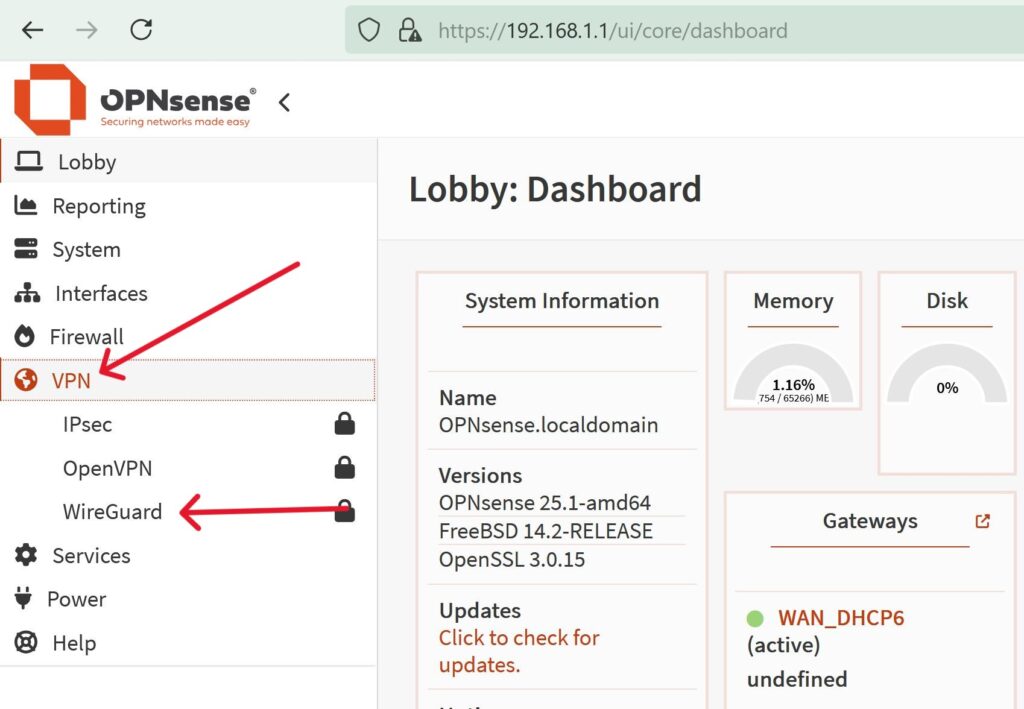
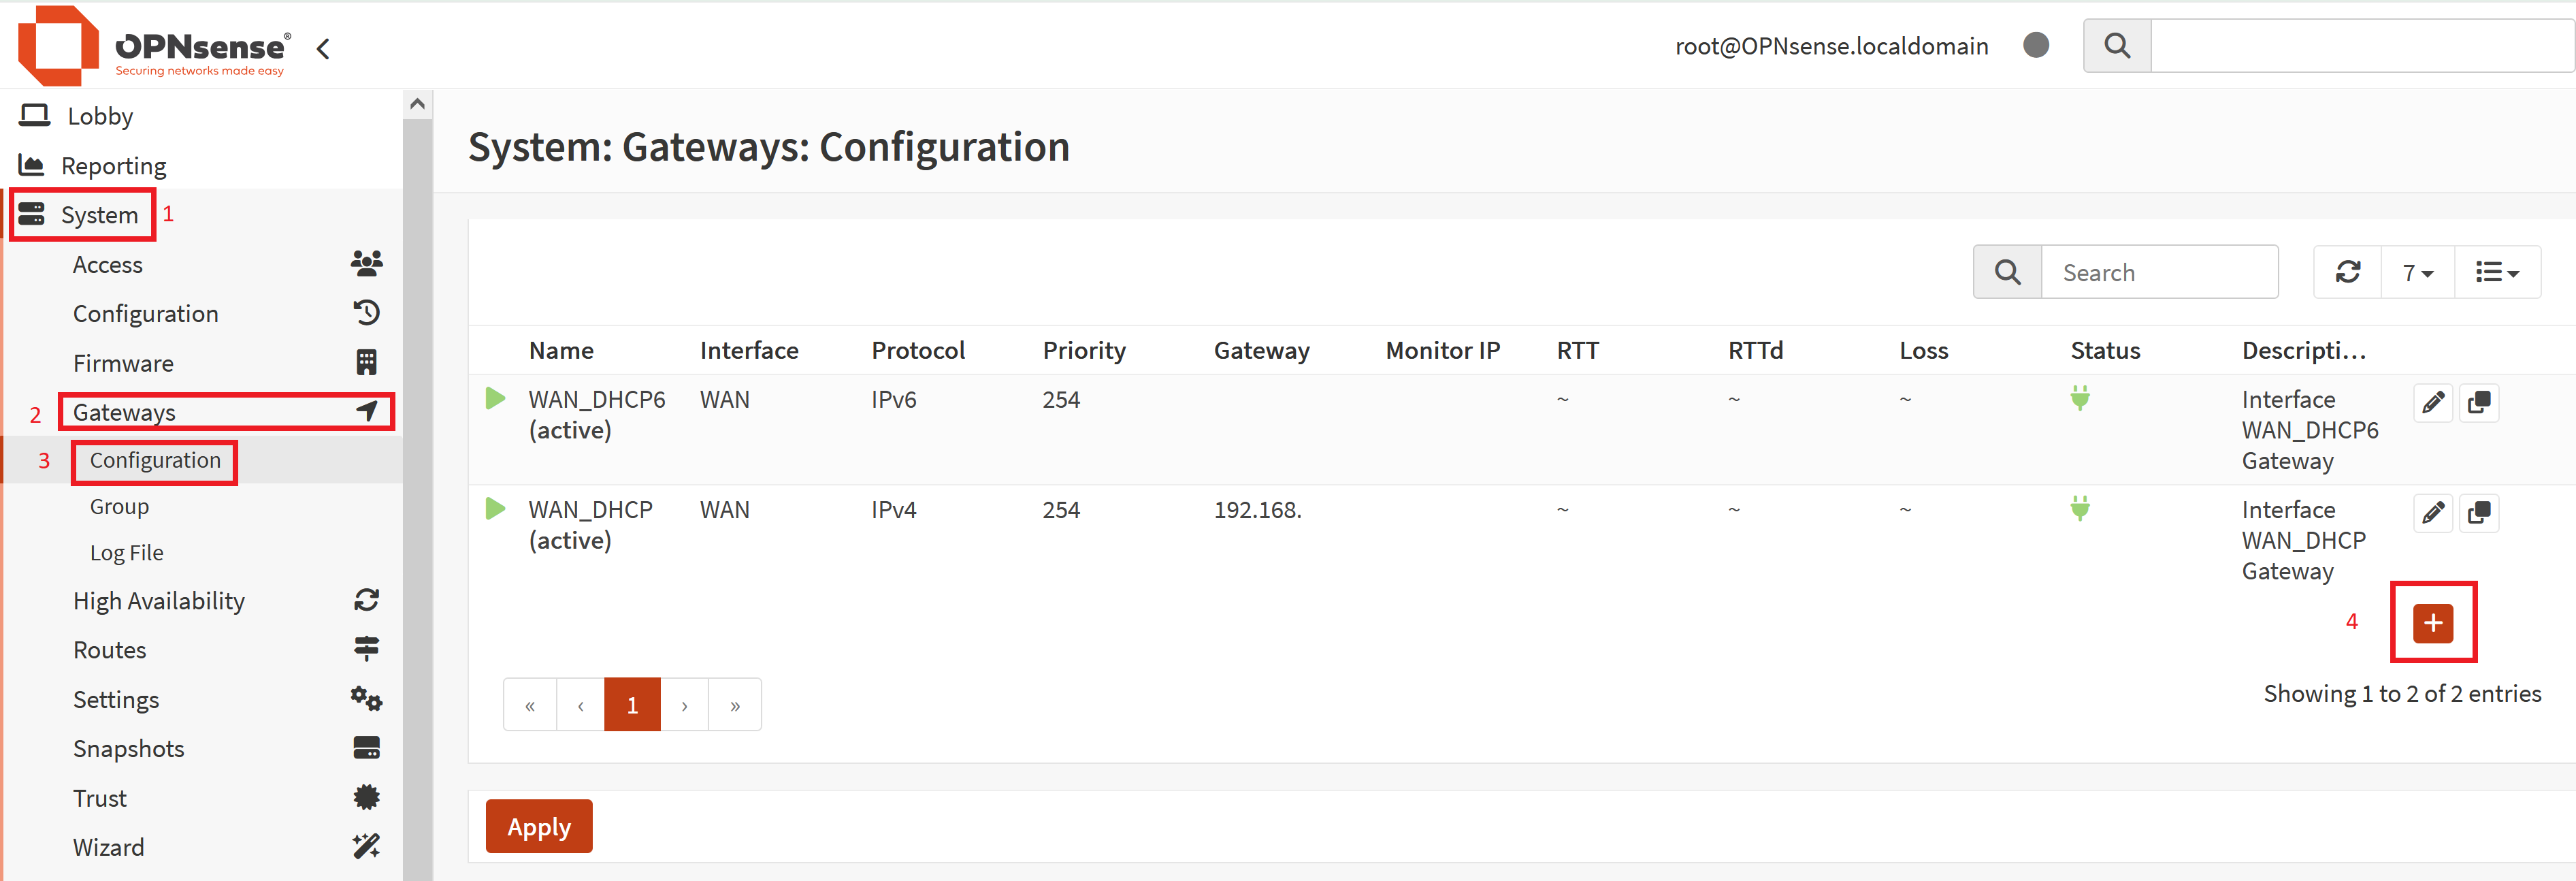
  •  Now, in the OPNsense Web GUI, go to System > Gateways > Configuration
  • Click on the "+" icon to add a gateway
  • A new menu will pop up
  • For "Name" enter something that will remind you of what this is
    • We are going to use Proton_VPN_Japan so we remember that this is for our Japanese VPN connection
  • Enter a Description if desired
  • For the "Interface" select the Wireguard Interface we enabled just a few moments ago
    • Our's is called "Protectli_Proton_VPN"
  • For "IP Address" enter the Endpoint IP that is provided in the Proton Wireguard config
    • Don't include the port number, similar to what was explained in Step 5.
  • Check the box for "Far Gateway"
  • Uncheck (remove) the option for "Disable Gateway Monitoring" if it is already enabled
  • For "Monitor IP", set this as the Endpoint IP address that you just entered for IP Address a few moments ago
  • You don't have to change anything else, Save settings and Apply

Moving on, now we will set up two Firewall Alias.

  • Go to Firewall > Aliases on the OPNsense Web GUI
  • Click on the (+) sign to add a new Alias
  • Make sure it is Enabled
  • Name this something that will make sense to you for this VPN connection
    • We will name it Japan_VPN_Alias
  • For "Type" we will set it to "Network(s)" so it will affect the entire LAN network
  • For "Content", input your LAN subnet in CIDR notion
    • The default OPNsense LAN is 192.168.1.1/24, but your LAN may be different if you ever changed it
    • For example, our LAN interface is 192.168.180.1/24, so that's what we are using
  • Save & Apply

Now we will set up another alias tied to private IP addresses on the local network. This is required.

  •  Add (+) another Alias
  • Let's Name it RFC1918
  • Check the "Enabled" box if it is not already
  • Set "Type" to "Network(s)"
  • For content, enter 192.168.0.0/16, 18.0.0.0/8, and 172.16.0.0/12
  • Save & Apply!

Firewall rule time. 

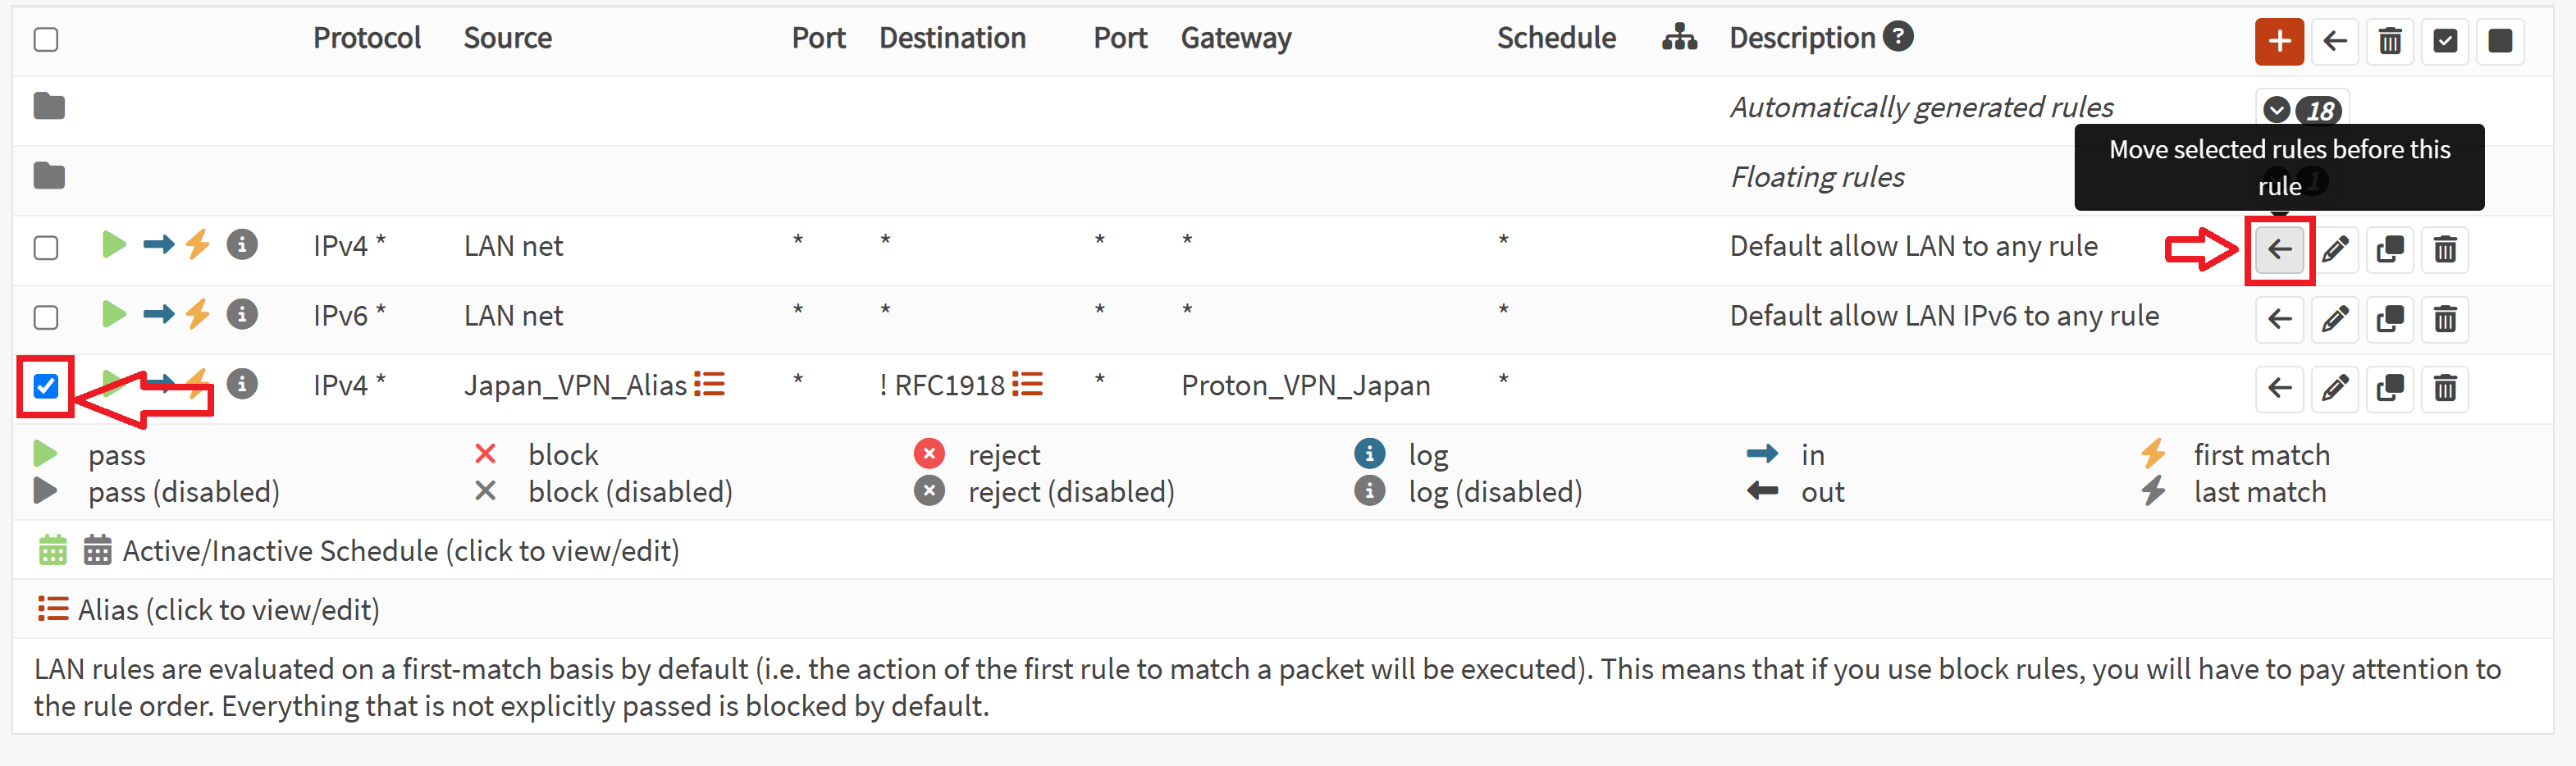
  • Go to Firewall > Rules > LAN
  • Add (+) a new rule
  •  Make sure "Action" is "Pass"
  • Interface should be "LAN"
  • Change "Source" to the Alias we set for your LAN earlier.
    • Ours was named "Japan_VPN_Alias"
  • Make sure "Destination/Invert" is checked!
  • Make the "Destination" the RF1918 Alias we made just moments ago
  • Set "Gateway" to the Gateway we setup for the VPN
    • Ours was named Proton_VPN_Japan
  • Save
  • Check the box next to the rule we just made and then click the left arrow button on the top Default allow LAN rule to move the rule we just created at the very top of the list. This is important.
  • Apply changes

Now we will make a Floating Firewall rule.

  • Go to Firewall > Rules > Floating
  • Click the (+) icon to add a new one
  • "Action" is "Pass"
  • Make sure "Quick" is NOT checked (disabled)
  • "Interface" can be left blank
  • "Source" is going to be the VPN interface's address option that is found towards the bottom of the dropdown
    • Ours is called Protectli_Proton_VPN address
  • "Destination" is going to be the VPN Interface's network that is also found towards the bottom of the drop down
    • Ours is called Protectli_Proton_VPN net
  • "Gateway" is going to be the VPN Gateway we setup earlier
    • Ours is called "Proton_VPN_Japan"
  • Click the "Show/Hide" button
  • Enable "allow options"
    • This may not be required, but this particular step is included in OPNsense's setup doc
  • Save & Apply

I know I keep saying it, but I swear we are almost done. Just trying to keep you motivated. Now we create an outbound NAT rule.

  • Go to Firewall > NAT > Outbound
  • Choose the button for "Hybrid outbound NAT rule generation"
  • "Save"
  • Click the (+) under the Manual rules to add a new manual rule
  • Set "Interface" as the Wireguard VPN interface
    • Ours is called Protectli_Proton_VPN
  • Set "Source Address" as the Wireguard VPN network that is found towards the bottom of the dropdown
    • Ours is called "Protectli_Proton_VPN net"
  • "Destination address" and "port" will be "any"
  • Translation/target is "Interface address"
  • Give it a description if desired

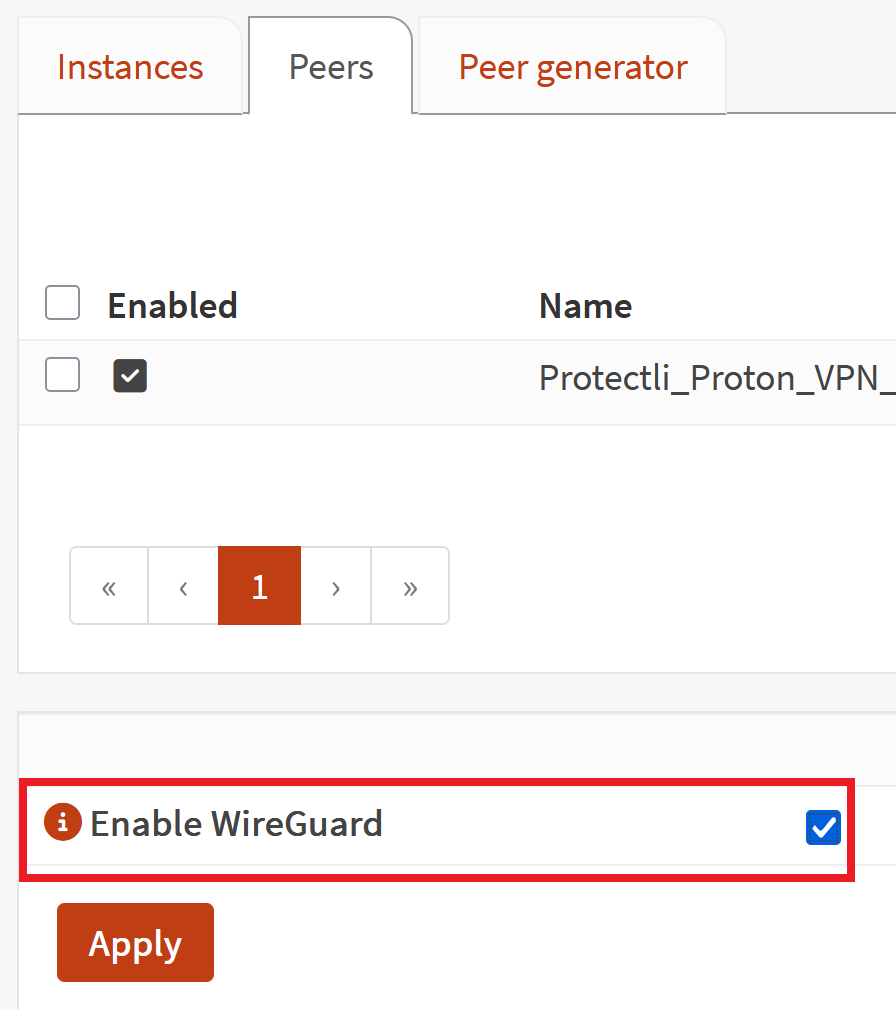
At this point you should be good to go. I'd recommend making sure the Wireguard interface is enabled at VPN>Wireguard>Instances (or Peers). You may need to disable it, save, and enable it again.

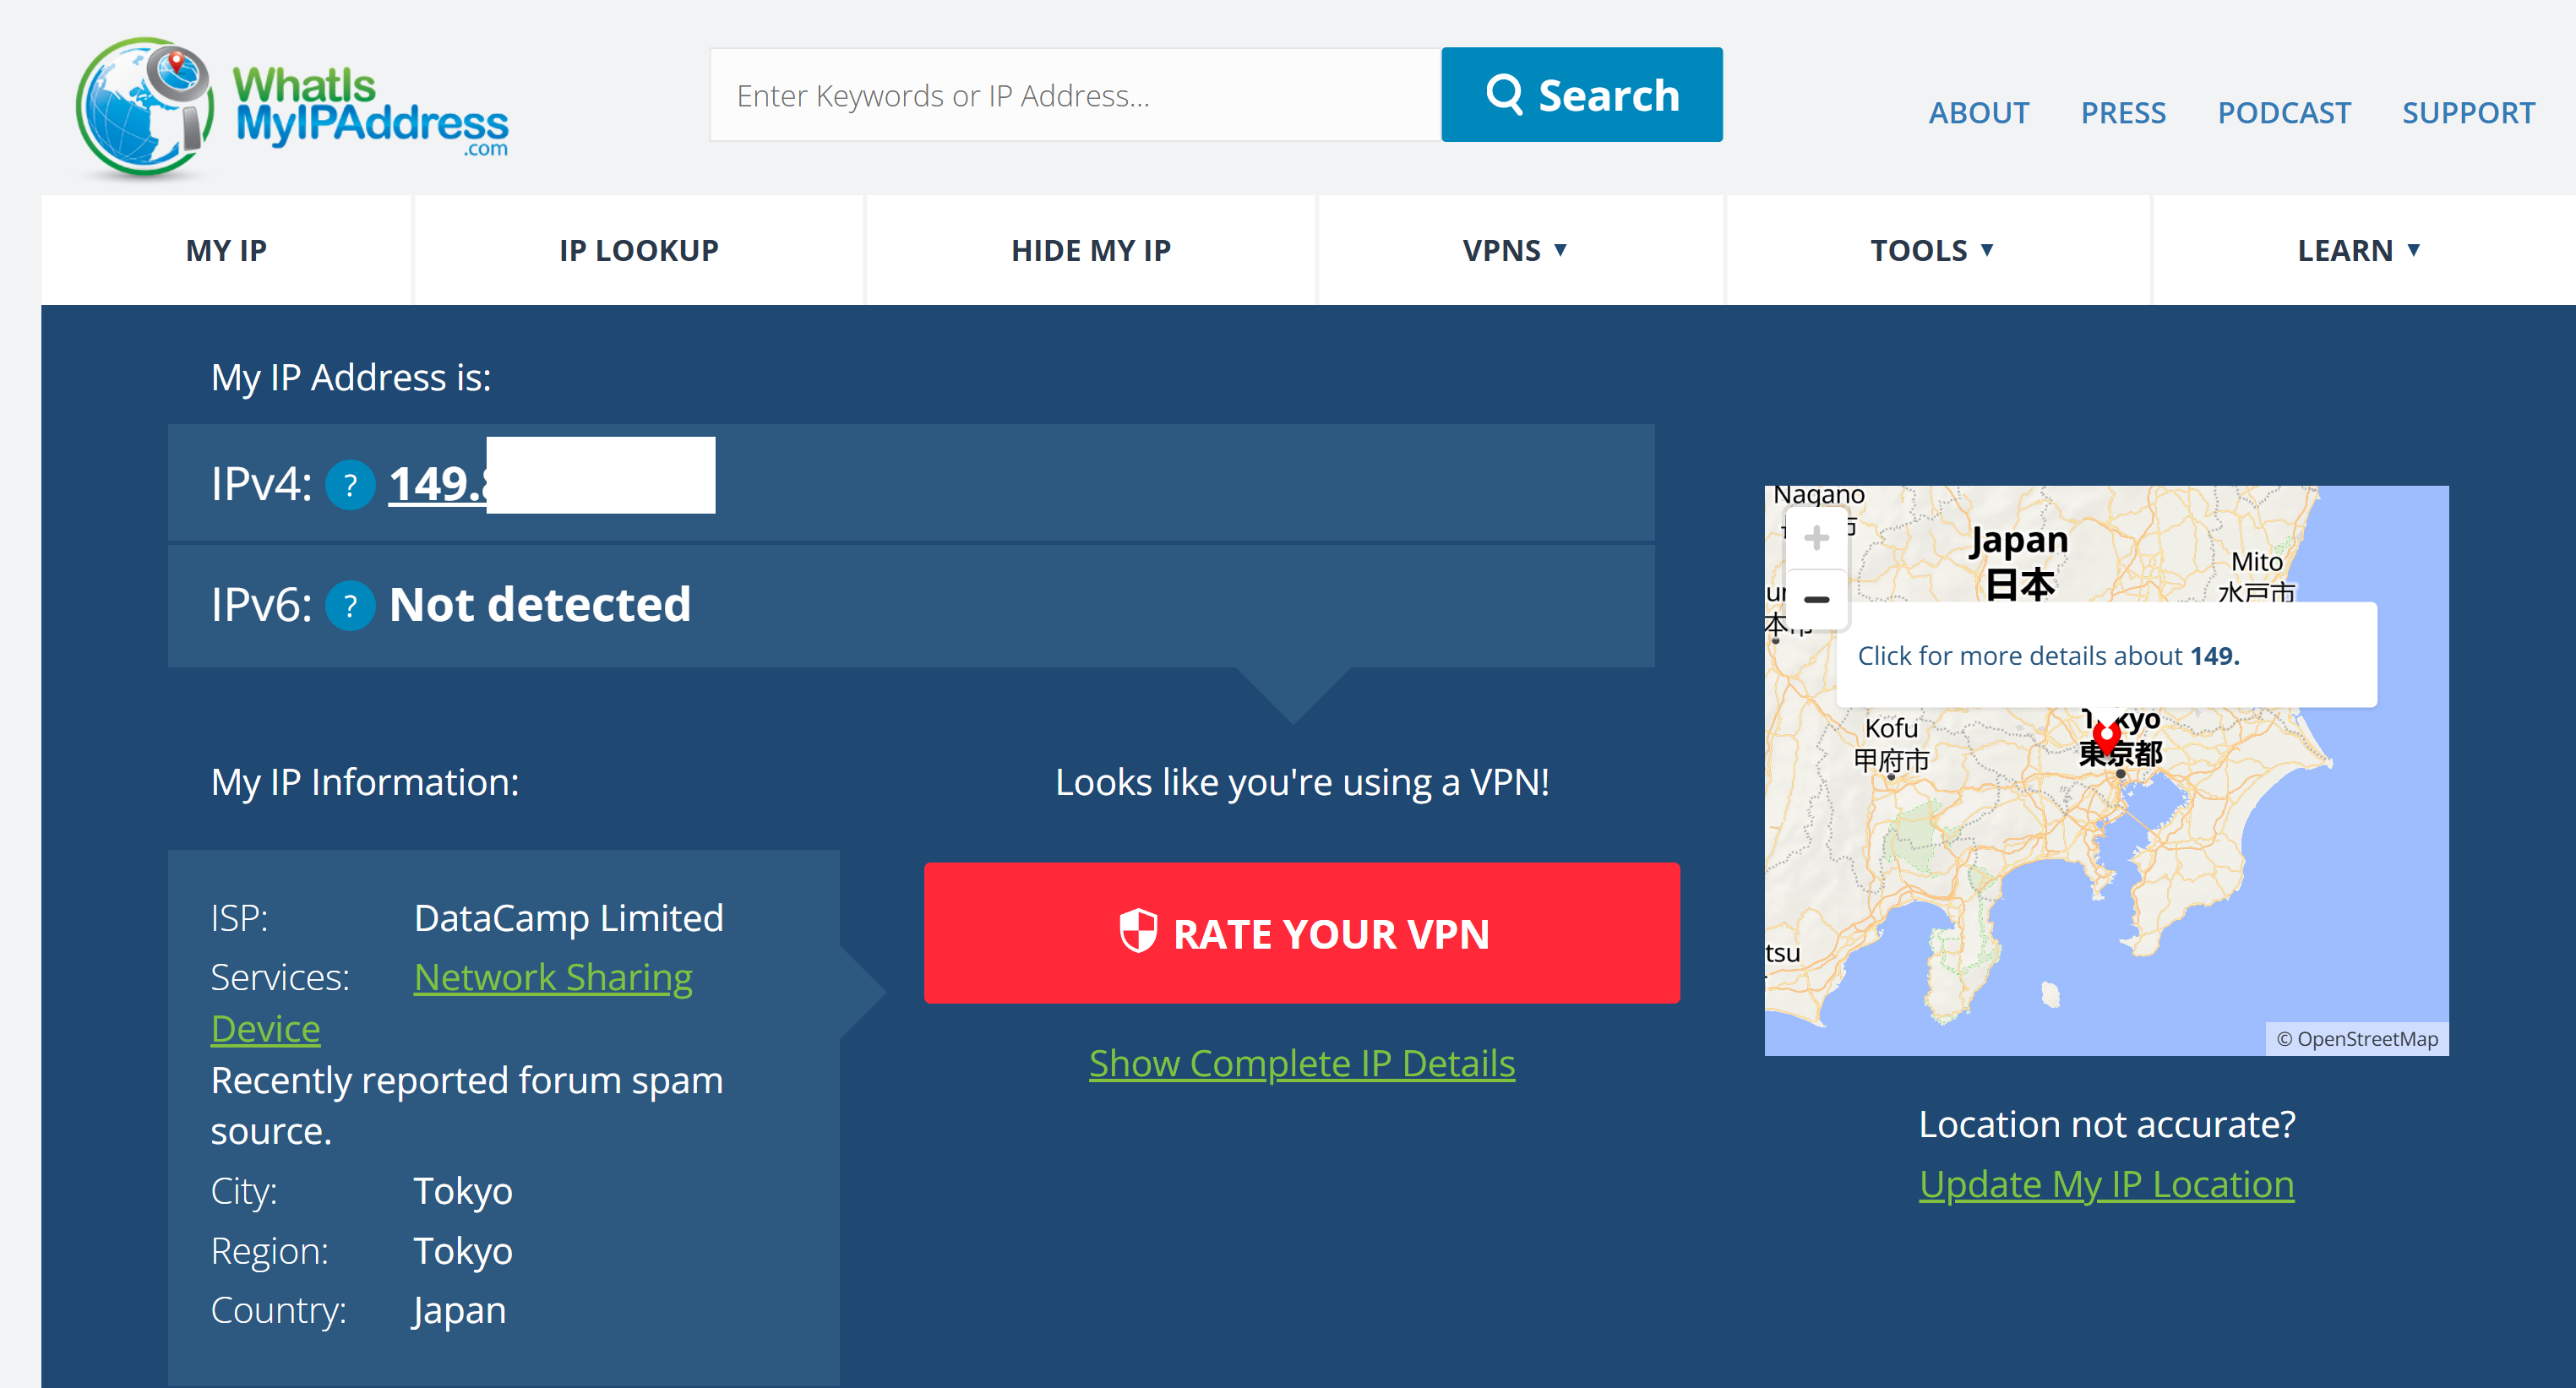
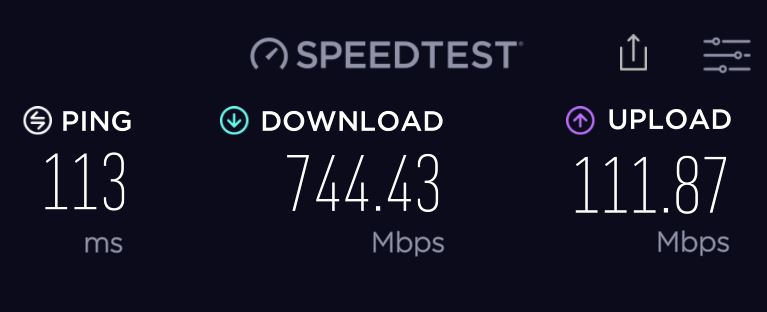
If you check out whatismyipaddress.com, you should see that you have a different public IP address then what your ISP gives you, and the map should show you in a different location. After configuring this VPN connection on a Vault Pro VP2430, we were getting over 700Mbps download speed through the VPN all the way from Vista, California to Tokyo, Japan!

Conclusion

If this setup isn't working for you, I hate to say it, but just go back through every step and make sure you entered everything correctly. Make sure you are using the correct IPs, private key, public key, etc, from your config file. Perhaps try restarting OPNsense one time for good measure. Please take into consideration all the other hardware that is on your network that could be affecting anything.

As mentioned earlier, we are not associated with Proton VPN, so please route your technical configuration issues to them directly. However, if you do need to reach out to us for some other Protectli hardware-related reason, feel free to. Check out our Contact page for more info. 

Table of Contents