Looking for a Specific Topic?
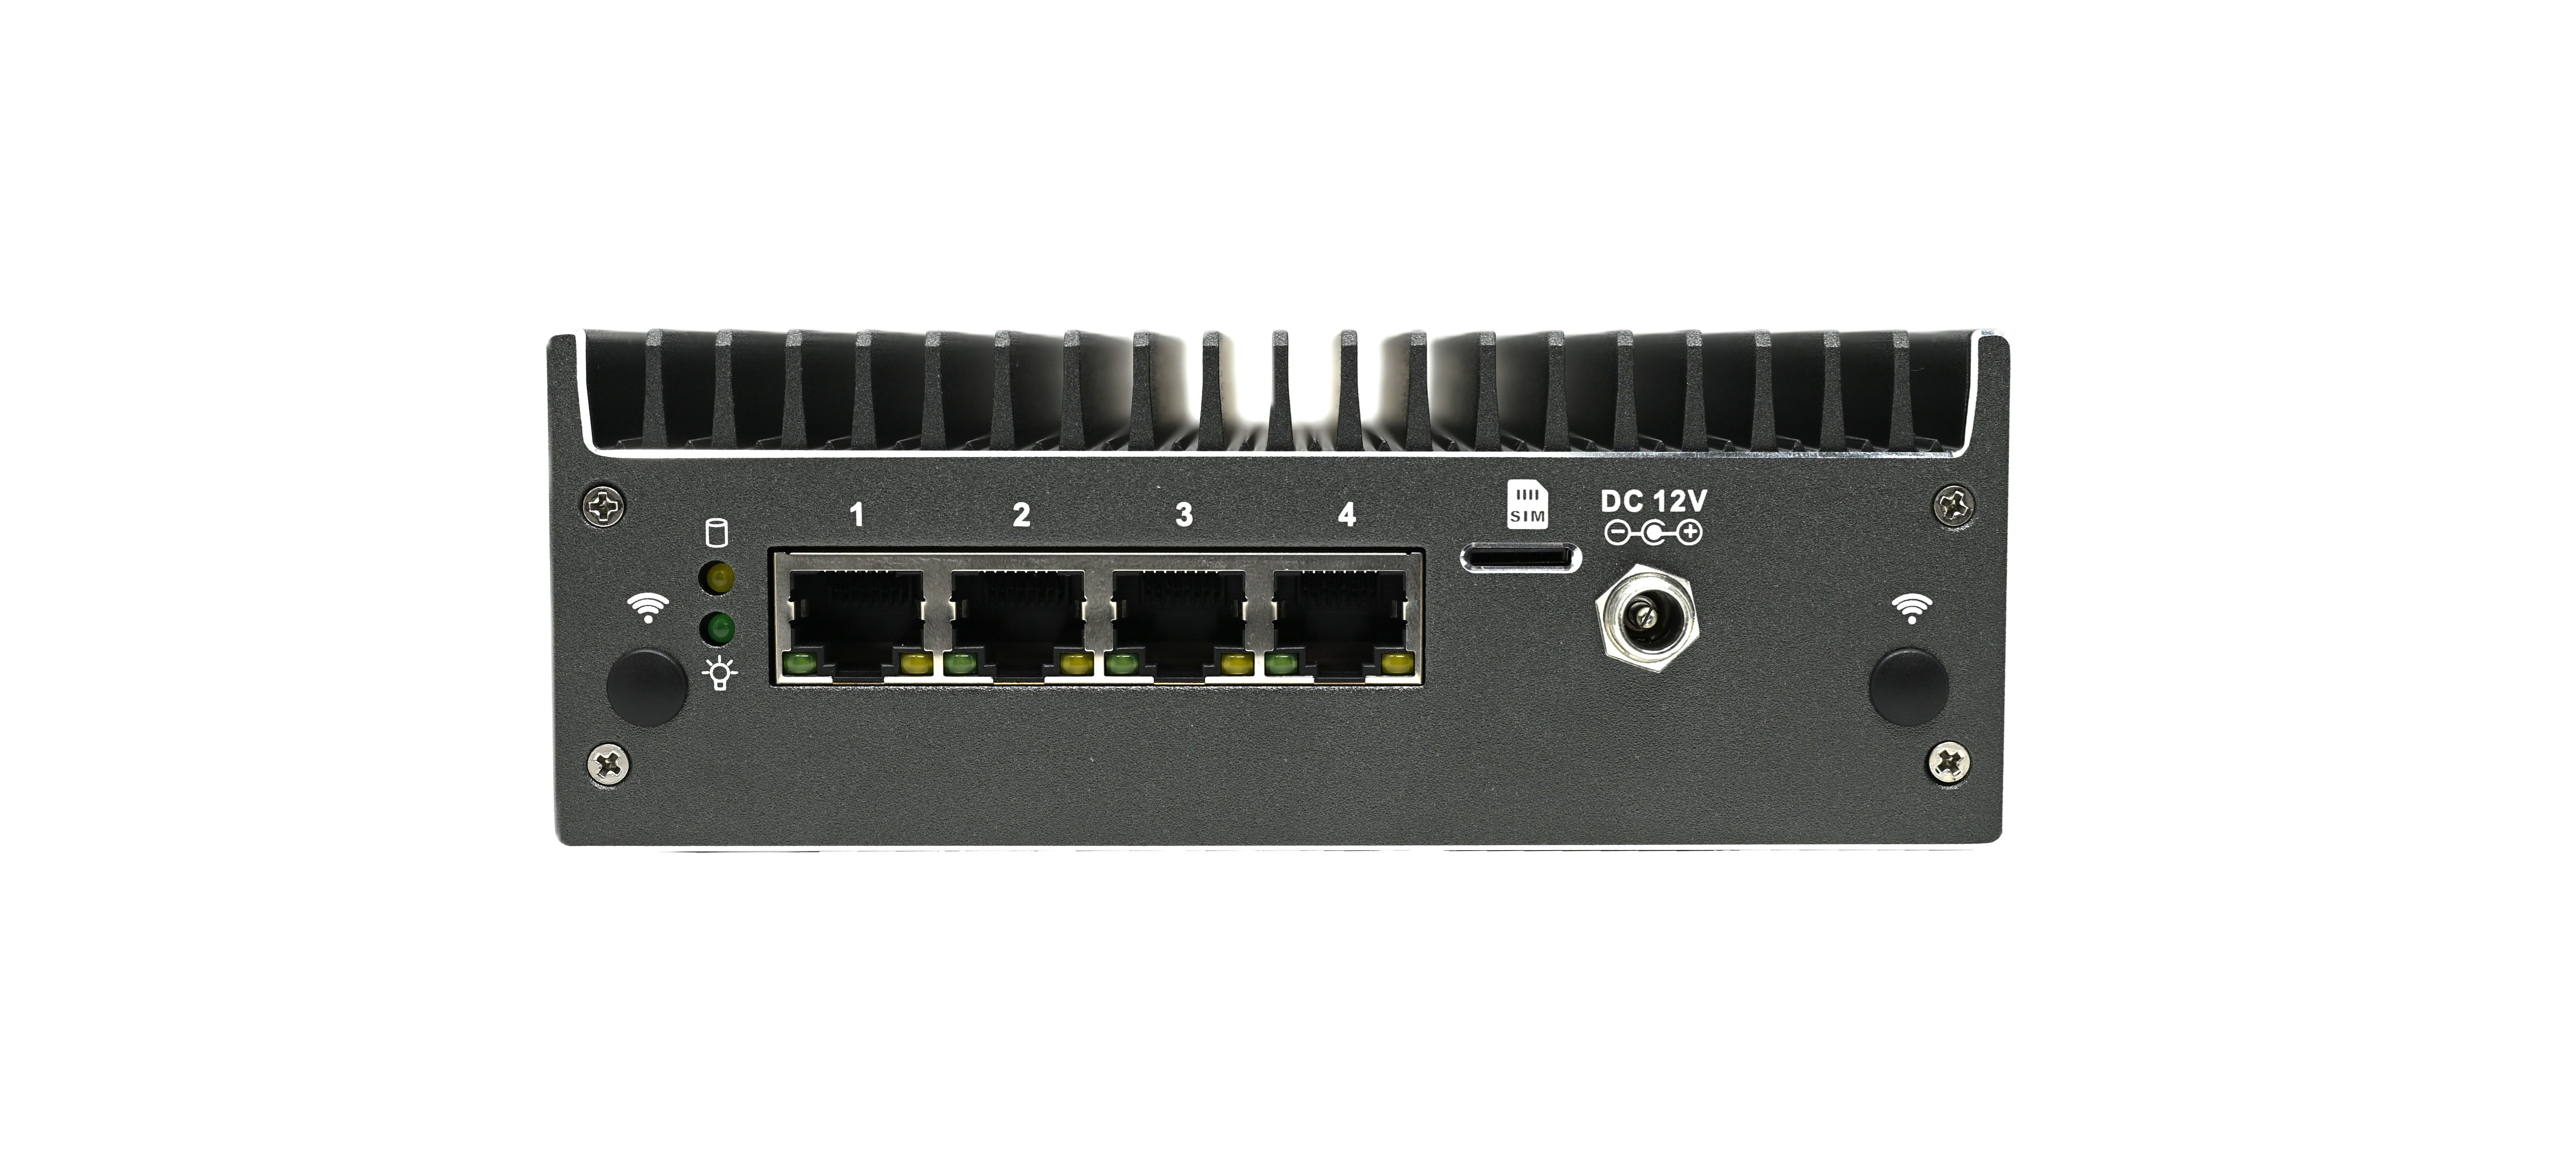
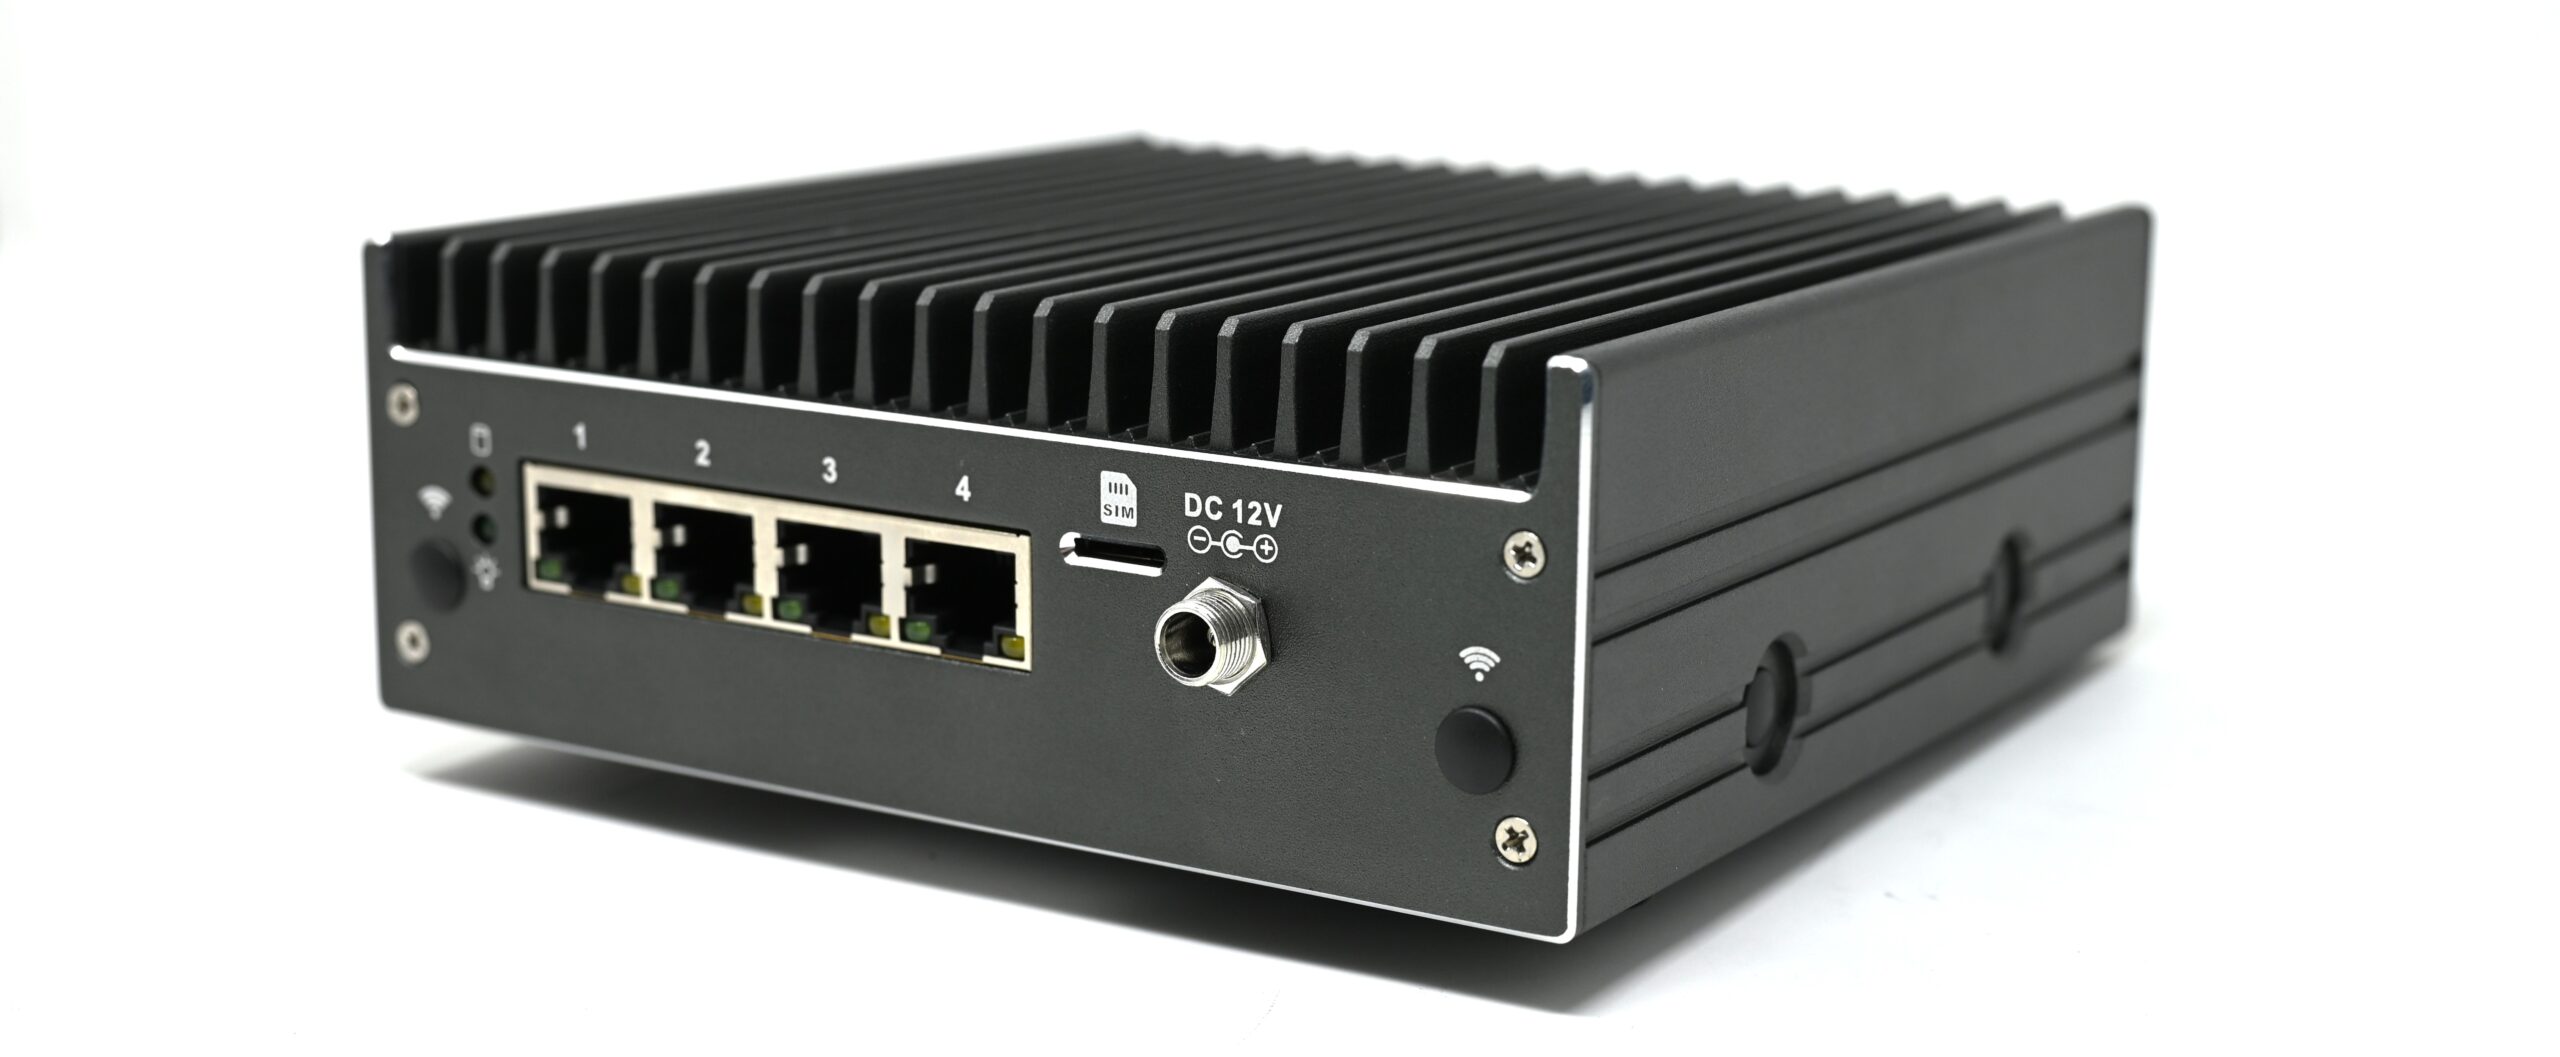
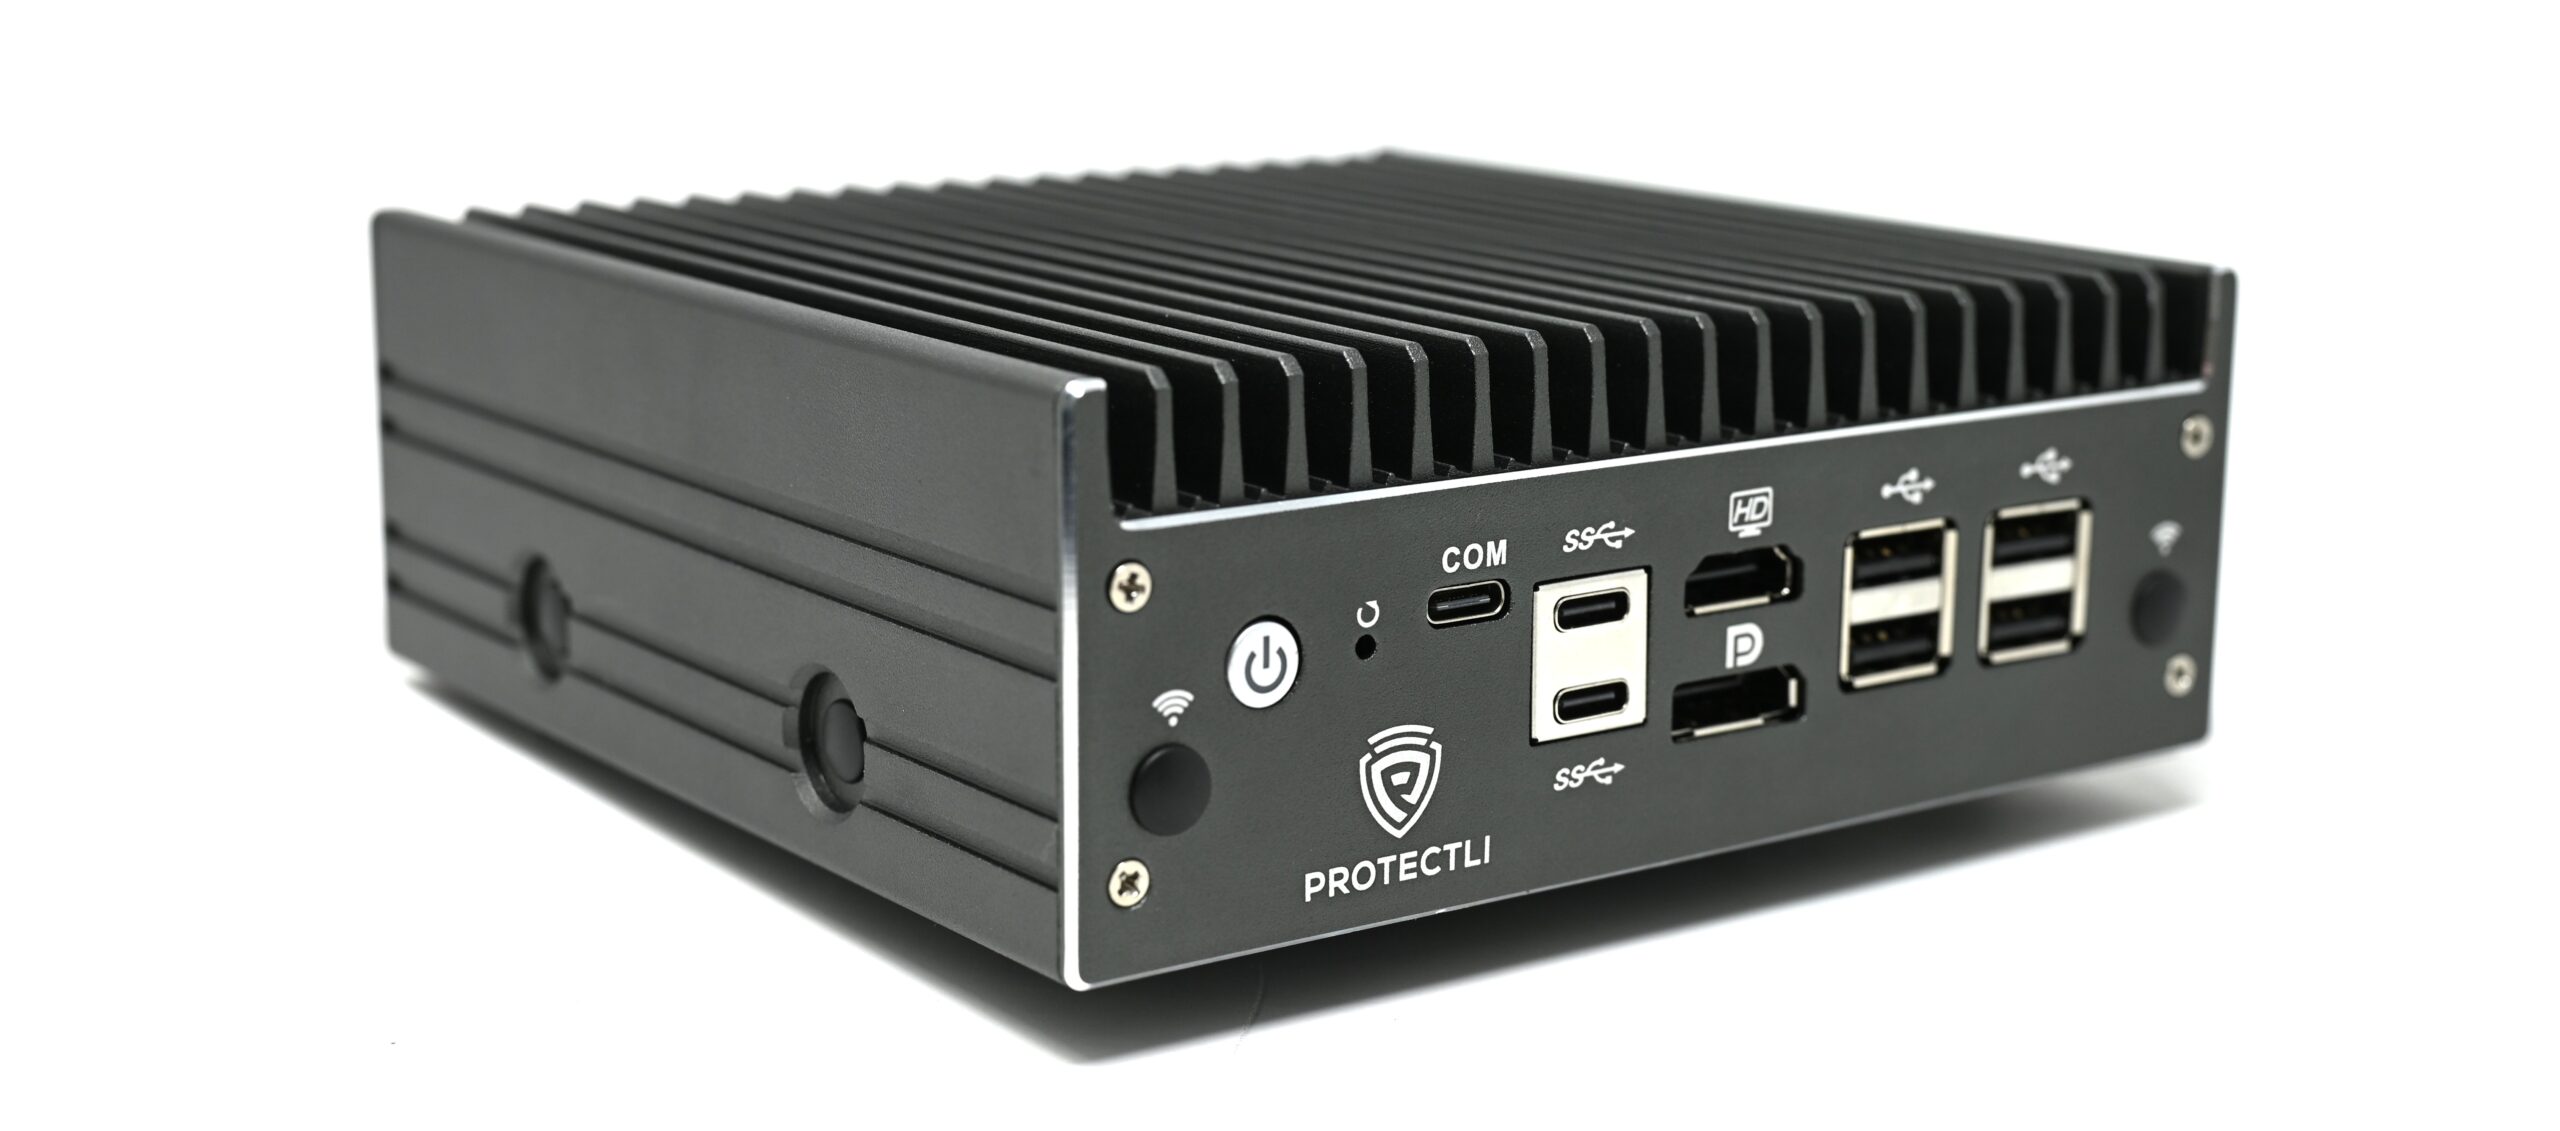
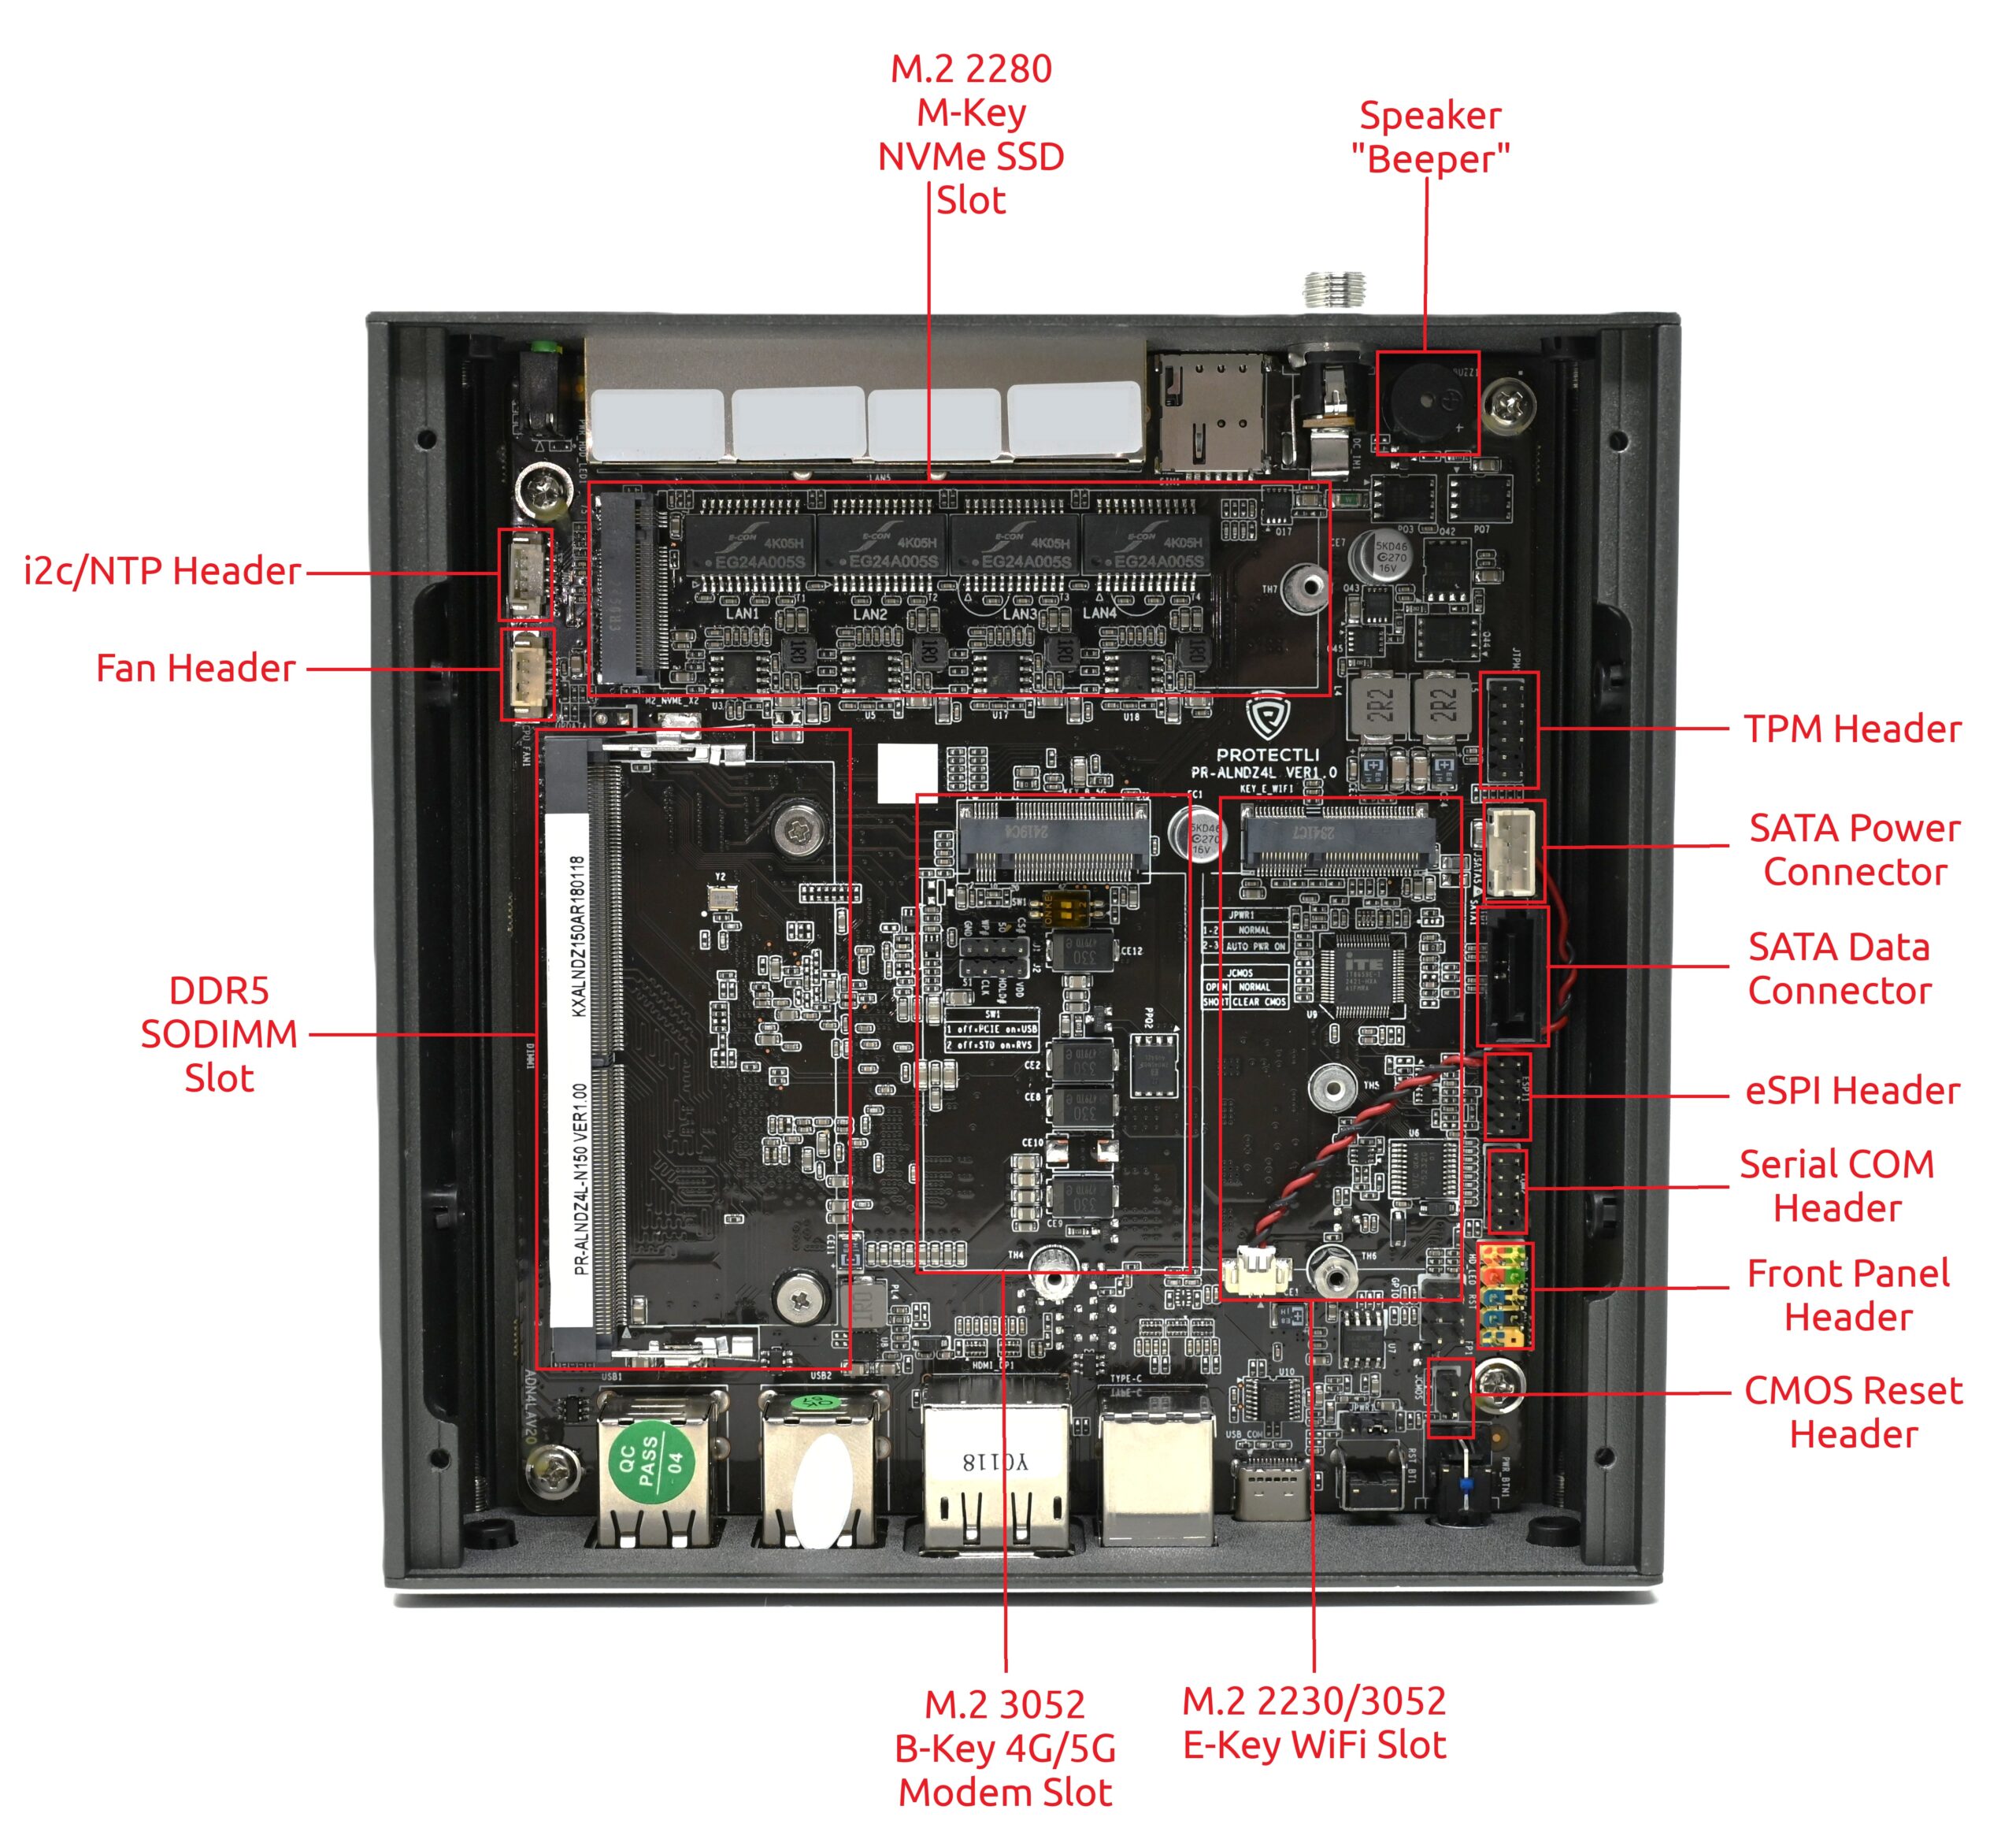
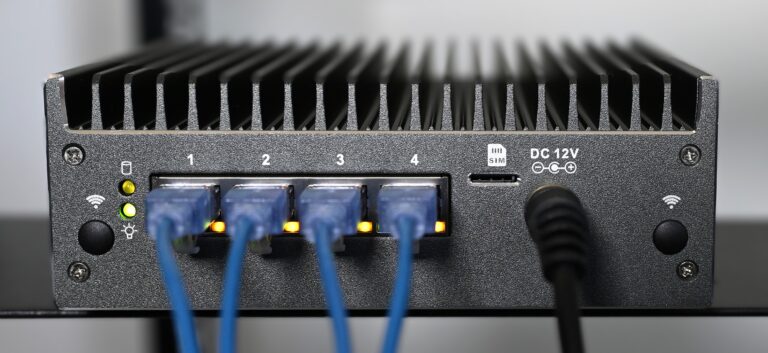
VP2430 Hardware Overview

Introduction
The Protectli VP2430 is a new addition to the Vault Pro (VP) lineup for 2025, building upon the success and feature set of the VP2410/VP2420. The Vault Pro VP2430 features the Intel® Quad Core N150 processor with support for up to 64GB of DDR5 SODIMM. It also includes three additional M.2 slots for M.2 M-Key 2280 NVMe storage (PCIe Gen 3 x2), M.2 E-Key 2230/3052 WiFi cards (PCIe Gen 3 x1), and M.2 B-Key 3052 4G/5G modems. 32GB of soldered-on eMMC storage comes standard. The Vault Pro VP2430 is equipped with four Intel® I226-V RJ-45 Ethernet ports, supporting up to 2.5GbE speeds with full backward compatibility to 1GbE and lower.
Protectli Vaults utilize Intel® components ensuring persistent compatibility with a wide range of operating systems (OS) and applications. The VP2430 features a fanless, all-aluminum chassis design, allowing for efficient heat dissipation from the CPU and other components without any moving parts or additional power requirements. A heatsink and thermal pads are supplied to passively cool the NVMe, RAM, WiFi, and 4G/5G modem modules, reducing operating temperatures by a substantial amount.
A detailed datasheet on technical aspects and header pin layouts can be found at this link.
An article reviewing the VP2430's component and OS compatibility can be found here.
External View
Internal View
The annotated image below showcases a majority of the connectors and headers found on the motherboard. For the headers that are not explicitly labeled, or for more in-depth information for technical specs and pin layouts, please refer to the official datasheet.
Thermal Pads and Heatsinks

The Vault Pro VP2430 includes two important heatsinks designed for efficient passive cooling. A large heatsink helps lower temperatures for components like RAM, WiFi cards, and 4G/5G modems, while a smaller dedicated heatsink cools the NVMe SSD. For optimal performance, it’s important to use the correct thermal pads for each component (outlined in the next section and datasheet).
In testing, we saw an average temperature drop of around 30+%* when components were paired with the heatsinks. Actual results will vary depending on workload, stress duration, and airflow conditions. That said, in typical environments with moderate ambient temperatures, the cooling benefits are significant.
Note: The large heatsink occupies the same space as a 2.5" SATA SSD, so both cannot be installed at the same time.
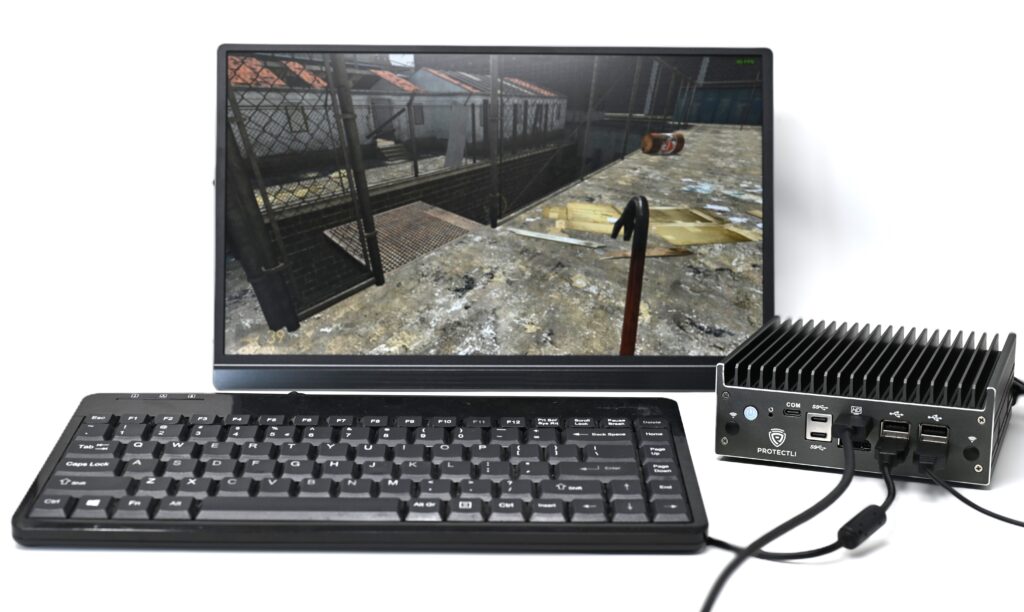
Tests were conducted using a single VP2430 unit with the following components:
RAM: 64GB DDR5 Crucial (CT64G56C46S5)
Storage: Samsung 980 NVMe M.2 SSD
WiFi: AW7916-AED M.2 WiFi 6E card
Each test was performed twice—once with the heatsink installed and once without—under identical conditions. Ambient temperature was maintained at approximately 21°C (70°F). Prior to each run, the system was fully cooled using compressed air and left unplugged for 15 minutes to ensure consistency. The Idle temperatures were recorded immediately as the OS booted, as each test was performed individually after a fresh boot.
Each test was performed on Ubuntu 24.04 and temperatures were reported via 'lm-sensors' as well as 's-tui'. To stress the unit, 's-tui', 'stress-ng', and Ubuntu's built-in disk benchmark test was utilized. For the RAM and WiFi tests, temperatures were logged at three points: idle (pre-stress), after 5 minutes, and after 10 minutes of stress.
For the WiFi test, the installed WiFi card was the only network connection established, and a constant iPerf test to another client on the network was being performed while s-tui was in "stress" mode.
For the RAM test, 'stress-ng' was used to stress the RAM. The following command was utilized:
stress-ng –vm 4 –vm-bytes 60G –timeout 600s
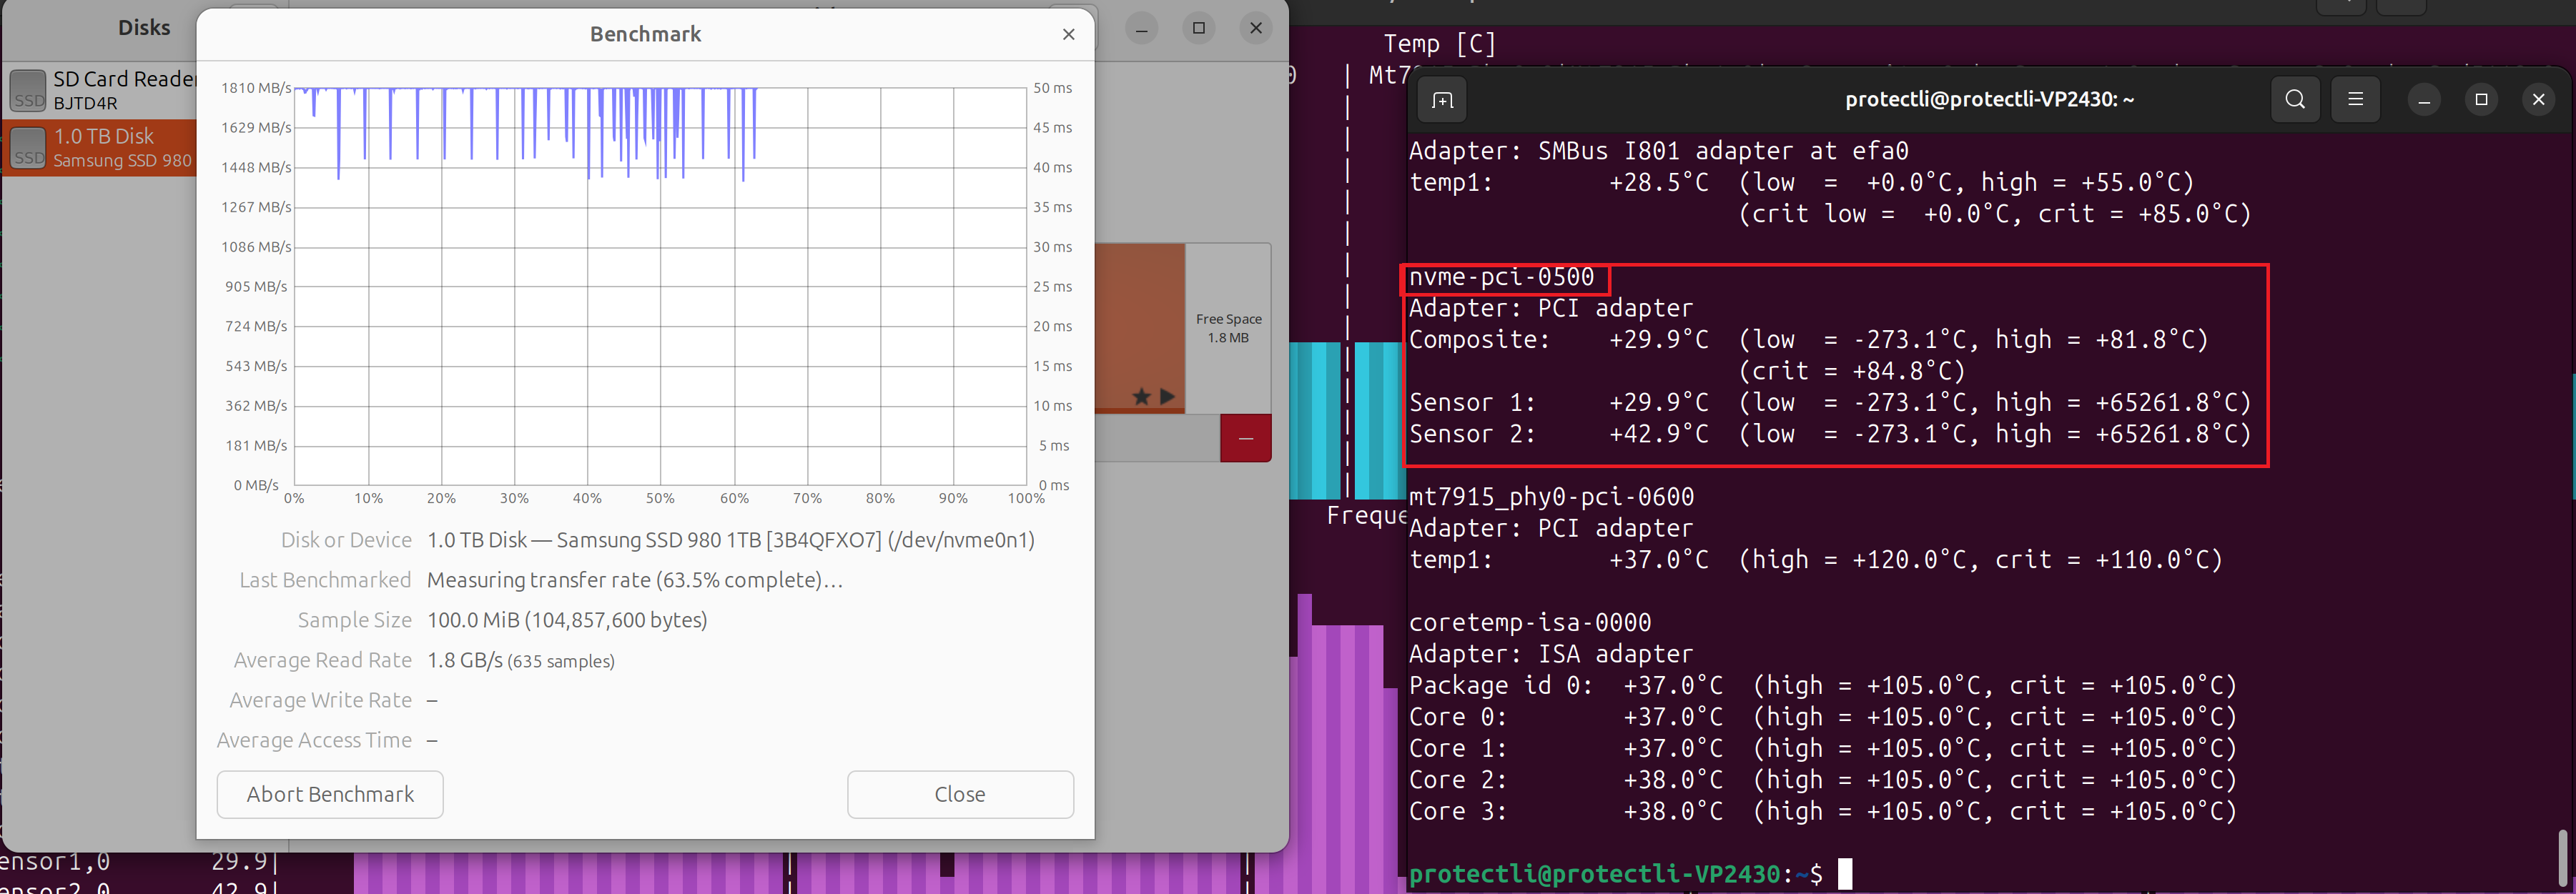
During the NVMe SSD test, we used Ubuntu's built in Disk Benchmark tool to perform a read-benchmark with 1000 samples of 100MB size two times in a row. Temperatures were collected with 'lm-sensors' and recorded right before the test at idle, directly after the first test finished, and also once more at 60% completion during the second test (as this was typically when it reached peak temperatures). There are three temperature sensors for the NVMe: Composite, Sensor 1, and Sensor 2.
On average during the NVMe benchmark test, temperatures were reduced by 17.87°C which corresponds to an average 35.4% reduction in temperatures.
Across all tested components, peak temperatures were reduced by an average of 36.8°C, a 46.17% decrease.
RAM Stress Results:
No Heatsink ❌ | With Heatsink ✅ | % Temperature Reduction |
---|---|---|
RAM (Idle): 36.5°C | RAM (Idle): 29.8°C | 18.36% |
RAM (5 Mins): 70.2°C | RAM (5 Mins): 38°C | 45.87% |
RAM (10 Mins): 76.5°C | RAM (10 Mins): 42°C | 45.10% |
WiFi Stress Results:
No Heatsink ❌ | With Heatsink ✅ | % Temperature Reduction |
---|---|---|
WiFi (Idle): 41°C | WiFi (Idle): 30°C | 26.83% |
WiFi (5 Mins): 73°C | WiFi (5 Mins): 39°C | 46.58% |
WiFi (10 Mins): 86°C | WiFi (10 Mins): 43°C | 50.00% |
NVMe Benchmarking Results:
NVMe No Heatsink ❌ | NVMe With Heatsink ✅ | % Temperature Reduction |
---|---|---|
Idle (Composite): 35.9°C | Idle (Composite): 25.9°C | 27.9% |
Idle (Sensor 1): 35.9°C | Idle (Sensor 1): 25.9°C | 27.9% |
Idle (Sensor 2): 40.9°C | Idle (Sensor 2): 26.9°C | 34.2% |
First Test (Composite): 42.9°C | First Test (Composite): 28.9°C | 32.6% |
First Test (Sensor 1): 42.9°C | First Test (Sensor 1): 28.9°C | 32.6% |
First Test (Sensor 2): 67.8°C | First Test (Sensor 2): 37.9°C | 44.1% |
Middle of Second Test (Composite): 47.9°C | Middle of Second Test (Composite): 29.9°C | 37.6% |
Middle of Second Test (Sensor 1): 47.9°C | Middle of Second Test (Sensor 1): 29.9°C | 37.6% |
Middle of Second Test (Sensor 2): 75.8°C | Middle of Second Test (Sensor 2): 42.9°C | 43.4% |

Heatsink Install Instructions
Included with every VP2430 are the two heatsinks explained in the previous section as well as seven (7) thermal pads. Measurements of the thermal pads can be found in the datasheet. The image below explains what each thermal pad is used for. Keep in the mind the "Bottom Thermal Pads" should be placed between the heatsinks and the Vault's bottom plate.
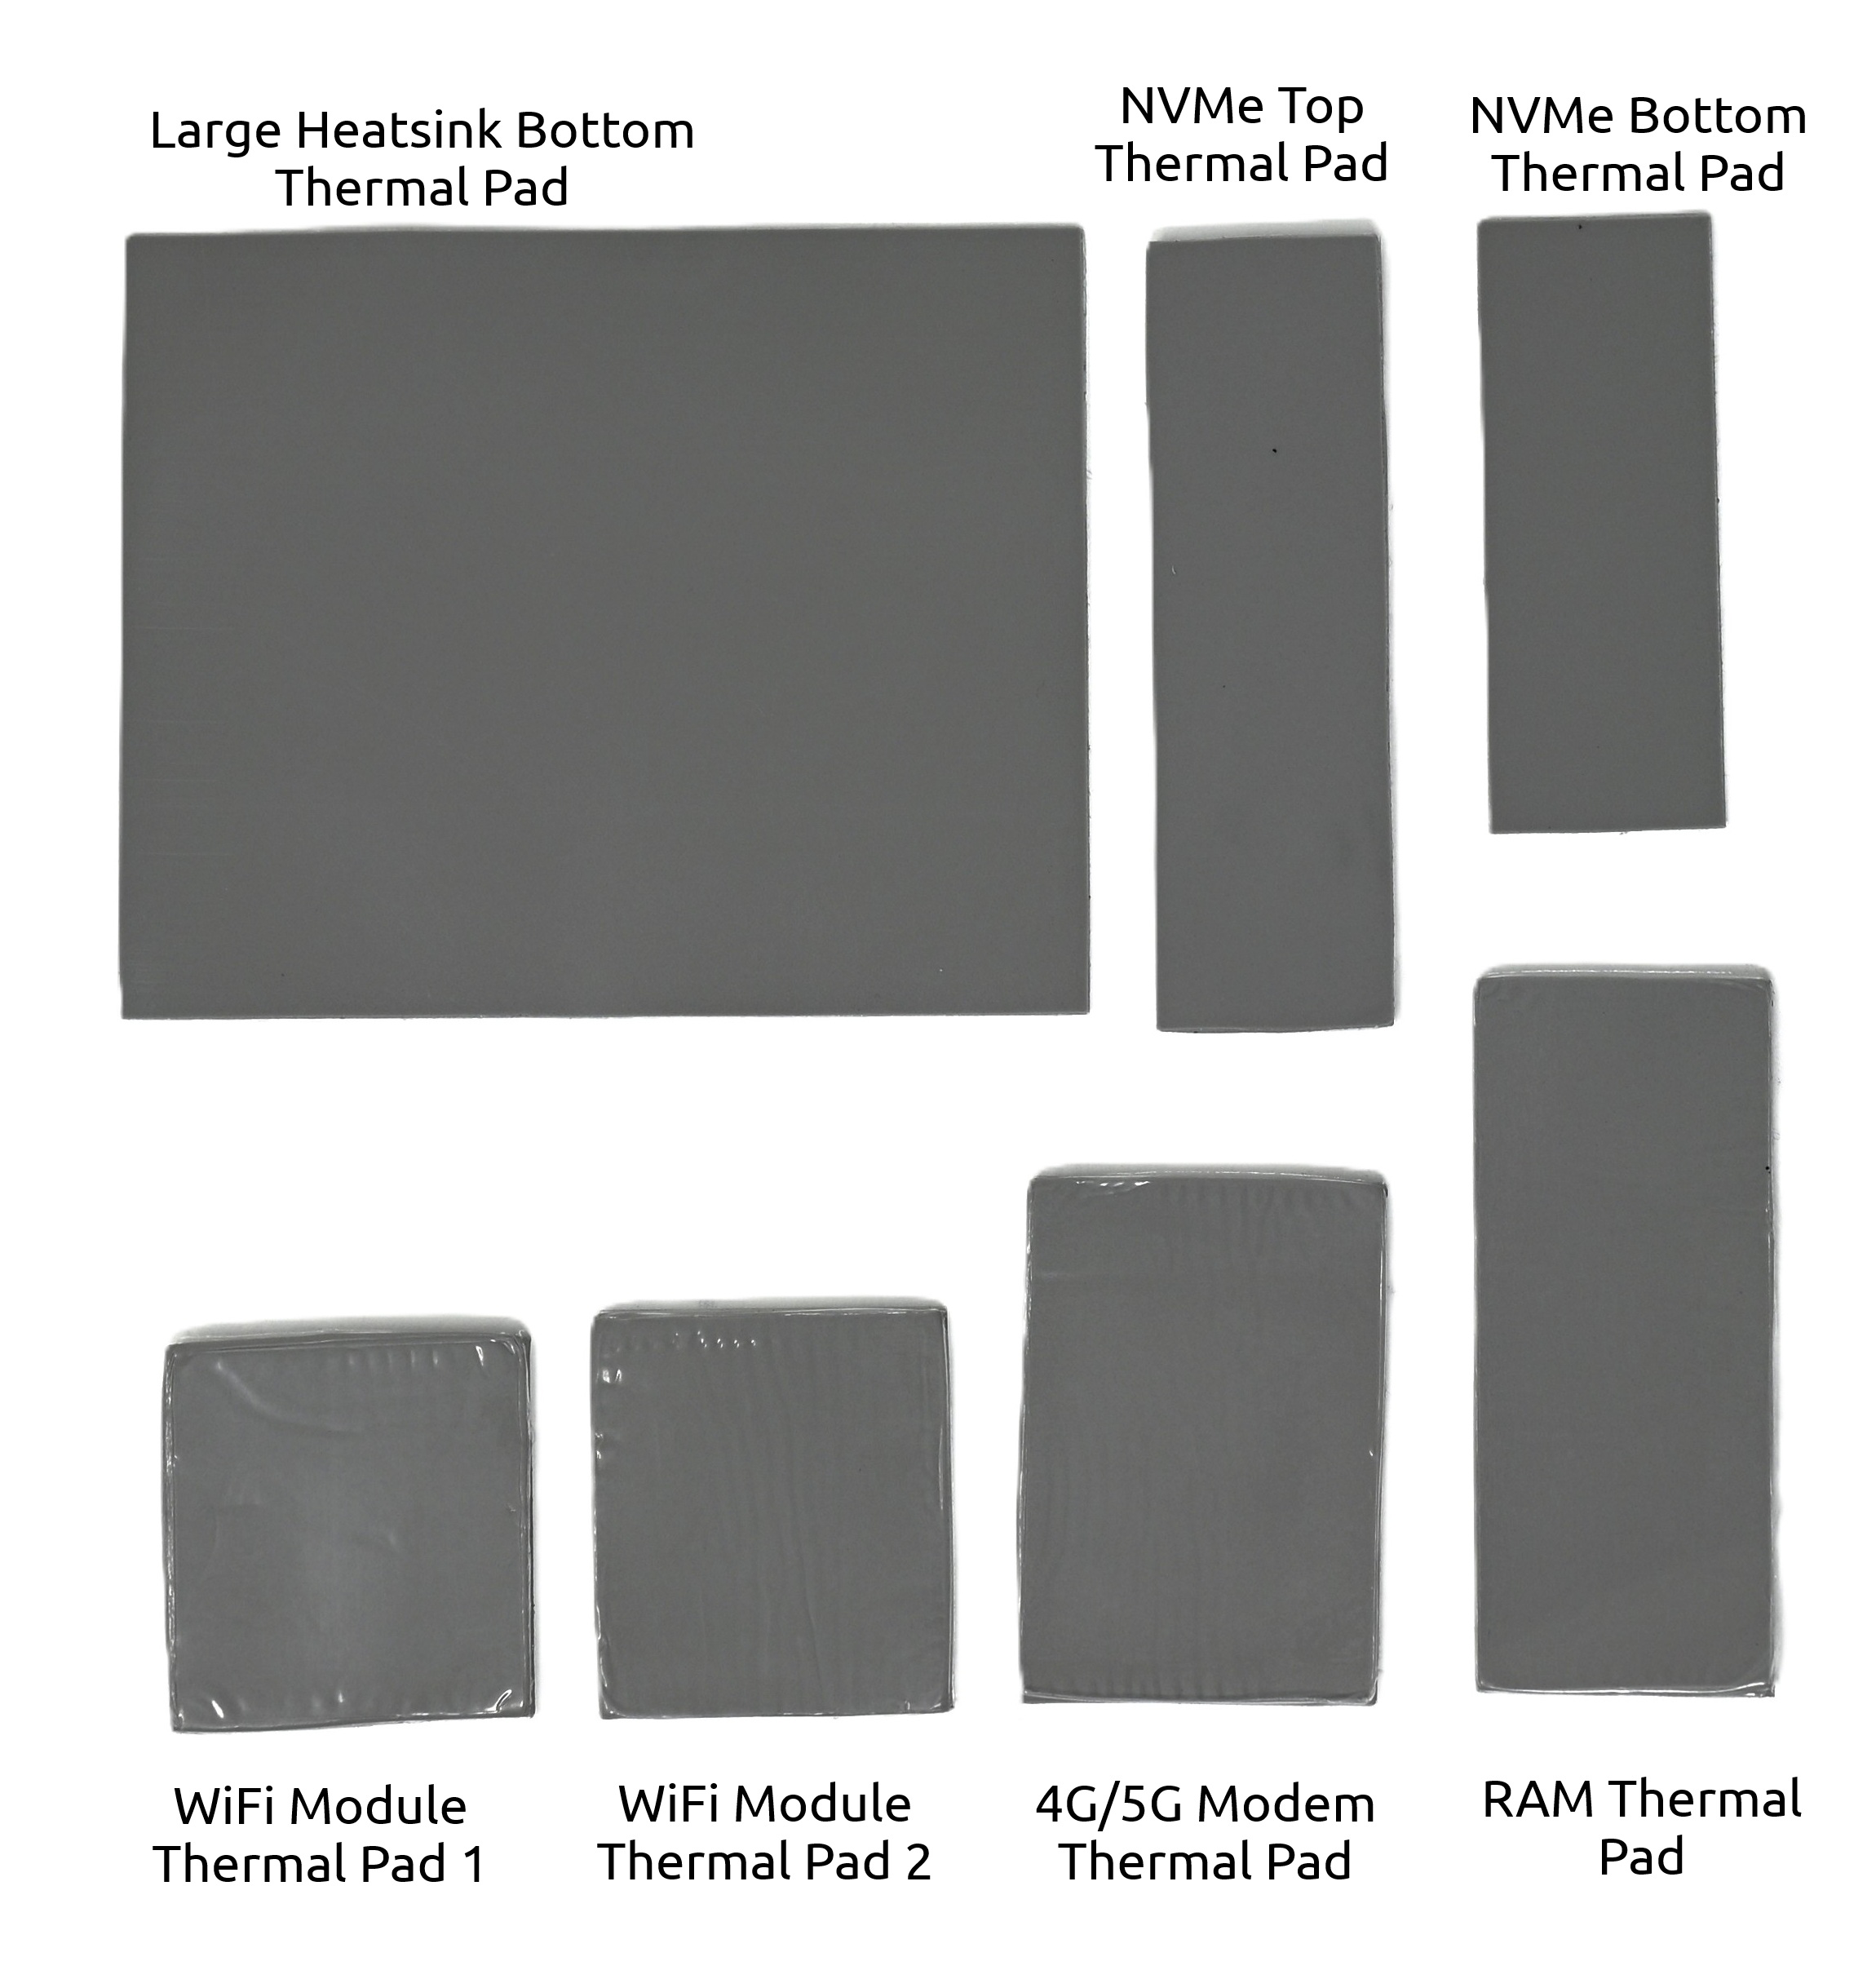
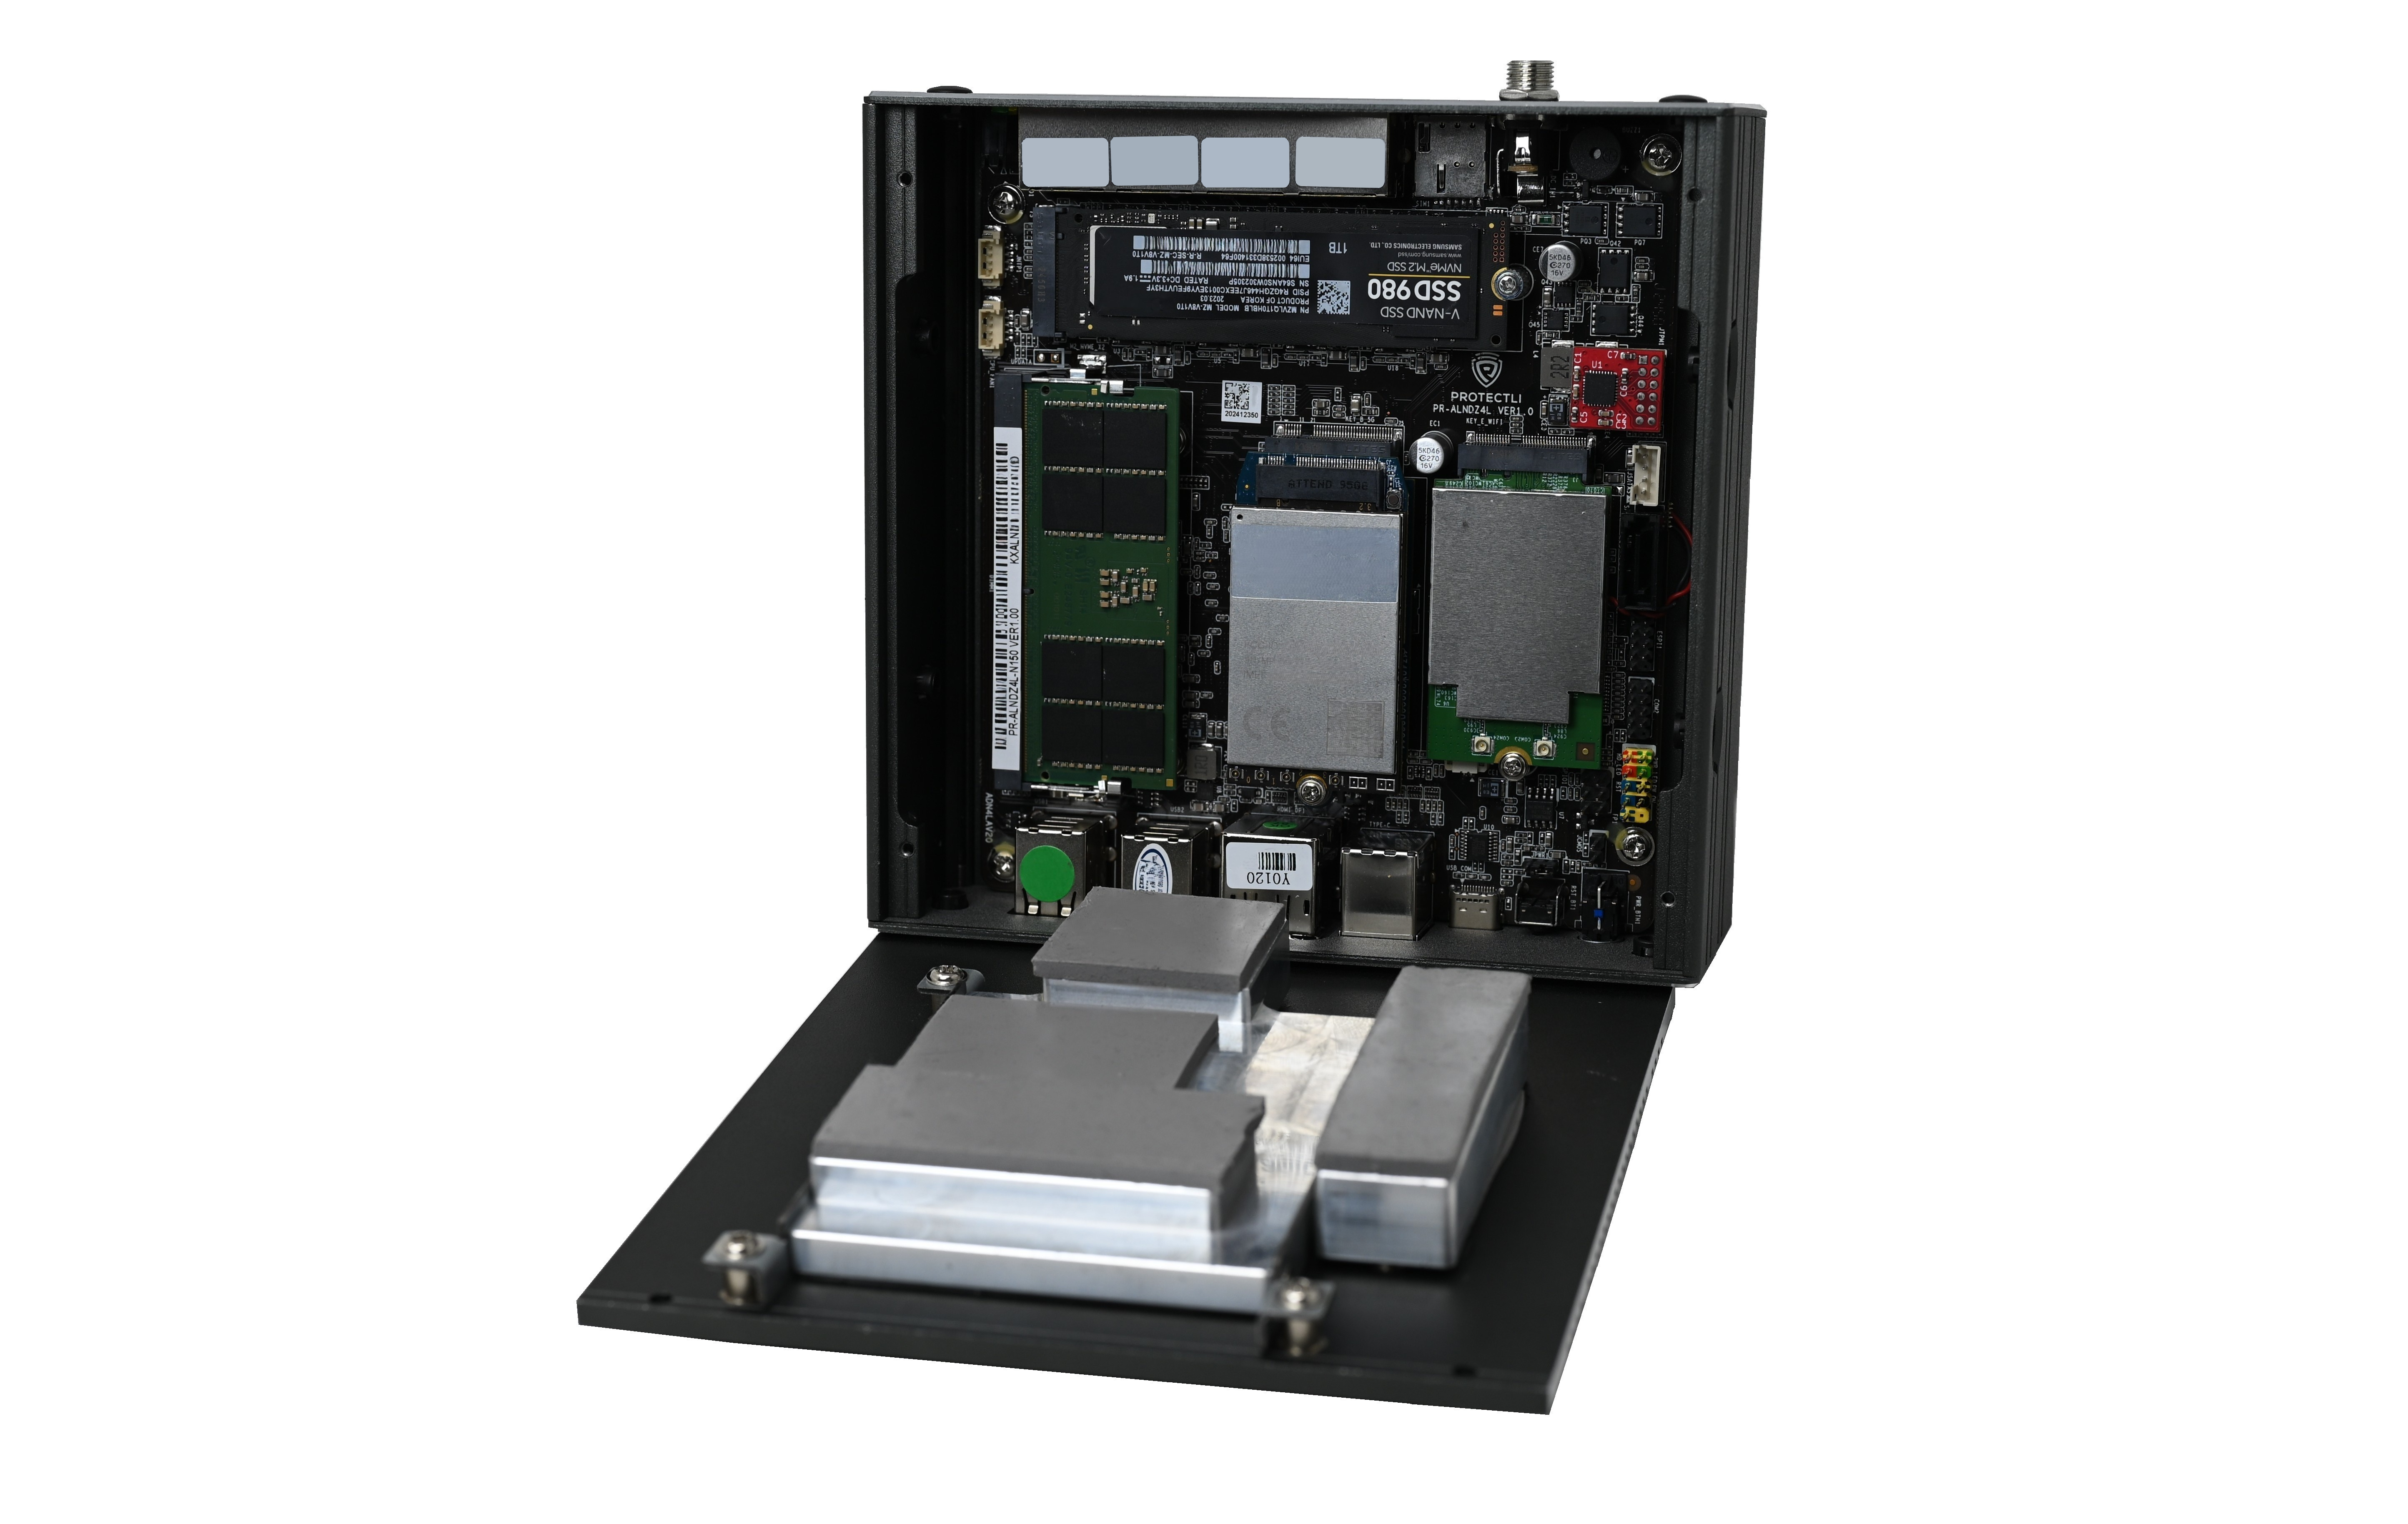
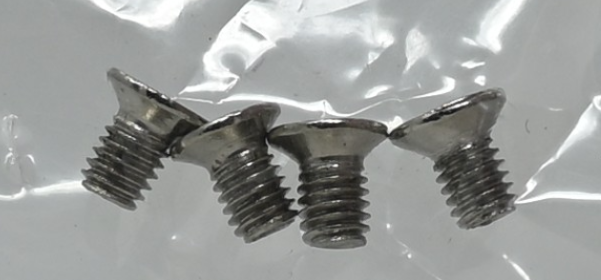
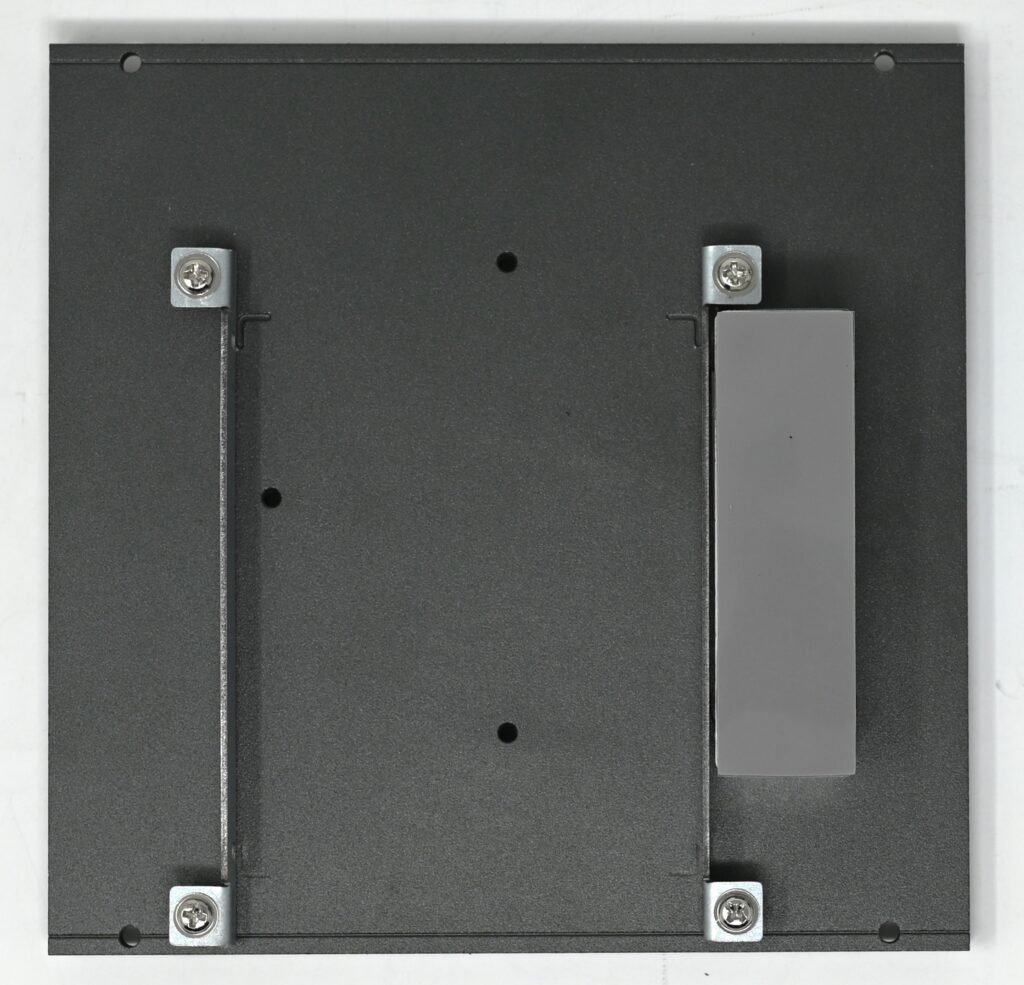
You will need to use four of the smaller flat-top headed screws that are included with the VP2430 (pictured below). You will also need the large heatsink bottom thermal pad, the large heatsink, a Phillips screwdriver, as well as the thermal pads that correlate with what components are installed in the unit. (If you don't have a WiFi card or Modem installed, you would want to grab the RAM thermal pad).
- If you have not already done so, remove the bottom plate of the VP2430 by unscrewing the four screws found in the corners on the bottom of the unit. Set the bottom plate aside.
- Carefully remove the thin layer of plastic found on both sides of the bottom thermal pad and place it on the bottom of the heatsink (the bottom of the heatsink is flat, do not place it on the side that has extrusions).
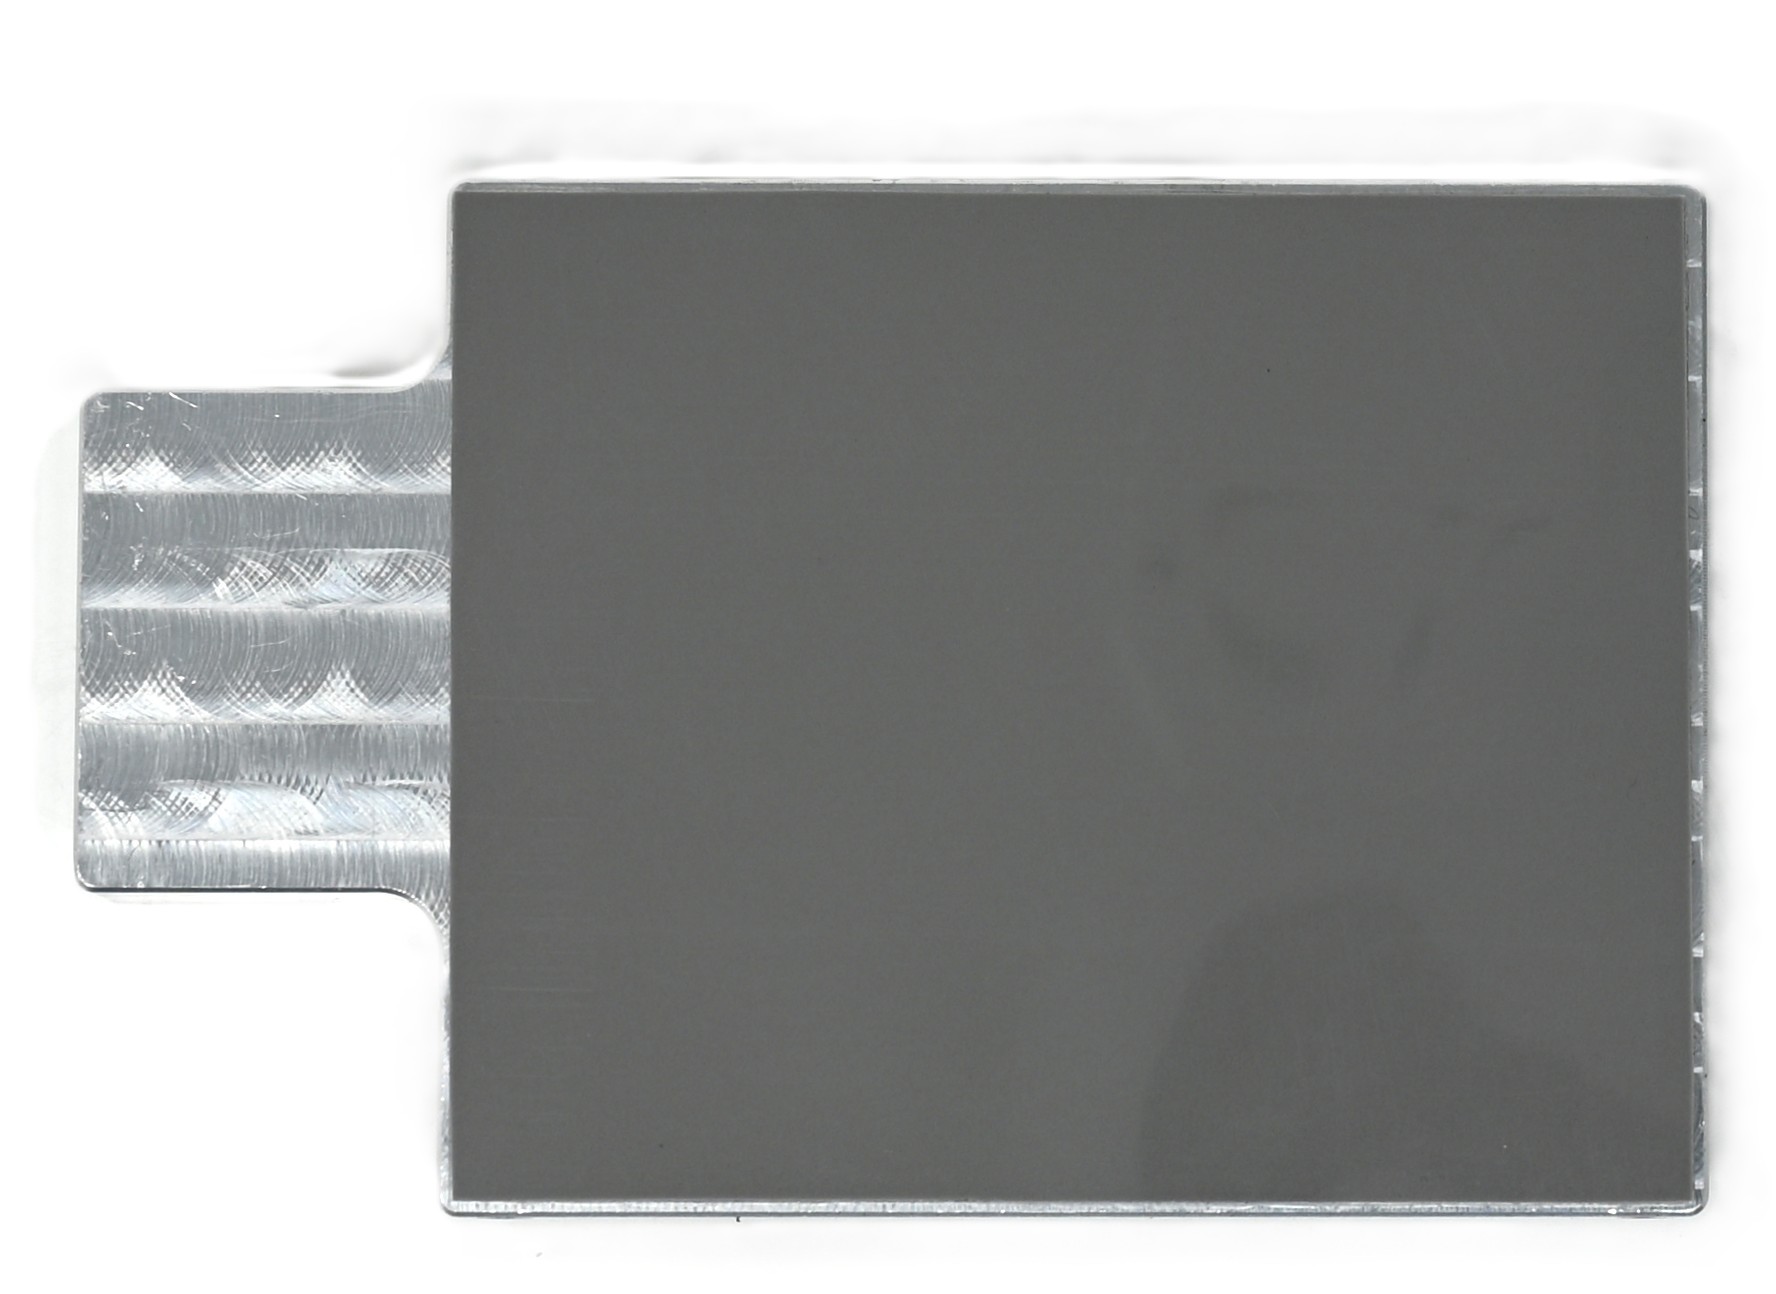
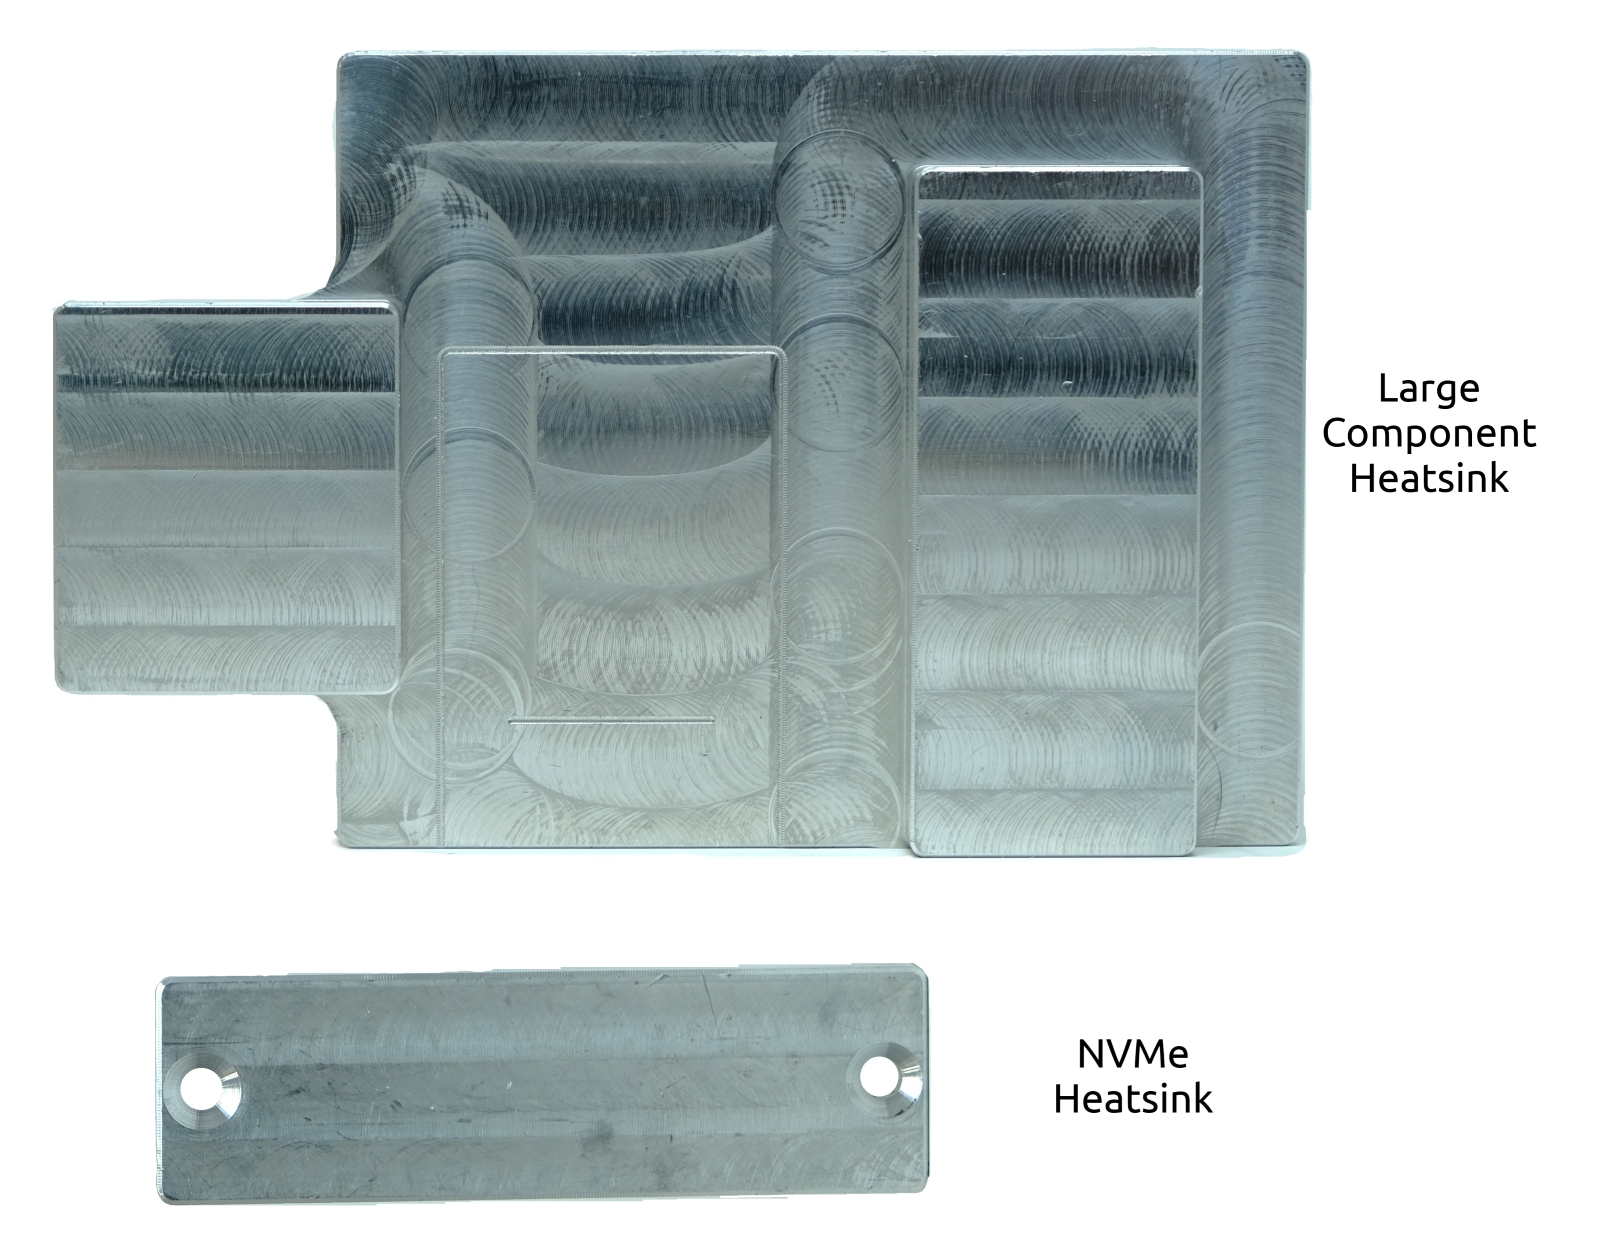
- Place the heatsink within the brackets found on the Vault's bottom plate, and screw it into the bracket using all four screws.
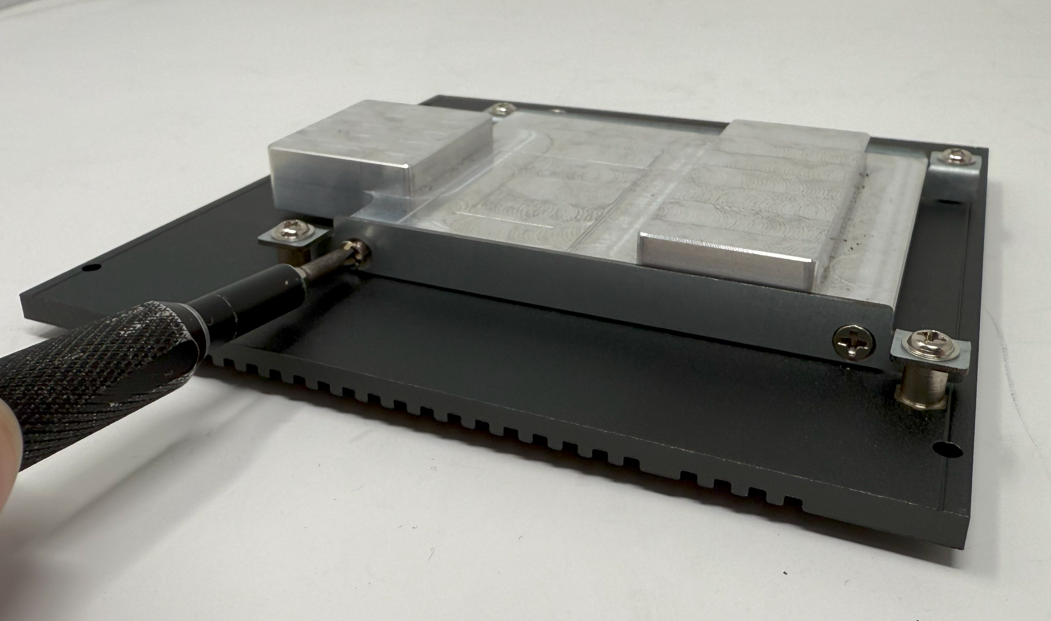
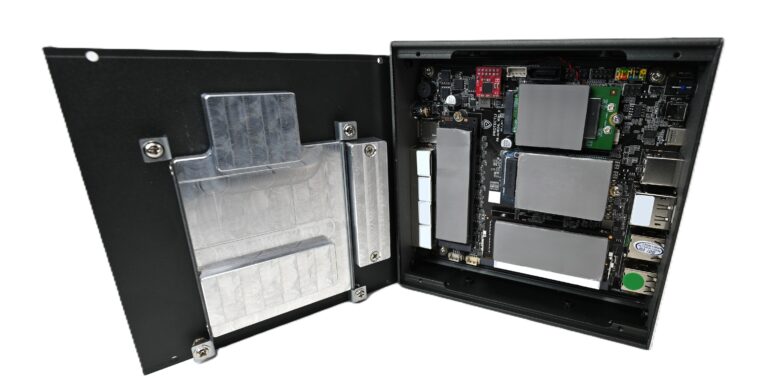
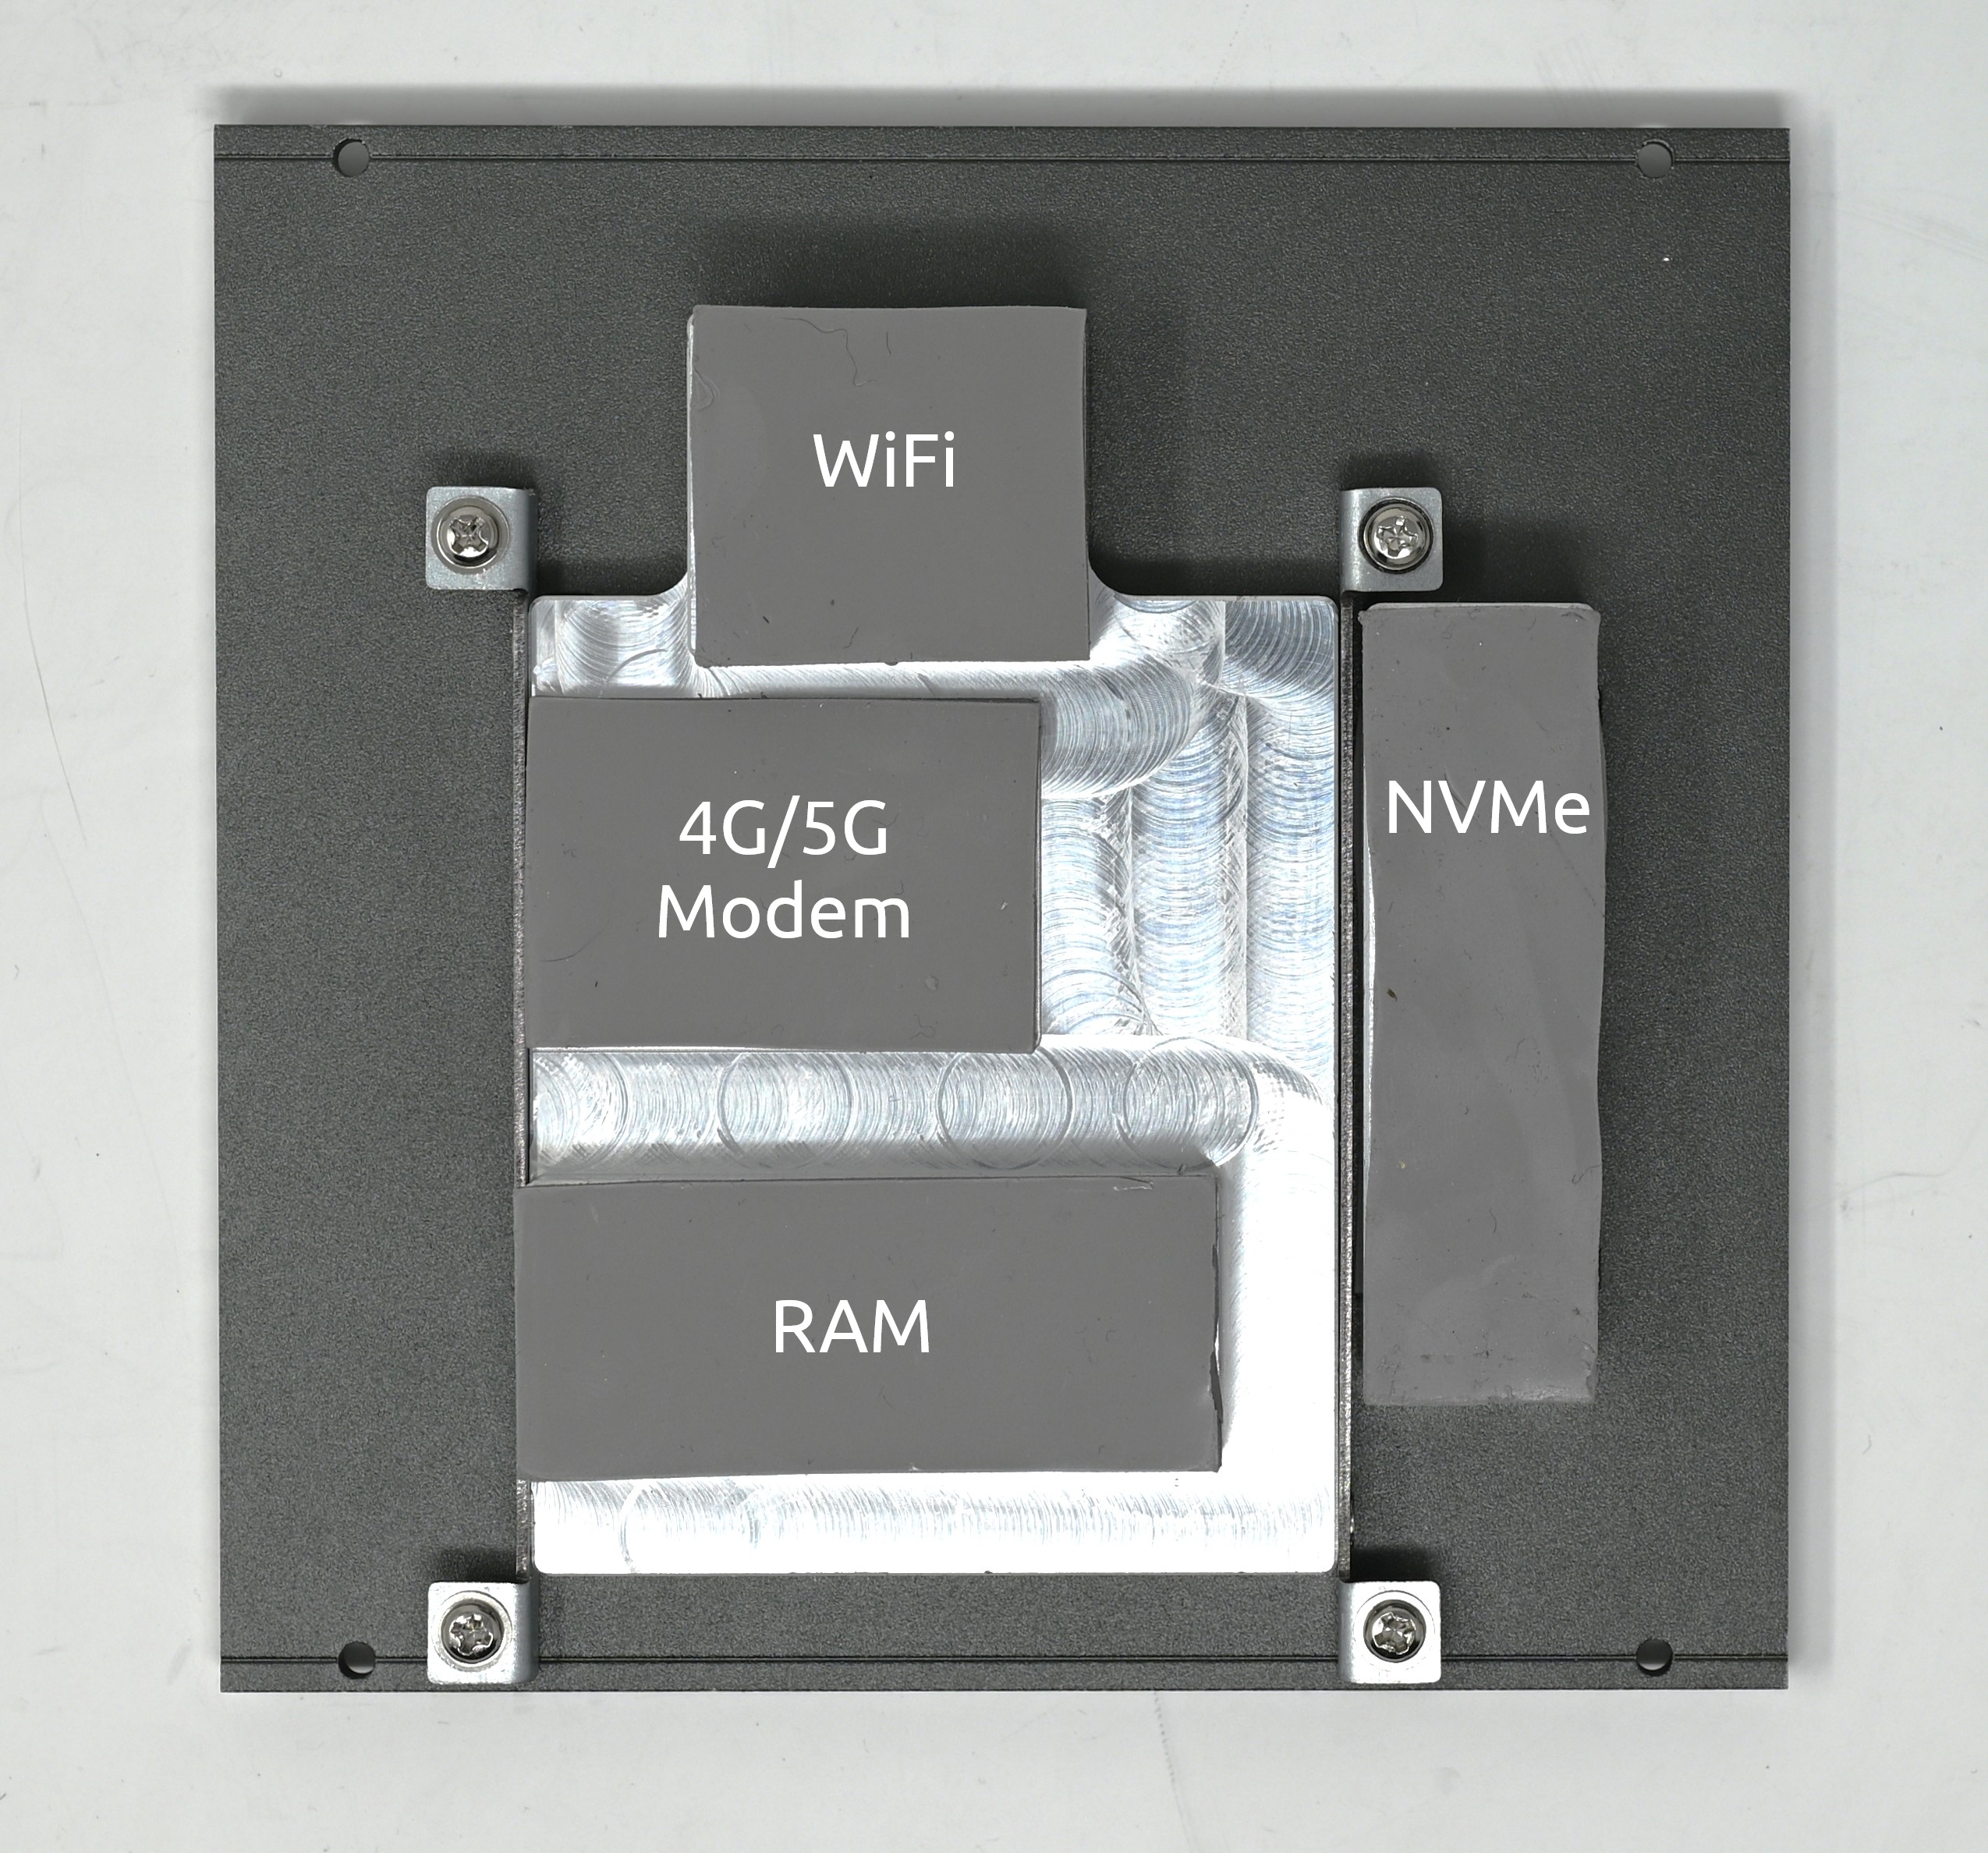
- You can now place the thermal pads on the correlating components, or directly on the heatsink. An example of all thermal pads being placed can be seen below.
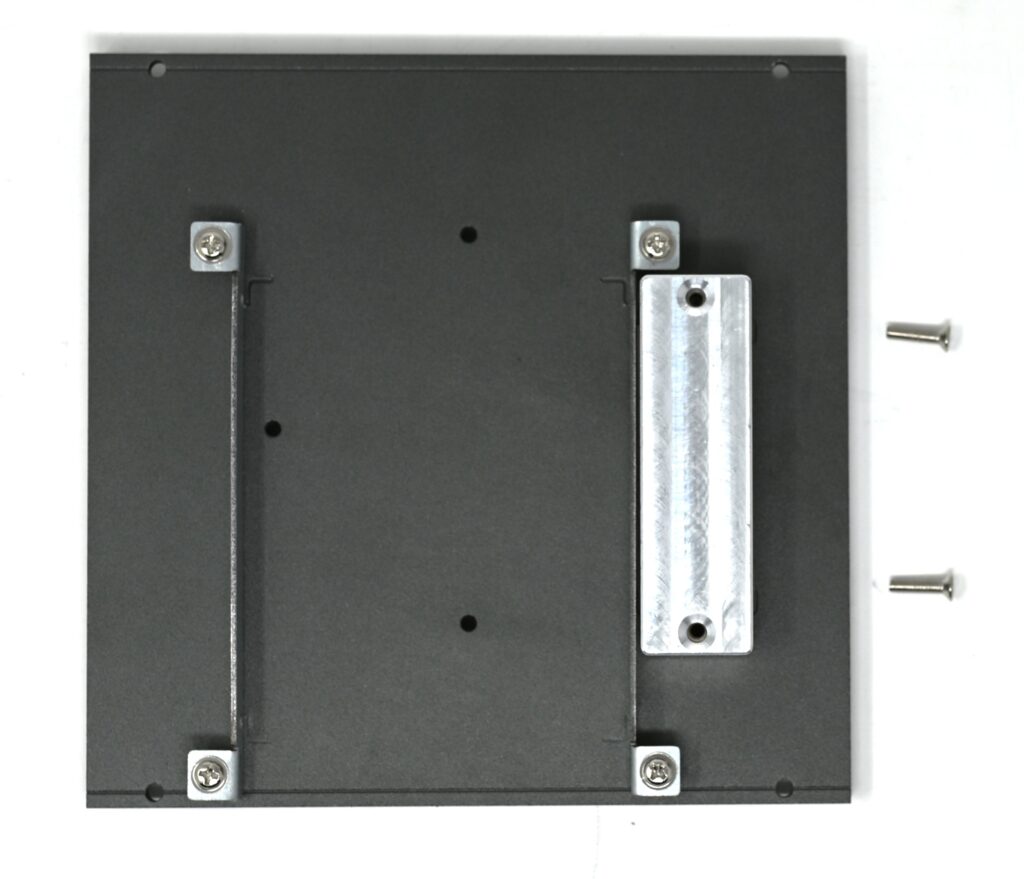
You will need the two long screws included with the unit, a Philips screwdriver, the NVMe heatsink, as well as the bottom and top NVMe heatsink thermal pads.
- Remove the bottom plate of the VP2430 by unscrewing the four screws found on the corners of the bottom of the unit if you have not already done so. Set the bottom plate aside.
- Carefully remove the thin plastic layer off both sides of the bottom thermal pad and place it on the designated location on the bottom plate.
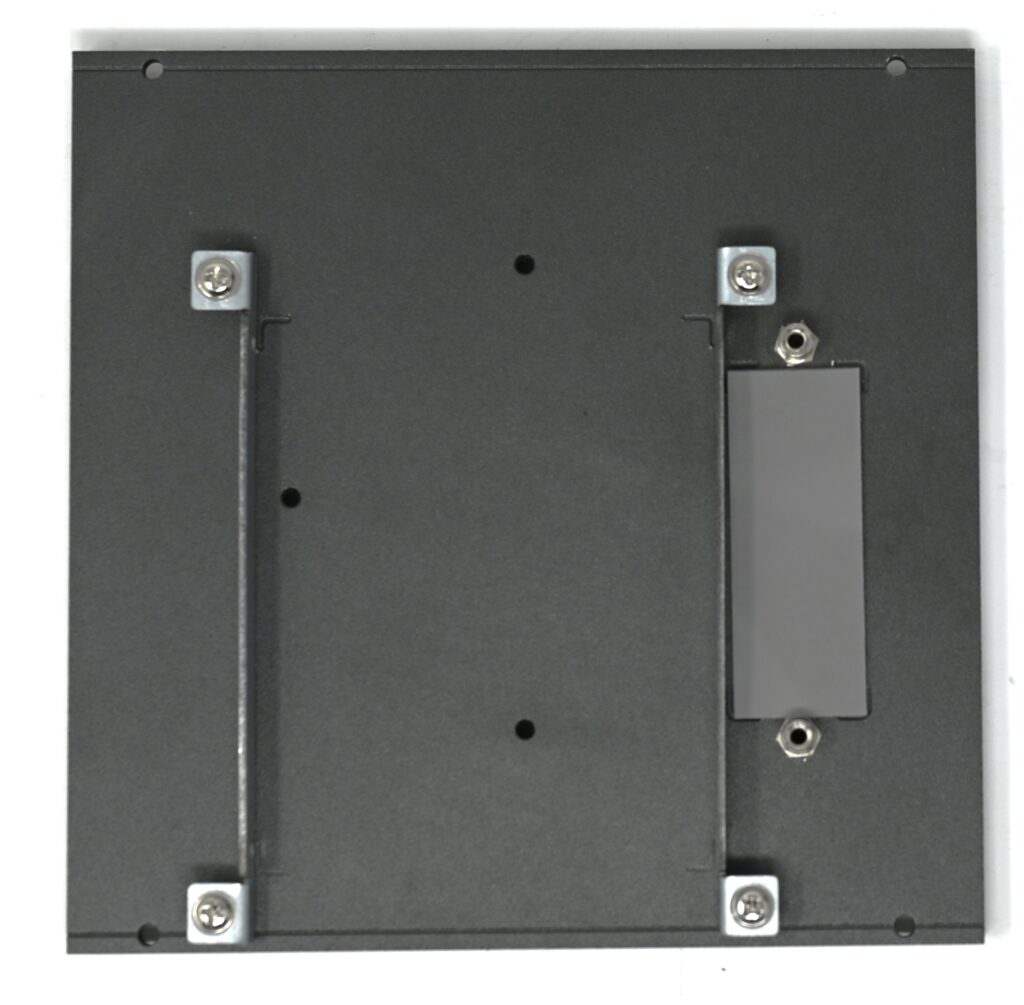
- Place the NVMe heatsink on top of the thermal pad, and make sure it lines up with the screw holes. Screw down the heatsink using two of the NVMe heatsink screws.
- You can place the top NVMe thermal pad directly on the heatsink (make sure to remove the thin plastic layer on both sides), or on your installed NVMe SSD.
CPU
The Vault Pro VP2430 is powered by the Quad-Core Intel® N150 processor, the successor to the N100. The N150 delivers improved power efficiency and better performance in both single and multi-core workloads, making it well-suited for next-gen firewall applications, virtualization, and workstation use.
It features 4 cores, 4 threads, a 6MB Intel® Smart Cache, and a max turbo frequency of 3.6GHz with support for Intel® Speed Shift and SpeedStep technologies. The integrated GPU also gets a boost, with speeds up to 1GHz—ideal for light graphical tasks like media playback, 2D/3D rendering, and even some retro gaming.

PassMark PerformanceTest Linux 11.0.1002 (Running on Ubuntu 24.04):
CPU Mark: 5757
Integer Math: 17330 Million Operations/s
Floating Point Math: 10164 Million Operations/s
Prime Numbers: 24.3 Million Primes/s
Extended Instructions (SSE): 2715 Million Matrices/s
Compression: 60230 KB/s
Encryption: 4606 MB/s
Physics: 547 Frames/s
Sorting: 8970 Thousand Strings/s
CPU Single Threaded: 2128 Million Operations/s
PassMark PerformanceTest 11.1 CPU Mark (Running on Windows 11):
CPU Mark: 5339
Integer Math: 16942 Million Operations/s
Floating Point Math: 10924 Million Operations/s
Prime Numbers: 26 Million Primes/s
Extended Instructions (SSE): 2621 Million Matrices/s
Compression: 54232 KB/s
Encryption: 3994 MB/s
Physics: 435 Frames/s
Sorting: 6935 Thousand Strings/s
CPU Single Threaded: 2097 Million Operations/s
Note: On AMI firmware, you may be able to slightly improve iGPU performance by changing Aperture size to 1024MB (found at Chipset>System Agent Configuration>Graphics Configuration). This will use more RAM to be utilized as VRAM.
3DMark® (Steam Demo) (Running on Windows 11):
Night Raid DirectX 12 test for integrated graphics, 1920x1080:
Night Raid Score: 5245
Graphics score: 6445
CPU Score: 2544
Graphics Test 1: Average FPS 27.63
Graphics test 2: Average FPS 35.27
Unigine Heaven Benchmark 4.0 (Running on Windows 11):
Direct3D11, 1920x1080, 8x Anti-Aliasing, Ultra Quality, Extreme Tessellation:
[Score of 189, AVG FPS 7.5, Min FPS 4.4, Max FPS 14.1]
Direct3D11, 1920x1080, 8x Anti-Aliasing, Low Quality, No Tessellation:
[Score of 424, AVG FPS 16.8, Min FPS 9.3, Max FPS 27.7]
Direct3D11, 1920x1080, No Anti-Aliasing, Low Quality, No Tessellation:
[Score of 922, AVG FPS 36.6, Min FPS 20.5, Max FPS 62.3]
Direct3D9, 1920x1080, No Anti-Aliasing, Low Quality, No Tessellation:
[Score of 853, AVG FPS 33.9, Min FPS 18.2, Max FPS 64.2]
Half Life 2 Lost Coast Source Engine Benchmark (Running on Windows 11):
DirectX 9, 1920x1080, Max settings, 8x Anti-Aliasing, 16x Anisotropic Filtering:
[Average FPS 42]
DirectX 9, 1920x1080, Max settings, 2x Anti-Aliasing, 2x Anisotropic Filtering:
[Average FPS 65]
DirectX 9, 1920x1080, Max settings, no Anti-Aliasing, Trilinear Anisotropic Filtering:
[Average FPS 100]
Old School Runescape:
Is that even a question?
IOMMU Group 0 00:02.0 VGA compatible controller [0300]: Intel Corporation Alder Lake-N [Intel Graphics] [8086:46d4]
IOMMU Group 1 00:00.0 Host bridge [0600]: Intel Corporation Device [8086:461c]
IOMMU Group 2 00:0d.0 USB controller [0c03]: Intel Corporation Device [8086:464e]
IOMMU Group 3 00:14.0 USB controller [0c03]: Intel Corporation Alder Lake-N PCH USB 3.2 xHCI Host Controller [8086:54ed]
IOMMU Group 3 00:14.2 RAM memory [0500]: Intel Corporation Alder Lake-N PCH Shared SRAM [8086:54ef]
IOMMU Group 4 00:16.0 Communication controller [0780]: Intel Corporation Alder Lake-N PCH HECI Controller [8086:54e0]
IOMMU Group 5 00:17.0 SATA controller [0106]: Intel Corporation Device [8086:54d3]
IOMMU Group 6 00:1a.0 SD Host controller [0805]: Intel Corporation Device [8086:54c4]
IOMMU Group 7 00:1c.0 PCI bridge [0604]: Intel Corporation Device [8086:54b9]
IOMMU Group 8 00:1c.2 PCI bridge [0604]: Intel Corporation Device [8086:54ba]
IOMMU Group 9 00:1c.3 PCI bridge [0604]: Intel Corporation Device [8086:54bb]
IOMMU Group 10 00:1c.6 PCI bridge [0604]: Intel Corporation Device [8086:54be]
IOMMU Group 11 00:1d.0 PCI bridge [0604]: Intel Corporation Device [8086:54b0]
IOMMU Group 12 00:1d.3 PCI bridge [0604]: Intel Corporation Device [8086:54b3]
IOMMU Group 13 00:1f.0 ISA bridge [0601]: Intel Corporation Alder Lake-N PCH eSPI Controller [8086:5481]
IOMMU Group 13 00:1f.3 Audio device [0403]: Intel Corporation Alder Lake-N PCH High Definition Audio Controller [8086:54c8]
IOMMU Group 13 00:1f.4 SMBus [0c05]: Intel Corporation Device [8086:54a3]
IOMMU Group 13 00:1f.5 Serial bus controller [0c80]: Intel Corporation Device [8086:54a4]
IOMMU Group 14 01:00.0 Ethernet controller [0200]: Intel Corporation Ethernet Controller I226-V [8086:125c] (rev 04)
IOMMU Group 15 02:00.0 Ethernet controller [0200]: Intel Corporation Ethernet Controller I226-V [8086:125c] (rev 04)
IOMMU Group 16 03:00.0 Ethernet controller [0200]: Intel Corporation Ethernet Controller I226-V [8086:125c] (rev 04)
IOMMU Group 17 04:00.0 Ethernet controller [0200]: Intel Corporation Ethernet Controller I226-V [8086:125c] (rev 04)
IOMMU Group 18 05:00.0 Non-Volatile memory controller slot (NVMe) [0108]
IOMMU Group 19 06:00.0 WiFi Slot Component [0002]
VPN Performance
Another great benefit of the N150 CPU is excellent performance metrics when utilizing a VPN connection on OPNsense or pfSense®. A comparison to the Vault V1410 and Vault Pro VP2420 can be seen below (all configured as site-to-site VPNs using the configurations found on our VPN KB articles):
pfSense® OpenVPN
pfSense® IPSec
OPNSense IPSec
OPNSense Wireguard
Memory (RAM)
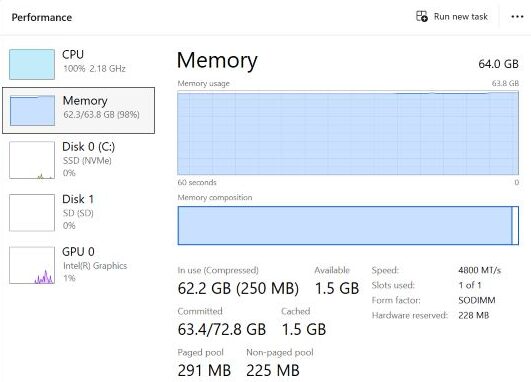
Although Intel's specsheet states that the N150 may only support up to 16GB of memory, we have successfully tested up to 64GB DDR5 SODIMM using a handful of different brands/models of RAM. The maximum memory frequency is 4800MHz.

We recommend being cautious if purchasing your own RAM from other sources that is over 16GB. All RAM modules that Protectli preinstalls in Vaults are guaranteed to work properly. If you purchase the exact same model of RAM from a different source, there is still a chance that it could be incompatible due to the fact that RAM manufacturers produce different batches that may use different components/chipsets that have not been qualified by us. Check out the VP2430 Component Compatibility article for more information.
RJ45 Ethernet Ports (4 x 2.5GbE, Intel® i226-V)

There are four (4) Intel® i226-V, 2.5GbE ethernet ports. These are all individual NICs using their own PCI lane, and are not behind any kind of PCI switch. LEDs on the left side of NIC emit solid green when connected at 2500/1000Mbps, and are turned off at 100/10Mbps.
Most Linux distributions as well as OPNsense and pfSense® will automatically have the drivers required to properly use the NICs. OPNsense and pfSense® use the igc driver.
Windows may require you to manually install the required drivers, which can be found directly on Intel's website. You can put the drivers from the "PRO2500" folder on a USB drive and use them during the installation of Windows 11.
Storage (NVMe SSD)
The VP2430's NVMe slot utilizes the M.2 M-Key 2280 form factor, and current industry standard capacities of 250 GB, 500 GB, 1 TB, 2 TB, and 4TB are supported. An NVMe SSD can be installed by Protectli if selected on the configurator when purchasing a unit on our website. If you wish to source your own NVMe, you shouldn't have any compatibility issues when using a name-branded drive. There is very little chance of any NVMe SSD not working with this unit.
The M.2 NVMe slot supports up to PCIe Gen 3 x 2 speeds. NVMe drives from newer generations should downclock automatically.
Storage (2.5" SATA SSD)
A single 2.5" SATA SSD may be installed. Included with each VP2430 are SATA data and power cables that connect directly to the corresponding headers on the motherboard. The 2.5" SSD can be mounted to the internal bracket found on the bottom plate. If you are using the included large component heatsink, you will not be able to install a 2.5" SATA SSD.
Storage (Soldered eMMC)
Every Vault Pro VP2430 contains 32GB of eMMC storage built-in to the motherboard. This storage is ideal for running a lightweight, non-intensive OS, or can simply be used as additional storage. It is not recommended to install an OS that requires constant read/writes on the eMMC as this can wear down the drive over time. If you do want to install an OS like OPNsense to it, you can, but you should follow our video guide on best practices for reducing eMMC wear.
WiFi Slot
The M.2 WiFi slot uses PCIe Gen 3 x 1 protocol, and supports M.2 E-Key 2230/3052 sized WiFi cards. Although this slot is designed for WiFi cards, it can support other M.2 devices assuming you have a card with the proper form factor and PCIe generation requirements.
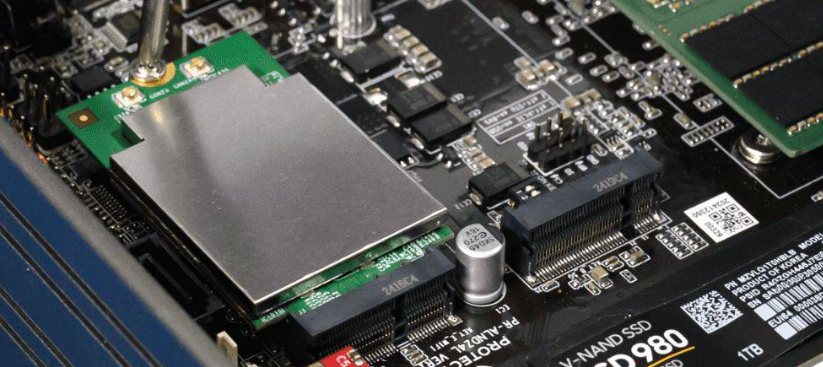
In addition to the 802.11ac WiFi card we offer, we have also successfully tested WiFi 6/6E cards (Mediatek MT7915 and MT7916 chipset). We were able to achieve roughly ~1.75Gbps throughput* when utilizing the WiFi 6E module on OpenWRT.
*Test was performed on OpenWRT 24.10.0. We utilizied a WiFi 6E module with the Mediatek MT7916 chipset. The access point (hostapd-openssl) was configured to utilize 802.11AX with a 160Mhz channel bandwidth. Throughput test was performed via iPerf3 between iPhone 16 Pro (connected wirelessly to OpenWRT access point) and a Windows laptop (hardwired to OpenWRT).
4G/5G Modem Slot
The M.2 Modem slot utilizes USB 3.2 Gen 1 protocol, and supports M.2 B-Key 3052 sized cards. Near the slot is a set of two switches that affect voltage on pins 20 and 22 which assists with supporting a wide range of modems. Further information on that can be found in the official datasheet.
An internal modem can be preinstalled by Protectli if purchased directly from our website.
On the Ethernet-side of the Vault Pro VP2430 is a Nano (4FF) SIM slot that can communicate with your installed modem. If you are utilizing a modem purchased from Protectli, you will need to access the modem's web GUI and modify a setting outlined below:
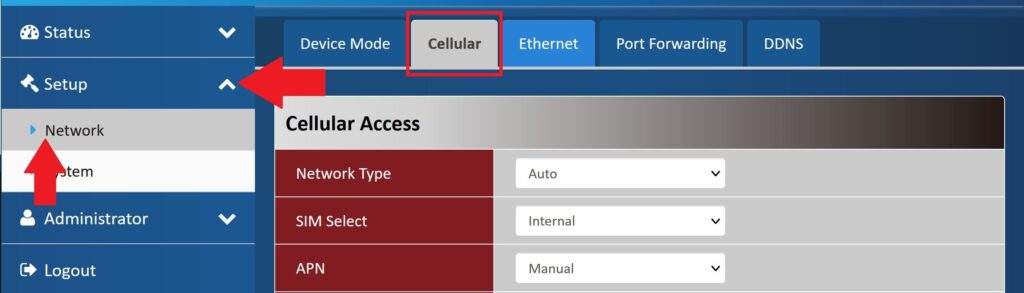
(Navigate to Setup -> Network -> Cellular Tab -> SIM Select – External):
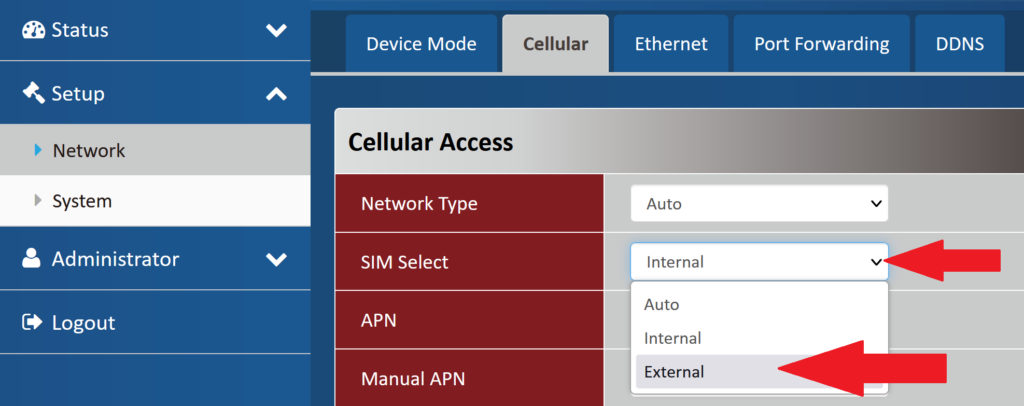
Make sure to save settings. You may need to restart the Vault or Modem for the SIM to work as expected.
HDMI/Display Port
Connect a monitor or TV to these ports for video/audio output. You can use a monitor to access the BIOS/UEFI firmware menu, or for displaying output of your installed operating system.
- The HDMI and Display Port supports a max resolution of 3840 x 2160 @60hz.
- The USB-C Ports support Display Port with the same standards as the dedicated Display Port
- 120Hz supported on lower resolutions such as 1920 x 1080.
- A maximum of three displays can be attached
As the N150 is a rather new CPU, some operating systems like Ubuntu 24.04 may be unable to display output above 800×600 due to running an older Linux kernel (you will need to be on 6.12 or newer). If you are running into this issue, please refer to this article from 9to5Linux for instructions on the process to update the underlying kernel to fix your issue. For Windows 11, we highly recommend updating the Intel® Graphics Drivers, downloading and using the Intel® INF Chipset Utility, and potentially running the Intel® Driver & Support Assistant. Make sure to run all Windows Updates and Optional Updates.
Serial COM Port
Used for serial console output, this is typically used to edit the BIOS/UEFI or modify an OS without the need for a monitor to be attached. A compatible USB-C COM cable is included with the VP2430. Please keep in mind this port is not a standard USB-C port and will not work with other USB peripheals. Click here for Vault COM Port/Serial Connection Tutorial.

USB Ports (4 x USB-A, 2 x USB-C)
There are a total of four (4) USB-A 2.0 ports commonly used to attach a keyboard/mouse/USB storage. The USB 2.0 Ports will offer a theoretical maximum throughput speed of 480Mbps (60MBps).
Additionally, there are two USB 3.2 Gen 2 USB-C ports. These ports can be used for Display Port video/audio output in addition to normal USB functions. The maximum theoretical throughput on these ports is 10Gbps (~1.2GBps).
Trusted Platform Module (TPM)
The Vault Pro VP2430 provides a polarized header for an optional hardware dTPM. The TPM is available from Protectli at this link. More information on TPM features can be found on this article.
The unit also contains a built-in PTT firmware TPM 2.0 when utilizing AMI firmware.
Conclusion
As always, if you have any questions or concerns, feel free to reach out to us directly so we can assist!