Have a Question?
Getting Started With Setting Up the Vault as a Firewall and Other Home Networking Tips and Info
Introduction
So you've purchased a Protectli Vault and you're ready to set it up in your home, but where do you begin? Even if you are a complete beginner to networking, have dabbled a little bit with configuring your router or modem, or are very confident with your skills, you should still have a good understanding of what the Vault actually is and how it can be utilized in your network.
This article aims to provide information for a very wide range of networking topics to help beginners feel confident, help with using other hardware with your Vault, and should be a good refresh for people who may have been out of the game for awhile.
We know that Protectli Vault owners have a wide range of skillsets. We know some of you are starting your networking journey with Protectli Vaults, some are self starters who learned from Reddit, YouTube, or forums; or maybe some of you were an expert back in the IBM or DOS days and are trying to get back into the modern stuff. So… where do we start?
What is a Protectli Vault?

To keep it simple: every Protectli Vault is a computer. It has a Central Processing Unit (CPU), uses Random Access Memory (RAM), has a storage device like a SSD or NVMe, and contains other typical computer features like USB ports, HDMI/Display Ports, and Ethernet Ports. It works just like your desktop or laptop computer at home. It can run Operating Systems (OS's), and is very popularly used to run firewall routing OS's like OPNsense and pfSense®.
A major benefit of using a Protectli Vault in your network is that every model contains multiple Network Interface Cards (NICs) [which are all those Ethernet Ports on the Vault] that can easily connect to your other network devices like a Modem, Wireless Router, Wireless Access Points (WAPs), Network Switches, and the like. Once the Vault is paired with an operating system of your choice, it can be placed in your network to secure all devices connected to it.
Another huge security benefit is that coreboot firmware is supported on all Protectli Vaults. What is coreboot you ask? Let's dive a bit deeper.
What is coreboot?
For a very quick, simple explanation: coreboot is an open-source, secure firmware that inherently "lives" on the Vault to help with making sure every component and part of the Vault is functioning properly with a security-focused mindset.
If you are unfamiliar with what firmware is, here's a metaphor that might help:
The Protectlli Vault = A car. Let's say it's a cool one like a Shelby GT350.
Firmware (coreboot) = the onboard computer system that tells the engine how to start, what to do when you press the gas pedal, how to read sensor data, and other important features. You wouldn't want people tampering with this, you'd probably prefer knowing it's safe, and you'd expect normal car functions to always work as expected.
Operating System (OS) = the driver who makes decisions and operates the vehicle. So, if you install OPNsense as your operating system, it will work with the Vault and Firmware to act as a firewall to secure your network traffic.
If you are really interested in diving deeper on coreboot, please check out our dedicated coreboot info and security features article.
How Does the Vault Secure My Network?
As previously mentioned, the operating system you choose to install will be "the driver" who makes the decisions on how to secure your network traffic.
People commonly install OPNsense or pfSense® in order to secure their home networks, as these are firewall operating systems.
After one of these OS's are installed, you will typically connect the Vault to your modem via Ethernet, and then you will connect your other devices to the other LAN ports of the Vault so all traffic coming from the internet goes through the firewall before reaching your computers, phones, TVs, etc.
For another metaphor: imagine a massive lake (the wide internet), and a river from that lake channels into your small town (the modem), and then all the water from the river goes into a water filtration system (the Protectli Vault's WAN port), and then the water leaves the filtration system (filtered at the firewall) and all the people in your town (your computers, phones, devices connected to the Vault's LAN port) can drink clean, filtered water.
In the image below, you can get a basic visual representation of how the traffic flows from the internet to other devices in a hypothetical home setup. Notice that all the computers, the switch, and access point all connect to the Vault and not the modem. The modem is connected to the Vault, and would be connected to the Vault's WAN Ethernet interface.

So Can I Just Connect the Vault To My Modem Now?
Let's slow down just a little bit and confirm a few things about the operating system choice, and we'll also make sure you have an understanding of some of the networking concepts you should think about.
- Do you have an operating system installed on the Vault?
- If you purchased the Vault from Amazon, it will not have one, so you must install an OS. You can find installation instructions on the Software/Operating System section of our Knowledge Base.
- If you purchased a Vault directly from our webiste and selected an operating system to be preinstalled, it will be installed to the storage device, and it should automatically boot to it
- If you do have an operating system installed, what is it?
- If it is OPNsense or pfSense®, great!
- If you have Ubuntu Desktop or Ubuntu Server installed, these are not inherently firewall operating systems, but technically can be used as them if you know what you're doing. If you want to use Ubuntu as a firewall, please look up (Google) some guides for utilizing ufw as a router firewall. If you don't have any experience with this and just want a firewall, you should install OPNsense or pfSense®. We will not review Ubuntu firewall setup in this article.
- If you do not have an operating system installed, and you want to use it as a firewall:
- Follow the instructions for installing OPNsense or pfSense found on our Knowledge Base.
Important Networking Concepts You Should Understand
You don't have to be an expert to get this up and running, but you should have a general concept of the following topics so you know what's going on.
MAC Address
A MAC address (Media Access Control address) is a unique identifier assigned to each network interface card (Ethernet Ports on your Vault) in a device, used for communication on a local network. Protectli Vaults have multiple Ethernet interfaces, and each one has its own distinct MAC address for identifying and managing network traffic at the hardware level. For the most part, you will not have to think much about this unless you are using AT&T Fiber or some other specific use case.
The serial number of your Vault is the MAC address for the first Ethernet port. It will typically be something similar to 6462662F0000, but this will vary depending on your Vault. Every number or letter will be unique.
IP Addresses
An IP address (Internet Protocol address) is a unique number that identifies a device on a network. It's kind of like a mailing address for your devices, and each device will have it's own IP address. If two devices have the same IP on your network, then this can cause problems. How can a mailman deliver a package to the correct address if multiple people have the exact same address? The mailman is just going to give up and go home.
This concept is important for when you connect your Vault to the Modem. If your modem is trying to provide the same IP address to the Vault that the Vault is trying to provide to a connected device, then there will be trouble with routing traffic.
This brings up the concept of DHCP and subnets.
DHCP and Subnets
DHCP stands for Dynamic Host Configuration Protocol. It’s a network service that automatically assigns IP addresses and other network settings to devices when they connect to the Vault. When you connect a computer to the LAN port of the Vault, the Vault will give the computer a valid IP address from a specific range of addresses.
But… how does it know what addresses it can hand out? This is where subnets come into play. A subnet defines the size and boundaries of an IP address range. By default, OPNsense and pfSense® configure the LAN interface to use the 192.168.1.0/24 subnet. This means:
The gateway (typically the Vault's LAN IP) is 192.168.1.1. The subnet can hold IP addresses from 192.168.1.2 to 192.168.1.254. This means that over 200 unique devices (computers, TVs, phones) can connect to this interface and receive a valid IP. pfSense® and OPNsense's default subnet range is typically 192.168.1.100-192.168.1.254, so the first device you connect to the Vault would get an IP of 192.168.1.100.

In the screenshot above, you can see that the LAN port is 192.168.1.1/24 as shown on a pfSense® console menu.
If you're curious what the /24 is, this is the subnet mask. It basically determines how many addresses can be used. It is a somewhat complicated concept until you really dive into it, so we won't be going into the technical details. If you are interested in getting an introduction to it, check out this video from Professor Messer. For most cases in home networks, using /24 is good as long as you're using a valid private IP, which we will explain a little bit more soon.
WAN and LAN
WAN (Wide Area Network) refers to the external network connection (normally the internet) that your firewall uses to communicate with the outside world. LAN (Local Area Network) is your internal network where your devices (like computers, printers, and phones) communicate with each other and access the internet through the WAN.
So, the Vault gets a WAN address from the modem, and then the Vault gives a LAN address to the devices directly connected to the Vault in order to access the internet securely.
Public and Private IP Addresses
A public IP is a globally routable address, directly reachable on the internet (WAN). Your modem will have a Public IP. Your modem should be able to hand that public IP (WAN IP) to the Vault when connected to the Vault's WAN port.
A private IP (LAN) is not routable on the internet, it’s only used inside local networks. Typical private IP addresses range from:
- 192.168.0.0 – 192.168.255.255
- 10.0.0.0 – 10.255.255.255
- 172.16.0.0 – 172.31.255.255
- If you are still confused with those numbers above, PLEASE watch this video and research subnets
Some modems will try to hand out a private IP to the devices connected to it. This can cause trouble when using the Vault as a firewall. For example: If your modem tries to set your Vault's WAN interface as a private IP of 192.168.1.2, and the Vault's LAN interface is 192.168.1.1/24, and the Vault tries to give a LAN (private) IP to a device connected to LAN, it won't know how to communicate properly since the WAN and LAN addresses are technically on the same subnet. This is known as double NAT.
If your modem hands out a private IP address (LAN) to your Vault's WAN interface, you may need to configure the modem to be in a "Bridge Mode" or "IP Passthrough" mode.
Bridge Mode or IP Passthrough Mode on Your Modem
Bridge Mode disables the modem’s built-in router functions and passes the public IP (WAN) address directly to your Vault, allowing it to handle all routing, NAT, and firewall tasks. This avoids double NAT issues and gives the firewall full control over your network traffic.
AT&T Fiber Modems typically have a feature called IP Passthrough mode instead, which effectively accomplishes the same thing, to some extent. If you have AT&T Fiber, this is your best bet and is required to be enabled. Information from AT&T can be found here (please read that…) You will want to set IP Passthrough mode to be linked to the MAC address of the Vault's WAN interface. You will need to connect a computer directly to your AT&T modem to access the settings. The password and IP will be found on your modem.
Modems typically have an IP Address you can navigate to modify settings of the modem. You would be able to access this by going to the IP Address in a web browser on a computer connected to the modem. The IP is commonly written on the bottom/side of your modem, but if you can't find it out, then you may want to refer to the documentation on the modem provided by your Internet Service Provider.
Getting the Vault Connected to your Modem
Alright. At this point you should have a Protectli Vault with a firewall operating system installed to it, you should have a general idea of some networking concepts, and you may have already made some changes to your modem to put it in a bridge mode or IP passthrough mode.
Preparation
- Place the Vault in a location where you will be able to connect it to your modem via ethernet as well as hooking up the Vault to a power outlet
- You realistically want a computer or laptop nearby that you will connect to the Vault later on
- To be extra prepared, bring a monitor and keyboard to connect to the Vault (not 100% necessary, but useful for double checking that the Vault is booting into the installed operating system)
Setup
- Place the Vault near your modem
- Connect one side of an ethernet cable to your modem, and the other side to the Vault's WAN port
- Information regarding default WAN and LAN assignments this can be found on the OPNsense guide or pfSense guide
- When we preinstall OPNsense, LAN is typically Port 1 and WAN is Port 2. This varies by the model you purchased, but just check out that OPNsense guide linked above
- Connect your computer or laptop via ethernet to the Vault's LAN port
- *Optional* Connect a monitor and keyboard to the Vault
- Take the power supply and plug it into your wall outlet, connect to the Vault
- The Vault should immediately attempt to power on
- If you have a monitor connected, pay attention and make sure you see that it is booting into your operating system

- After a minute or so, you may hear a jingle emit from the Vault. If you have a monitor connected, you should see a login prompt and potentially a bunch of options to select from
- Once you've made it to this point, your firewall is now running
- Open a web browser on a computer connected to the Vault's LAN port
- Go to the default LAN IP address
- This will be 192.168.1.1 if you have not changed anything already
- You should now see a login prompt for your operating system
- This page is where you will do a vast majority of your firewall configuration, this is known as the Web GUI
If you are having trouble reaching the internet, please reboot your modem while the Vault is turned on (do not turn off the Protectli Vault). This will refresh the WAN address which typically solves this issue. You should also verify that you have not manually set a static IP on the computer beforehand. You should allow it to accept DHCP.
You should also make sure you have the modem connected to your WAN port and your computer connected to LAN port. You can double check the interface assignments by connecting a monitor and keyboard to the Vault and checking which interfaces are set to WAN or LAN.
Finally, make sure you do not have a router placed before the Vault. The Vault should be directly connected to your modem. If another router is in front of the Vault this can cause double NAT issues like we explained earlier.
Next Steps, Configuration Options, and Connecting Other Networking Devices
So at this point you have a firewall running on your network. The default configuration of OPNsense and pfSense® have a WAN interface and a single LAN interface enabled with basic packet filtering and rules. However, are you wanting to connect more networking devices to the Vault like a switch, NAS, or wireless access point?
Depending on what Vault model you have, you have a few options.
Creating Backups of Your Configuration
Before you do any major configuration changes, you should backup your config so you can easily revert to it if any issues arise.
You can download your configuration file by:
OPNsense: Go to System > Configuration > Backups > Press the Download configuration button
pfSense®: Go to Diagnostics > Backup & Restore, click the Download configuration button
On these pages, you can also upload configuration files to restore to them.
Using a Network Switch
A Network Switch, if you are unaware, is basically a device with multiple Ethernet Interfaces that can connect to the Vault's LAN interface, which allows you to connect computers, servers, gaming consoles, etc in order for all of them to get an individual IP address on the same network. This is a very useful piece of equipment, and is especially great for Vaults with only two Ethernet interfaces so you can connect a bunch of devices directly to the single LAN interface. A general idea on how that works can be seen in the image below:

In this image, let's pretend the Vault has OPNsense installed. The modem is connected to Port 1 of the Vault, which we designated as the WAN port. Port 2 is our LAN port and we have connected a switch to it. The Ethernet cable from the LAN port goes into the first available port on the Switch, and the Switch gets it's own IP of 192.168.1.2. There are four computers connected directly to the switch, and they all get their own IP addresses because the switch allows the computers to get an IP address from the Vault's LAN DHCP. Every computer is able to use the internet as expected, and they can all communicate with each other.
Using a Wireless Access Point or Wireless Router
You can connect a Wireless Access Point (WAP) to the Vault's LAN port (or OPT port) to allow WiFi access on the network, and the traffic will be secured behind the firewall.
One major distinction between a WAP and a normal Wireless Router is that a WAP, by default, will hand out IP addresses from the Vault's DHCP server. A Wireless Router, by default, tries to hand out IP addresses from it's own DHCP server, which can (and will) cause issues when connecting to the Vault. Almost every single Wireless Router has the ability to be put into an "Access Point" mode so it can hand out IP addresses directly from the Vault.
An overview on setting up a Wireless Router as an Access Point with the Vault can be found on our YouTube channel!
Setting up the other Ethernet Interfaces with an IP Address, Subnet, and DHCP
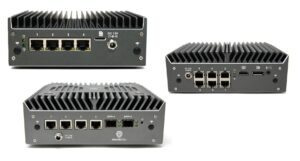
If your Vault has more than 2 ethernet interfaces, you can set up the other ports to have their own IP address and subnet to provide a connection to other devices.
By default, these other ports are not setup with an IP address, a subnet, DHCP, or firewall rules. You will have to manually set these all up. It might feel overwhelming if you're new to this, but it is a fairly quick process.
A big benefit of having different networks/subnets set up on individual NICs is that you can segregate certain aspects of your network from each other if desired. If you have a home security camera setup, you could have all of your cameras connected to a specific interface on the Vault, and you could apply rules so only specific computers can connect to them.
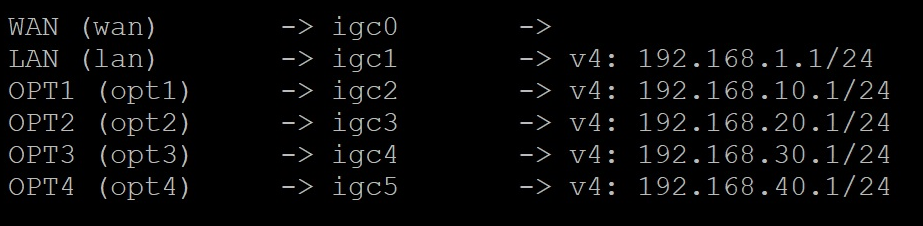
One big thing to take into consideration is that each NIC has a specific name as seen by the operating system. With OPNsense and pfSense®, the first port would be seen as [igb/igc]0, second port would be [igb/igc]1, third port would be [igb/igc]2, etc. With the 2.5GbE Vaults, it would be "igc0", "igc1", "igc2", etc. Check out the image below for an example where every single ethernet port on a VP4600 was configured with it's own network:
For instructions on setting up OPT ports, please check out the articles linked below:
OPNsense: Click Here.
pfSense®: Click Here.
Changing the Default LAN Port's IP Address
If you want to change the LAN address from the default 192.168.1.1/24 to something else, you absolutely can. It is very important that you also update your DHCP range when you do this, otherwise you can lock yourself out from accessing the Web GUI.
The reason you would lock yourself out if you just change the IP without updating DHCP is because it would still be attempting to hand out IPs from the previous subnet, which won't work.
One of the easiest ways to change the default LAN IP address, subnet, and DHCP is to do it through the console menu, which is accessible when connecting a monitor and keyboard directly to the Protectli Vault. (If you do not already have a monitor connected to the Vault, you will need to connect the monitor and reboot the Vault one time, otherwise you will not see video)
Click on the dropdowns below for instructions for either OPNsense or pfSense®:
Connect a monitor and keyboard to the Vault. If the Vault is already powered on, please make sure the monitor is attached to the Vault, and reboot one time. The HDMI or Display Port connection must be attached when the Vault initially boots, otherwise video will not display.
- Let OPNsense boot all the way, you will typically hear a little jingle when it is completed booting, or you will see a login prompt
- Login with your root username and password
- When you are typing the password, you will not see any text on the screen, it will be invisible
- After logging in, you should see a a bunch of different options with numbers next to them
- Type 2 then hit your Enter key to select the option to "Set interface IP address"
- You should now see a list of all the available interfaces
- Type the number correlating with the LAN port (typically 1 by default), and hit Enter
- Type N when asked "Configure IPv4 address LAN interface via DHCP?" and hit Enter
- The reason we choose no for this is because this would imply some other device would hand out an address to the LAN port, but we want to configure it manually
- You will now be prompted to "Enter the new LAN IPv4 address"
- You can enter whatever you would like here as long as it is a valid private IP address
- For example, you could do something like 10.10.10.1, but there are thousands of options
- Type your desired IP address and hit Enter
- You will now be prompted to "Enter the new LAN IPv4 subnet bit count"
- In most cases using 24 will be fine, which would allow for over 250 unique IP addresses to be handed out
- Type your desired subnet bit count and hit Enter
- You will now be prompted to "enter the new LAN IPv4 upstream gateway address" You should just hit Enter to skip this
- Type n and hit Enter when asked to "Configure IPv6 address LAN interface via WAN tracking"
- Type N and hit Enter when asked to "Configure IPv6 address LAN interface via DHCP6?"
- Hit Enter to skip "Enter the new LAN IPv6 address"
- Type Y and hit Enter when prompted "Do you want to enable the DHCP server on LAN?"
- You will now be asked to enter the starting IP address for your DHCP range. Type your first usable IP address and hit Enter
- If you happened to use the example IP address mentioned a few steps ago, your first IP would be 10.10.10.2
- If you used a different IP address and are worried about doing something wrong, you can use a subnet calculator
- You will now be asked to enter the end address (the last usable IP address in your subnet) Enter the IP address and hit Enter.
- Again, if you happened to use the example IP address then you can set the last IP to be 10.10.10.230 (254 would be the highest, but we won't use the whole range in case we want to set a static IP on a device later on)
- Use the subnet calculator linked in the previous step if you are confused
- You may now be asked "Do you want to change the web GUI protocol from HTTPS to HTTP?" type N and hit Enter
- If asked "Do you want to generate a new self-signed web GUI certificate?" you can type y and hit Enter
- If asked "Restore web GUI access defaults?" you can type y and hit Enter
- The LAN port will now begin configuring and you should eventually get a message stating that you can access the web GUI by opening the IP address in a web browser
- If you already had a computer or switch connected to the LAN port, you may need to refresh the connection on the device for it to get the new IP
- You could just reboot the Vault one time too
Connect a monitor and keyboard to the Vault. If the Vault is already powered on, please make sure the monitor is attached to the Vault, and reboot one time. The HDMI or Display Port connection must be attached when the Vault initially boots, otherwise video will not display.
- Once pfSense boots all the way, you may hear a jingle play
- If prompted to login, use your root username and password
- You should now see a menu with at least 16 options
- Type the number 2 and hit Enter to choose "Set interface(s) IP address"
- Type the number correlating with the LAN port (normally 2) and hit Enter
- When prompted to "Configure IPv4 Address OPT 1 interface via DHCP?" type n and hit Enter
- You will now be prompted to enter the new LAN IPv4 address. Type your desired IP address and hit Enter
- You can enter whatever you would like here as long as it is a valid private IP address
- For example, you could do something like 10.10.10.1, but there are thousands of options
- When asked to set the subnet bit count, you can type 24 and hit Enter
- a 24 bit count would allow for over 250 usable IP addresses
- Hit Enter when prompted for new IPv4 upstream gateway, please leave this section blank and do not type anything else
- When asked to "Configure IPv6 via DHCP6", type n and hit Enter
- When prompted to "enter new IPv6 address", press Enter key to skip
- When asked to "enable the DHCP server on LAN", type y and hit Enter
- You will now be asked to enter the start address of your DHCP range. This will be the first usable IP address. Type your first IP address and hit Enter
- If you used our example IP address from a few steps ago, your start address would be 10.10.10.2
- If you used a different IP address and are worried about doing something wrong, you can use a subnet calculator
- For the end address, type the last available IP address from your subnet and hit Enter
- Again, if you happened to use the example IP address then you can set the last IP to be 10.10.10.230 (254 would be the highest, but we won't use the whole range in case we want to set a static IP on a device later on)
- If asked to revert to HTTP, type n and hit Enter
- This should finalize your setup and you will get a success message telling you that you can access the Web GUI with the new IP address
- If you already had a computer or switch connected to the LAN port, you may need to refresh the connection on the device for it to get the new IP
- You could just reboot the Vault one time too
Configuring a Static IP For a Specific Device On Your Network
Setting a static IP for a specific device on your network is extremely useful when you have an internal server, a Network Attached Storage (NAS), your own DNS, or maybe some other hardware peripheral like home-automation hubs.
Setting a static IP to a specific device will make sure that the device always has the same IP address and that it won't randomly change down the line. Instructions for setting a static IP for OPNsense and pfSense can be seen in the drop downs below:
First, access your OPNSense Web GUI on a computer connected to the Vault.
There are two options to configure a static IP for a specific device. If the device you want to set a static IP for is already connected to the Vault and has an IP, we can view the existing leases and go from there. Otherwise, we can add a new entry based on the MAC address of the device.
If the device you want to add a static IP to is already connected to the Vault:
- Go to Services > ISC DHCPv4 > Leases
- You should see a list of all the devices connected to the Vault that have been given an IP address
- You can click on the + icon to the far right of the device you want to configure a static IP to start configuring it
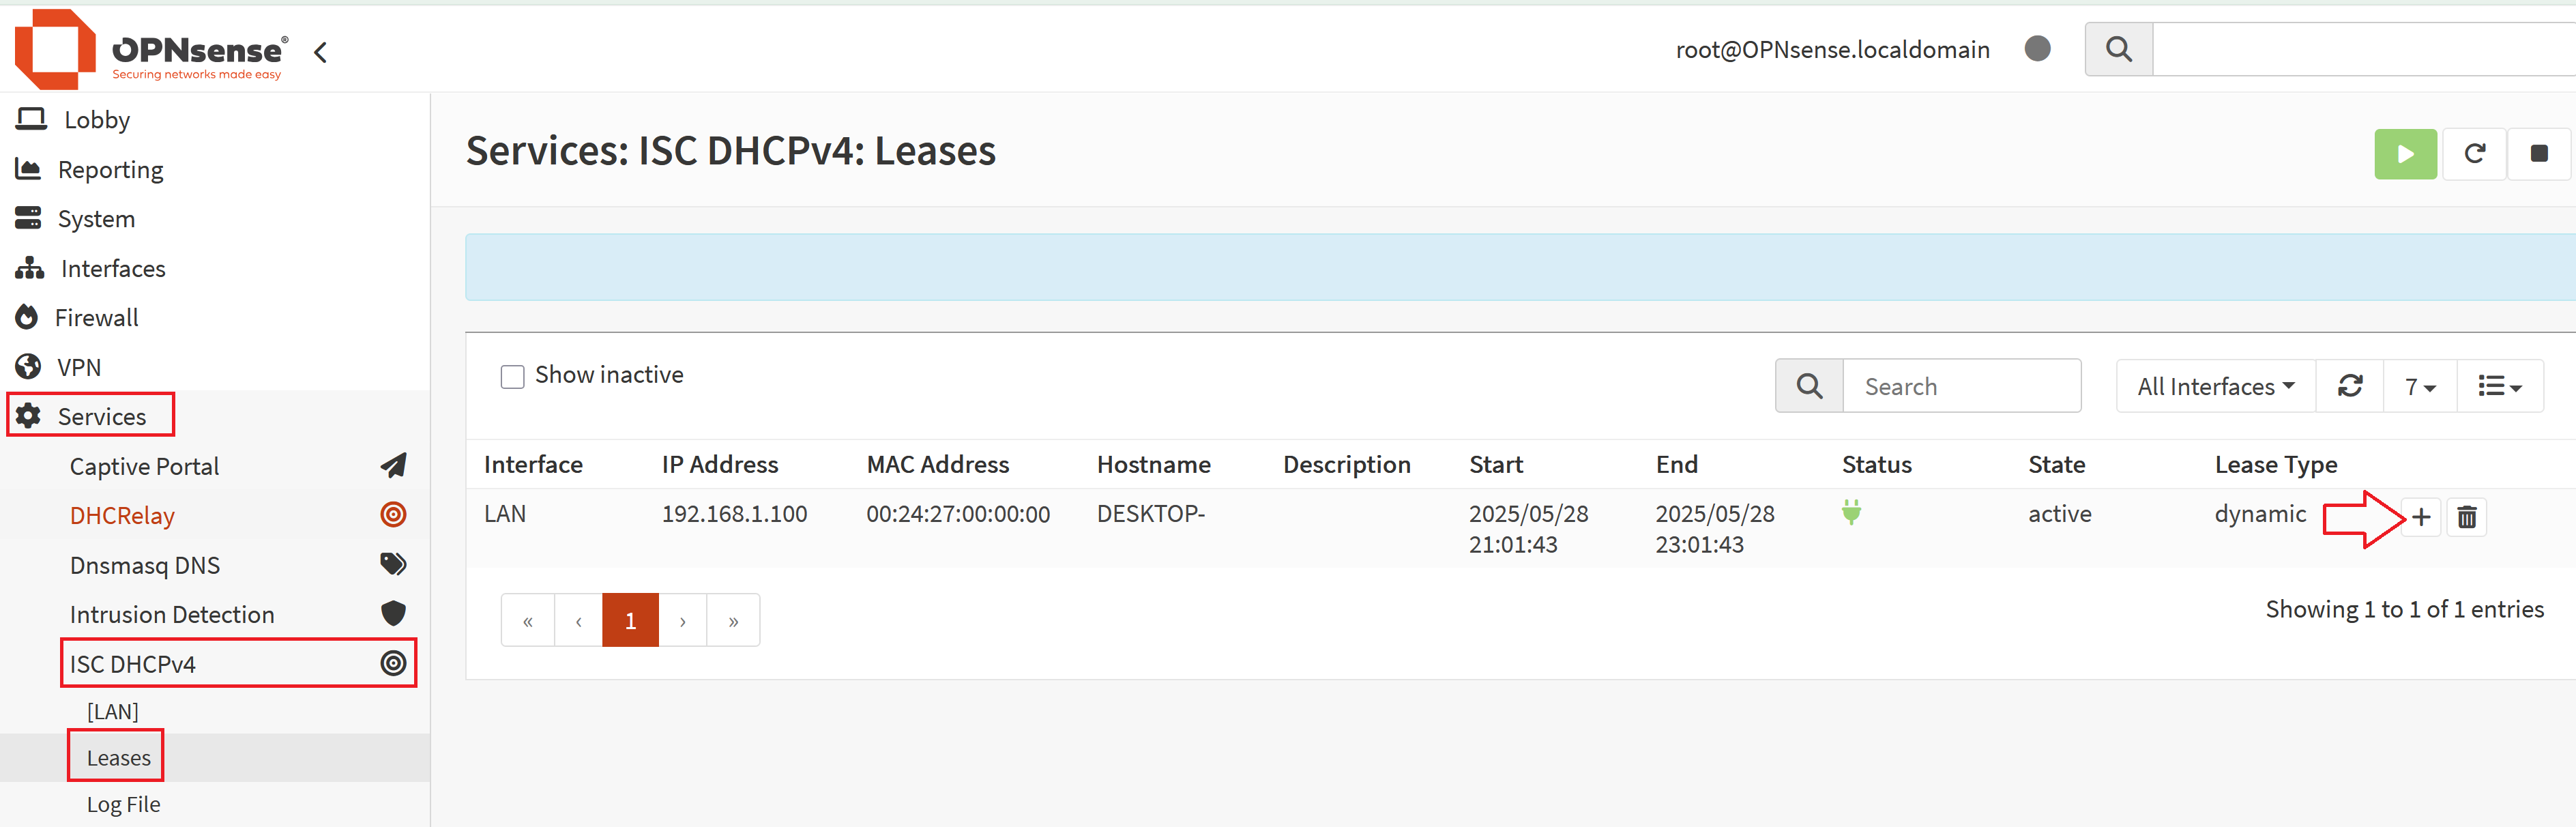
- Once here, the MAC address should already be filled out in the MAC address field
- Scroll down to the "IP Address" section and give it an IP address that is within your subnet, but outside of the DHCP range
- For example, the default OPNsense LAN subnet is 192.168.1.0, but the DHCP range is 192.168.1.100 – 192.168.1.254. You would have to enter an address that is somewhere before 192.168.1.100. (192.168.1.50 for example)
- If you happened to follow our instructions for changing the default LAN address from a few sections ago and made your LAN DHCP range 10.10.10.1 – 10.10.10.230, you could set the static IP as anything from 10.10.10.231 – 10.10.10.254
- Save settings and Apply
If you have not already connected the device to your Vault, you will need to do the following:
- Go to Services > ISC DHCPv4 > [LAN]
- If you are configuring a static IP on a different interface, this might be OPT1, OPT2, etc
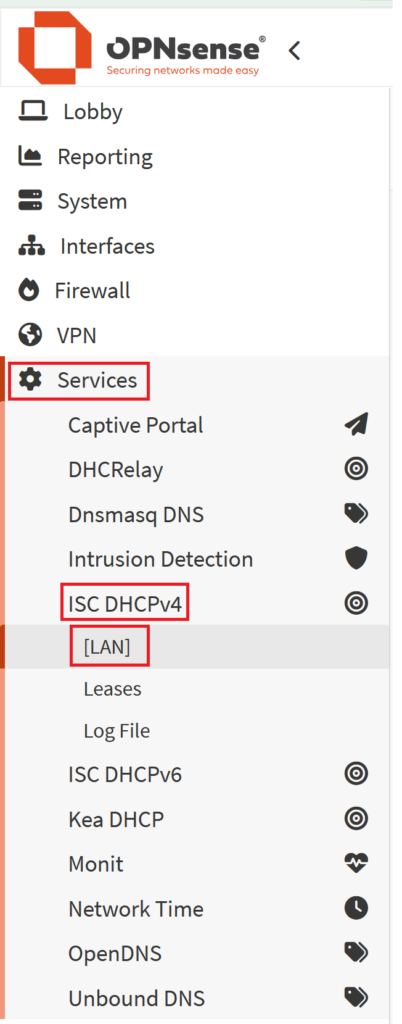
- Once there, scroll down to the bottom of the page to the "DHCP Static Mappings for this interface." section
- Click the + icon to add a new static mapping
- You will need to enter the MAC address of the device you wish to add a static mapping for
- If you don't know what the MAC address is for the device, it is sometimes printed on a label on the bottom of some computers, servers, etc
- If you don't have the MAC address, you may just want to go ahead and connect the device to your Vault and allow it to acquire an IP so you can just follow the first set of instructions in this drop down
- Scroll down to the "IP Address" section and give it an IP address that is within your subnet, but outside of the DHCP range
- Save & Apply
Log in to the pfSense web interface.
Go to
Services → DHCP Server → LANScroll down to the section labeled
"DHCP Static Mappings for this Interface"
Click ➕ AddFill out the fields:
MAC Address: Enter the MAC address of the device.
IP Address: Choose an IP address within the LAN subnet, but outside of the DHCP range.
Example: If your DHCP range is192.168.1.100–192.168.1.200
, you could assign192.168.1.10
Click Save
Click Apply Changes at the top of the page.
If you don't know the MAC address, you can just go to Status > DHCP Leases instead and add a static mapping for the device directly there.
Setting up a VPN
Nowadays you can't go one YouTube video without getting an advertisement for some sort of VPN provider that can be used to secure your internet connection. Popular VPN providers include NordVPN, Proton VPN, ExpressVPN, or Mullvad VPN.
With that being said, a VPN connection can be useful for a whole host of reasons. The security conscious people may simply want to add another layer of hiding their identity, some people may want to access websites not normally available to them in their geographic region, or maybe you're wanting to block trackers/ads.
But what even is a VPN? A VPN (Virtual Private Network) creates a secure, encrypted connection between your device and a remote server run by a VPN provider. This hides your real IP address and routes your internet traffic through the VPN server, helping protect your privacy and bypass geographic restrictions.
Most, if not all, of the big VPN providers allow you to setup a VPN connection on OPNsense or pfSense®. Typically these companies will have documentation available on their website on how to set it up. A big benefit of setting up a VPN directly on OPNsense or pfSense® is that the VPN connection would be tied to a single ethernet interface on the Vault, and every single device connected would be behind the VPN. Manually setting up a VPN connection does take some basic knowledge of networking, and you may run into some roadblocks if this is your first time trying to set one up. However, it's an awesome learning experience.
We at Protectli have a guide for setting up a VPN connection utilizing Proton VPN on OPNsense available at this link.
Intrusion Detection/Intrusion Prevention (IDS/IPS)
IDS (Intrusion Detection System) and IPS (Intrusion Prevention System) are security features built into OPNsense and pfSense® that help monitor and protect your network from malicious traffic.
IDS watches all the traffic passing through your firewall and alerts you if it detects suspicious activity.
IPS goes a step further by not just detecting, but actively blocking harmful traffic before it reaches your devices.
Both systems rely on signature-based rules (like threat databases), and in OPNsense, they're typically powered by Suricata, which can run inline on your network interfaces.
These can be somewhat taxing on your system, and may affect throughput. Units with better CPUs will handle IDS/IPS better, especially when you have big rule sets. This typically takes up quite a bit of RAM as well.
One great plugin for OPNsense is called ZenArmor. This is a full IDS/IPS solution that is built right into OPNsense, and has an awesome dashboard. They do have a paid subscription option, but it is certainly worth it if you require an IDS/IPS solution that works well. Information on that can be found here: https://docs.opnsense.org/vendor/sunnyvalley/zenarmor.html
Recommended Tweaks/Configuration Changes
In terms of general performance benefits, there aren't really any 100% recommended changes. With newest versions of OPNsense and pfSense®, the default configuration is already pretty solid in terms of balancing performance and power. Features like AES-NI are enabled by default.
If you are on a PPPoE connection with pfSense®, you may want to follow these instructions for improving throughput.
Otherwise, you can generally fool around with the PowerD settings found in the System > Settings > Miscellaneous section of the Web GUI to potentially affect performance. This isn't guaranteed to make a major difference, but you may want to test enabling PowerD in Hiadaptive mode or Performance mode if you are using a VPN connection or IDS/IPS to see if performance increases.
Conclusion
There is obviously quite a lot you can do when using the Vault as a firewall, and you should check out the documentation of each operating system to really dive deep into other things we haven't gotten into.
If you have any questions or concerns, please reach out to us at support@protectli.com.