Have a Question?
How to Fix COM/Serial Output on OPNsense 25.1 for Vaults with coreboot
Overview of the Issue
OPNsense 25.1 updated the underlying FreeBSD kernel to 14.2, which has changed the device hints for UART (Universal Asynchronous Receiver-Transmitter) from ISA (Industry Standard Architecture) to ACPI (Advanced Configuration and Power Interface). This has resulted in serial output problems on certain Protectli Vault and Vault Pro devices utilizing both coreboot firmware and OPNsense 25.1 as the operating system. This effectively causes no serial output to display for the operating system.
There are currently two workarounds to solve this issue. There is one solution for directly installing OPNsense 25.1 as well as one solution for updating from 24.7 to 25.1. If you have already updated to OPNsense 25.1 and lost serial access, please follow the steps found in the "Solution 2: For Upgrading" section of this article.
The following table contains the Vault and Vault Pro products that are currently affected:
| Vault/Vault Pro Model | coreboot Version |
|---|---|
| Vault FW6 Series | v1.0.14 (or older) |
| Vault V1000 Series | v0.9.3 (or older) |
| Vault Pro VP2410 | v1.1.1 (or older) |
| Vault Pro VP4600 Series | V1.2.0 (or older) |
Solution 1: For Installation
In this section we will be installing the OPNsense serial image. Due to this, you will need to utilize a serial console like PuTTY (Windows/Linux), minicom (Linux), or screen (MacOS terminal). If you have never used a serial connection with your Protectli Vault or Vault Pro, please refer to this article for instructions. You will also need to properly burn the OPNsense serial image to a USB storage drive. You can download the OPNsense serial image from OPNsense's website. If you need help burning the image to your USB, please refer to this article for instructions.
As a forewarning: there are 36 steps for this solution, so please make sure you are following along in order and do not miss any steps.
- Insert the USB drive with the OPNsense 25.1 serial image burned to it, into an available USB port on your Vault/Vault Pro
- Verify that the COM cable is connected to your Vault's COM port and your computer
- Start PuTTY (or other serial console) and verify that the proper settings have been selected (115200 baud rate, use correct COM connection)
- Start the serial connection
- Power on the Vault
- Press F11 on your keyboard to enter Boot Manager menu, if you immediately see a list of options, you should still hit the F11 key
- Once in the “Boot Manager Menu”, select the USB drive with the serial OPNsense installer and press enter
- Once the OPNsense logo is displayed, quickly press the space bar to pause the auto boot timer
- From the OPNsense menu, press 3 to “Escape to loader prompt”
- You should now see “Exiting Menu!”, and some command options
- To set the device hints back to ISA, use the following command:
-
set hint.uart.0.at=”isa”
-
Press Enter key to confirm
-
- To apply the changes and boot, type the following command:
-
boot
- Press Enter key to confirm
-
- Please read this whole step before proceeding. You should now see the full output through the serial console and you will be able to start the installation process. After a minute or so, you will be prompted to login. You can install OPNsense by logging in as "installer" and using the password "opnsense" (do not actually type the quotation marks). You can proceed to follow the installation steps, but please do not reboot yet. The last step will be the "Installation Complete" section that asks if you would like to reboot. Do not proceed past that page yet, and do not reboot yet. If you accidently rebooted already (no worries), you can skip ahead to the Solution 2 section.
The previous steps only affected the installation instance rather than the entire installed operating system, so if you reboot now, the issue will reappear. In order to fix the issue on the installed instance, please do the following:
- Once you reach the "Installation Complete" page, press the Escape (ESC) key on your keyboard.
- A 5 second reboot timer will start, so quickly press the CTRL + C key on your keyboard to abort the reboot
- You will now be greeted by a login prompt
- Login by using "root" as the username, and "opnsense" as the password (once again, do not include the quotation marks)
- You will be presented with several options, type 8 and hit your Enter key to enter the Shell
- You will now be in the shell. You should see a line that says "root@OPNsense:~ #". You are able to type commands here
- The first command we will enter will allow us to view where the FreeBSD system files have been installed. Type the following command:
-
gpart show
-
Press your Enter key to send the command
-
- In the following image/example, you can see the location of the system files on the third partition of the eMMC storage (mmcsd0p3, freebsd-ufs). In our example we installed the OS to the eMMC of the Vault, but yours may be in a different location if you installed OPNsense to an NVMe or SSD, and yours may say zfs instead of ufs.
- You will need to mount your FreeBSD partition to /mnt/. Our example can be seen below, but keep in mind your partition will probably be different:
-
mount /dev/mmcsd0p3 /mnt/
- *Note that there is a single space between the partition (mmcsd0p3) and /mnt/
-
Press your Enter key to send the command
-
-
- Move to the directory where the partition was mounted and boot into it by entering the following commands:
-
cd /mnt/ boot
- Press your Enter key to send the command
-
- Access/change the device hints by entering the following command:
-
vi device.hints
-
- You will now see all the device hints that are set
- Use the arrow keys on your keyboard to move to "hint.uart.at="acpi". You will want the flashing underscore cursor to be placed under the "a" in "acpi"
- Press the "X" key on the keyboard a few times until acpi is completely gone
- Press the "I" (as in India) key on your keyboard to enter Insert Mode, and type "isa". Press the Escape (ESC) key on your keyboard.
- Use your arrow keys again to move the cursor to "hint.uart.1.at="acpi". Place the cursor over the "a" in "acpi" again, and press the "X" key on your keyboard until acpi is removed. Press your "I" (as in India) key again, and type "isa".
- Once you have finished editing, press the Escape (ESC) key to make sure you are not in any editing mode in vi.
- Type ":" (don't hit Enter yet) and make sure you see it at the bottom of the screen
- Type the following:
-
wq!
- Press the Enter key on your keyboard to send the command (forces a write and quit)
-
- You will now be back at the shell command line.
- Change to the home directory by entering the following command:
-
cd ~
- Press the Enter key on your keyboard
-
- Type the following command to unmount the partition:
-
umount /mnt/
-
Press the Enter key on your keyboard
-
- Type the following command to reboot:
-
reboot
- Press the Enter key on your keyboar
-
The full serial console output should now be visible on the serial console. The device hints will use ISA instead of ACPI.
After entering the "reboot" command from step 36, the Vault/Vault Pro will reboot. You can unplug your OPNsense USB drive from the Vault/Vault Pro. If you are using a Vault V Series or Vault Pro VP Series, you may need to change the boot order in the coreboot menu so your SSD/installation location is the first in line. If needed, follow the steps found on this article.
Solution 2: For Upgrading
This set of instructions is for those that have already installed or upgraded to OPNsense 25.1 and have lost serial console access, or if you are preparing to upgrade to OPNsense 25.1 from an earlier OPNsense version and don't want to lose serial console access. This will require a computer to be connected via ethernet to the LAN port of the Protectli Vault or Vault Pro. This means that the Vault/Vault Pro should be turned on and actively running OPNsense, and that it is handing out an IP address to the connected computer.
- On a computer connected to the LAN port of the Vault, access the OPNsense webGUI in a web browser of your choice
- This is 192.168.1.1 by default, but you may have changed it at some point
- If you are unsure, you can use the command line/terminal on the computer connected to the LAN port to check. On Windows, type "ipconfig" to find the Default Gateway, which would be the address you would go to. On Linux, type "ip route | grep default" and find the Default Gateway.
- Login to the OPNsense web GUI
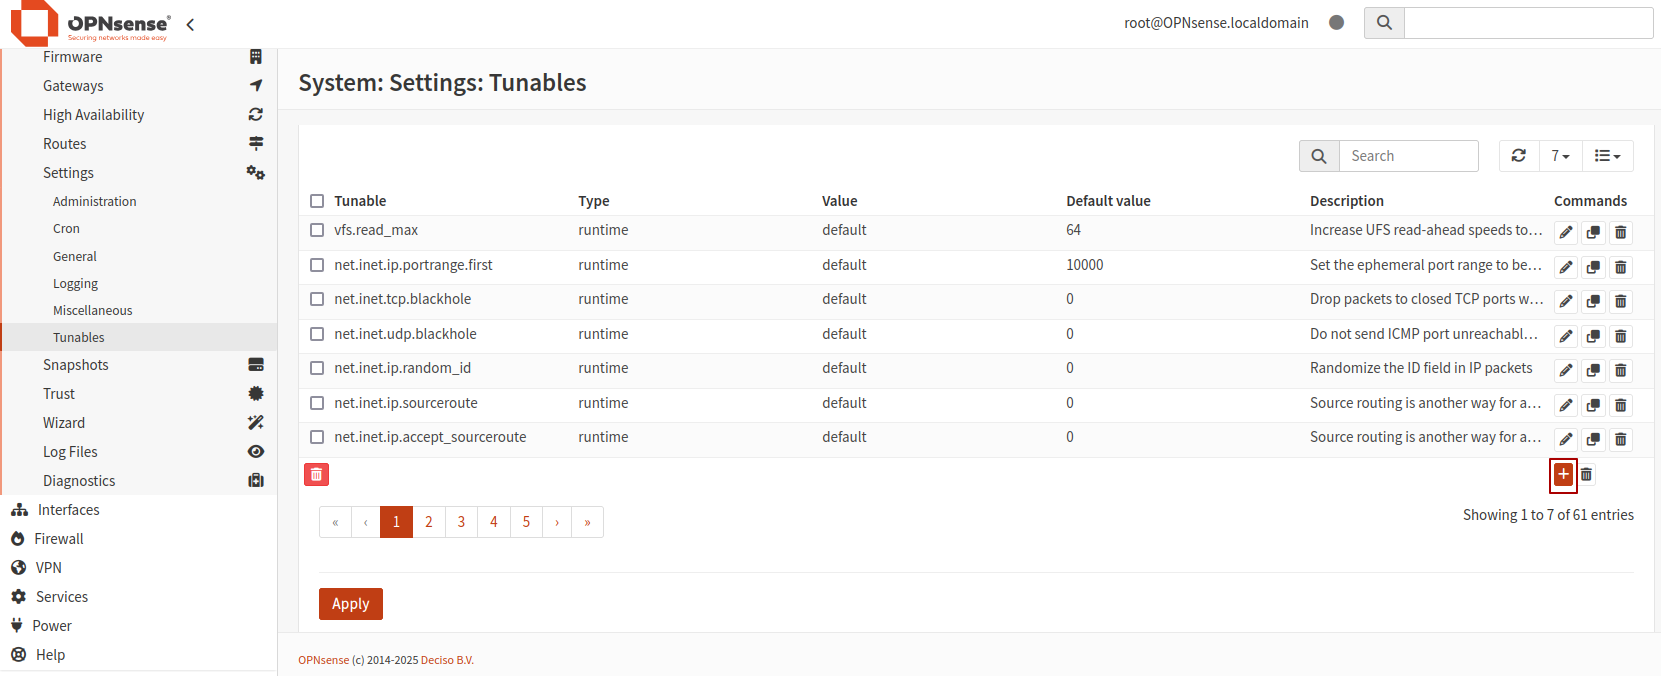
- On the left-side menu, navigate to Systems > Settings > Tunables
- Locate the "+" symbol towards the right side of the screen under the tunables list, and click it

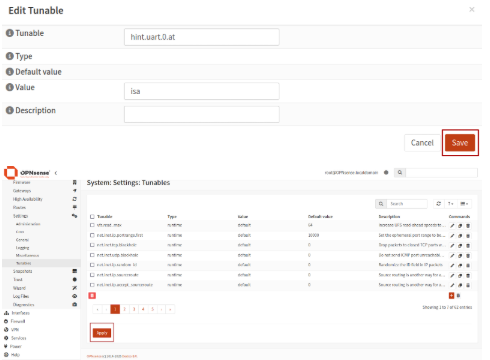
- You should now be at an "Edit Tunable" menu
- In the "Tunable" field, enter "hint.uart.0.at"
- Navigate to the "Value" field, and enter "isa"
8. Click the "Save" button, and then click the "Apply" button towards the bottom left

At this point you will now be able to upgrade to OPNsense 25.1 if you have not already, and this will also fix the serial console issue if you already have 25.1 installed. You may need to reboot one time for the changes to apply.
Conclusion
These steps should solve the serial console issue on OPNsense 25.1 with the Protectli Vault/Vault Pro utilizing coreboot firmware. If you had any problems along the way, please review the steps again and make sure you followed every single one properly. If you have any questions or concerns, please reach out to us!
